Heated Bathroom Mirror Installation
Bathroom renovations often involve upgrading to features that enhance comfort and convenience. A heated bathroom mirror is one such upgrade, eliminating fogging and providing a clear reflection even after a hot shower. Installing a heated bathroom mirror, while achievable for a dedicated DIY enthusiast, requires careful planning and execution. This article outlines the necessary steps and considerations for a successful installation.
Planning the Installation
Before purchasing a heated bathroom mirror, careful measurements of the designated space are crucial. Consider existing fixtures, such as light switches and electrical outlets, to ensure adequate clearance. Heated mirrors come in various sizes and shapes, so selecting one that complements the bathroom's aesthetics and available space is essential. Understanding the mirror's power requirements is also important. Some mirrors require a dedicated circuit, while others can be connected to an existing lighting circuit.
Electrical Requirements
Heated bathroom mirrors require a power source, and the installation process involves working with electrical wiring. If unfamiliar with electrical work, consulting a qualified electrician is highly recommended. Safety precautions, such as turning off the power at the breaker box before commencing any electrical work, are paramount. The specific wiring requirements will depend on the mirror's specifications and local electrical codes. Some mirrors may require a Ground Fault Circuit Interrupter (GFCI) outlet for added safety in the bathroom environment.
Wall Preparation
The wall where the mirror will be mounted needs to be structurally sound and capable of supporting the mirror's weight. For drywall installations, ensuring the presence of wall studs is essential for secure mounting. If the existing wall finish is damaged or unsuitable, repairs or replacements may be necessary before proceeding with the mirror installation. Marking the desired mirror location on the wall using a level ensures proper alignment and a professional finish.
Mounting the Mirror
Heated mirrors typically come with mounting brackets or clips specifically designed for their installation. These brackets need to be securely affixed to the wall, using appropriate fasteners for the wall type. The mirror is then carefully attached to the brackets, ensuring a snug and stable fit. Following the manufacturer's instructions precisely is critical for both the mirror's functionality and safety. Some mirrors may have specific wiring connections that need to be made after the mirror is mounted.
Connecting the Wiring
Once the mirror is securely mounted, the electrical connections can be made. This typically involves connecting the mirror's wiring to the power supply, ensuring proper polarity and secure connections. Using wire nuts and electrical tape ensures safe and reliable connections. Again, if unfamiliar with electrical wiring, seeking professional assistance is advised. After the wiring is complete, the power can be restored at the breaker box to test the mirror's heating function.
Sealing and Finishing
After the mirror is installed and tested, the final step is to seal the edges of the mirror to the wall. This prevents moisture from getting behind the mirror, which could lead to damage or mold growth. A neutral-cure silicone sealant is typically recommended for this purpose. Applying a neat bead of sealant around the mirror's perimeter creates a waterproof barrier and provides a finished appearance. Excess sealant can be carefully removed with a damp cloth.
Troubleshooting
If the heated mirror does not function correctly after installation, several troubleshooting steps can be taken. First, verify that the power is on at the breaker box and that the GFCI outlet (if applicable) has not tripped. Check all wiring connections to ensure they are secure and properly made. Consult the manufacturer's troubleshooting guide or contact their customer support for assistance with specific issues. If unsure about any aspect of the troubleshooting process, consulting a qualified electrician is recommended.

How To Install A Led Bathroom Mirror Wiring Heated

Bathroom Heated Mirrors Mirror With Lights

Black Led Heated Bathroom Mirror 600 X 800mm Lepus Better Bathrooms

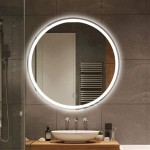
Round Backlit Led Heated Bathroom Mirror 600mm Luna Better Bathrooms

Demister Bathroom Mirrors Fog Free Heated Qs Supplies

Heated Bathroom Mirror Illuminated Tapron

Nrg Illuminated Led Bathroom Mirror With Touch Switch Anti Fog Demister Heated Pad Mirrors Horizontal

500x700 Rectangular Heated Bathroom Mirror With Touch Lights Wall Mounted Ip44 Vertical Or Horizontal

Rectangular Led Heated Bathroom Mirror With Shaver Socket 500x700mm Pegasus Better Bathrooms

Round Backlit Led Heated Bathroom Mirror With White Shelf 500mm Ersa Beba 27008 Appliances Direct

