Sunburst Wall Mirror DIY: A Step-by-Step Guide
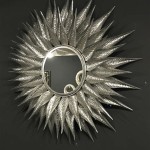
A sunburst mirror is a stunning statement piece that can instantly transform any room. Its radiating design adds a touch of glamour and elegance, bringing warmth and light to any space. While these mirrors can be expensive to purchase, crafting your own sunburst wall mirror is a rewarding and achievable DIY project. This guide will walk you through the steps of creating a beautiful and unique sunburst mirror using readily available materials.
Materials and Tools
Before embarking on your sunburst mirror DIY project, gather the necessary materials and tools to ensure a smooth process. You will need:
- A circular mirror (the size will determine the overall size of your sunburst)
- Wooden dowels or craft sticks (choose a length that aligns with your desired sunburst size)
- Wood glue
- Heavy-duty adhesive or construction adhesive
- Paint (choose a color that complements your decor)
- Paintbrush
- Measuring tape
- Pencil
- Scissors or a utility knife
- Saw (for cutting dowels to size)
- Sandpaper
- Safety goggles
- Work gloves
- A circular piece of wood or cardboard (for the backing)
- A sturdy hanging mechanism (such as a sawtooth hanger or D-rings)
Creating the Sunburst Framework
The heart of your sunburst mirror lies in its framework. Here's how to construct it:
- Determine the number of rays: Decide on the number of rays you want for your sunburst. More rays create a fuller, more intricate design. Aim for an even number for symmetrical balance.
- Cut the dowels: Using your saw, cut the dowels or craft sticks to the desired length. Ensure all pieces are the same length for a cohesive design.
- Mark the mirror: Use a pencil to mark equally spaced points around the circumference of the mirror. The number of points should correspond to the number of rays you have chosen.
- Assemble the rays: Apply wood glue to the ends of the dowels and secure them to the marked points on the back of the mirror. Ensure the dowels are positioned radially outwards. Use clamps or weights to hold them in place while the glue dries.
- Create the backing: Cut a circular piece of wood or cardboard slightly larger than the mirror. This will serve as the backing for the sunburst. Ensure the center of the backing aligns with the center of the mirror.
- Attach the rays to the backing: Apply heavy-duty adhesive or construction adhesive to the back of the dowels where they meet the backing. Press them firmly into place and allow the adhesive to dry completely.
Finishing Touches
Once the framework is securely attached, you can personalize your sunburst mirror with finishing touches:
- Sand and smooth: Sand any rough edges on the dowels or backing to ensure a smooth and polished look. Use progressively finer grit sandpaper for a smoother finish.
- Paint the sunburst: Choose a paint color that harmonizes with your decor. Apply two or three coats of paint to the dowels and backing, ensuring even coverage. Allow each coat to dry completely before applying the next.
- Attach the hanging mechanism: Secure the hanging mechanism to the back of the backing. Choose a mechanism appropriate for the weight of your mirror. Ensure it is securely attached and positioned for optimal stability.
Your sunburst mirror is now ready to be showcased. Hang it in a prominent place in your home, where its radiant design can illuminate the space and add a touch of personality to your decor.
Key Considerations
Keep the following points in mind while crafting your sunburst wall mirror:
Customization
The beauty of this DIY project lies in its versatility. You can customize your sunburst mirror by:
- Choosing different materials: Instead of traditional dowels, consider using branches, twigs, or even metal rods to create a unique and rustic aesthetic.
- Varying the length of the rays: Experiment with different ray lengths to create a dynamic and captivating design. Shorter rays create a more compact look, while longer rays provide a more dramatic effect.
- Incorporating embellishments: Add decorative elements such as beads, sequins, or even small mirrors to create a whimsical and personalized touch.
Safety Precautions
Safety is paramount when working with tools and adhesives. Always wear safety goggles and work gloves when using power tools and adhesives. Ensure proper ventilation while working with paint. Keep children and pets away from the work area.

Diy Starburst Mirror Goodwill Akron

Sunburst Mirror Diy How To Make Wall Decor Decoration Ideas

Create A Sunburst Mirror

Diy Sunburst Mirror 4 Wall Art

Diy Sunburst Mirror From A Candle Holder That S What Che Said

How To Make A Fabulous Diy Sunburst Mirror For Joyful Derivatives

Diy Gold Sunburst Mirror Sarah Hearts

Diy Sunburst Mirror Blooming Homestead

Sunburst Mirror Diy How To Make Wall Decor Decoration Ideas

How To Make A Fabulous Diy Sunburst Mirror For Joyful Derivatives