Create a Stunning Backlit Mirror DIY
A backlit mirror adds a unique and sophisticated touch to any space. It's a captivating design element that transforms a room's ambiance, creating a warm and inviting atmosphere. While backlit mirrors are often seen in high-end spaces, you can easily create your own with a bit of time, effort, and readily available supplies. This DIY project allows you to personalize your decor, adding a touch of your style and personality to your home.
Materials and Tools You Need
Before embarking on your backlit mirror project, ensure you have the necessary materials and tools. This list is a guideline, and specific items may change depending on the size and design of your mirror and your personal preferences.
- Mirror: Choose a mirror of the size and shape you desire. Old mirrors can be repurposed, or you can purchase a new one. Consider the size of the space where you intend to place the mirror.
- Mirror Backer Board (Optional): This is a sturdy board that sits behind the mirror, offering a strong support and a clean surface for attaching the lighting. If your mirror has a pre-existing frame, this step might be unnecessary.
- Light Source: LED strip lights are a popular choice for backlit mirrors due to their energy efficiency, long lifespan, and flexibility. You can choose from warm white, cool white, or colored LED strips to match your design aesthetic.
- Power Supply: The LED strip usually comes with a power supply, but if not, you'll need to purchase one separately. Ensure the power supply is compatible with your LED strip.
- Connector: If you're using multiple LED strips, you'll need a connector to join them together. Some LED strips come with pre-attached connectors.
- Adhesive Tape: This is used to secure the LED strip to the backer board. You can choose from double-sided adhesive tape or special LED strip adhesive tape.
- Wire Cutter: Cut the LED strip to the desired length with a wire cutter. Ensure the cut is clean and even to avoid damage to the strip.
- Screwdriver: If you are using screws for mounting the mirror, you'll need a screwdriver that matches the screws. Alternatively, you can use adhesive to attach the mirror.
- Measuring Tape: Accurately measure the mirror and LED strip to ensure a proper fit.
- Protective Gear: When working with electrical components, it's essential to wear safety glasses and gloves to prevent any potential injuries.
Step-by-Step Guide to Create Your Backlit Mirror
With the materials and tools ready, you can begin assembling your backlit mirror. Follow these steps for a successful outcome:
- Prepare the Mirror: If you are using an existing mirror, clean it thoroughly with glass cleaner. If the mirror is new, ensure it is free from any protective films.
- Attach the Backer Board (Optional): If you're using a backer board, measure the mirror carefully and attach it to the back of the mirror using wood glue and clamps. Ensure a secure bond for a sturdy base for the LED strip.
- Install the LED Strip: Measure the length needed for the LED strip, leaving a slight excess for connecting to the power supply. Cut the strip with a wire cutter, ensuring you cut at the designated markings on the strip. Peel off the protective backing of the adhesive tape and apply it to the LED strip. Attach the LED strip to the backer board or directly to the back of the mirror, ensuring it is centered and evenly spaced. If you're using multiple LED strips, connect them using a connector.
- Connect the Power Supply: Connect the power supply to the LED strip, ensuring the polarity is correct (positive to positive and negative to negative). Plug the power supply into a wall outlet. You can test the LED strip at this point to ensure it is working properly.
- Mount the Mirror: If you're using screws, mark the positions on the wall and drill pilot holes. Secure the mirror to the wall using appropriate screws. Alternatively, you can use adhesive to attach the mirror.
- Conceal the Wiring: If the wires are visible, you can use electrical tape or zip ties to secure them neatly to the back of the mirror. This ensures a clean and professional finish.
- Enjoy Your Backlit Mirror: Once the mirror is mounted and wired, you can enjoy the warm and inviting glow it creates. You can experiment with different lighting styles to create the desired ambiance for your space.
Tips for Success
Follow these tips for a successful backlit mirror DIY project:
- Choose the Right LED Strip: Select a LED strip with the appropriate brightness and color temperature for your space. Consider the size of the mirror and the overall design aesthetic.
- Ensure a Secure Connection: It's crucial to ensure that all connections are secure and correctly wired. Carefully check the polarity of the LED strip and power supply to prevent damage.
- Test Before Mounting: Test the LED strip thoroughly before mounting the mirror to ensure it functions correctly and the brightness is satisfactory.
- Consider Safety: When working with electrical components, it's essential to exercise caution. Always turn off the power before making any adjustments or repairs.
- Be Creative: Feel free to experiment with different designs and patterns. For instance, you can create a unique look by using colored LED strips or incorporating patterns or shapes into the design.

25 Beautiful Diy Vanity Mirror That Is Easy And To Do Most Of This Projects Can Be Bathroom Makeover Small Mirrors

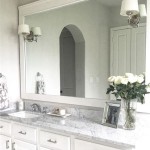
Bathroom Remodel Diy Backlit Mirror Leah And Joe Home Projects Crafts

Bathroom Remodel Diy Backlit Mirror Leah And Joe Home Projects Crafts

Diy Floating Glowing Mirror

How To Diy Vanity Mirror With Led Strip Lights

Bathroom Remodel Diy Backlit Mirror Leah And Joe Home Projects Crafts
:max_bytes(150000):strip_icc()/makesandmunchies-c136f898cca640faa72b6209012230cb.jpg?strip=all "7 Diy Lighted Mirror Ideas To Add A Little Extra Shine Your Space")
7 Diy Lighted Mirror Ideas To Add A Little Extra Shine Your Space

Custom Led Backlit Bathroom Mirror Diy Project

8 Reasons Why You Should Have A Backlit Mirror In Your Bathroom

How To Diy Vanity Mirror With Led Strip Lights