Framing a Bathroom Mirror That Has Clips
Bathroom mirrors are often functional necessities, but their aesthetic contribution to the overall space can be significantly enhanced by adding a frame. While many mirrors are directly adhered to the wall, a large number are secured with clips, presenting a unique situation when attempting to add a frame. Framing a mirror with clips requires careful consideration of the clip type, the mirror's existing placement, and the desired aesthetic of the frame itself. This article will explore the methods, considerations, and necessary steps for successfully framing a bathroom mirror that utilizes clips for its mounting.
The initial step involves a thorough assessment of the existing mirror and its surroundings. This includes identifying the type of clips used to secure the mirror, measuring the precise dimensions of the mirror, and evaluating the available space around the mirror for accommodating a frame. Understanding these factors is crucial to ensure the frame fits correctly and doesn't interfere with the mirror's stability or accessibility to the clips should future adjustments be necessary.
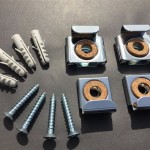
The type of clips used to secure the mirror will significantly influence the framing approach. Common types include J-clips, Z-clips, and plastic or metal edge clips. J-clips typically sit behind the mirror, hooking onto the bottom edge and sometimes the top edge, making them relatively easy to work around. Z-clips, sometimes called French cleats, offer a more secure mounting as one part is attached to the wall, and the mirror hangs upon the other. Edge clips, on the other hand, are visible on the front of the mirror and require a framing method that either conceals or integrates them into the frame design.
Mirror dimensions should be measured precisely, ideally to the nearest 1/16 of an inch. This is critical for ensuring the frame fits snugly around the mirror without being too tight, which could strain the glass, or too loose, which would negatively impact its appearance and stability. Consider the reveal, the amount of mirror edge exposed by the frame, which influences the overall look. A larger reveal allows more of the mirror to show, while a smaller reveal creates a tighter, more modern appearance.
The surrounding space around the mirror, including the proximity to walls, light fixtures, and countertops, is another essential factor. Ensure the frame will not obstruct any existing fixtures or prevent the mirror from being easily cleaned. Consider the placement of electrical outlets, as the frame shouldn't cover them or make them inaccessible.
Considerations for Frame Design and Material Selection
The aesthetic of the frame should complement the overall design of the bathroom. Consider the existing color scheme, cabinet style, and hardware finishes when selecting the frame's material, color, and profile. Options range from simple, minimalist frames to more ornate and decorative designs. The material choice directly impacts the durability, maintenance requirements and the moisture resistance of the frame within the humid environment of a bathroom.
Wood is a popular choice for framing mirrors, offering a wide range of styles and finishes. However, wood is susceptible to moisture damage, so it's crucial to use a wood species that is naturally water-resistant, such as cedar or redwood, or to apply a protective sealant before installation. Consider using paint or varnish suitable for high-humidity environments. Another suitable option is MDF (Medium-Density Fiberboard) primed and painted with moisture-resistant paint. MDF is more dimensionally stable than solid wood and less prone to warping.
Metal frames, such as aluminum or stainless steel, offer a sleek, contemporary look and are highly resistant to moisture. However, metal frames can be more expensive than wood frames and may require specialized tools for cutting and assembly. Powder-coated metal frames provide an extra layer of protection against corrosion and offer a wide variety of color options.
Plastic or composite materials, such as PVC, are another option for bathroom mirror frames. These materials are highly resistant to moisture and require minimal maintenance. They can be molded into various shapes and textures, offering a wide range of design possibilities. However, plastic frames may not have the same visual appeal as wood or metal frames and may appear less luxurious.
The profile, or shape, of the frame is an important design element. Simple, flat profiles create a clean, modern look. More elaborate profiles, such as those with beveled edges or decorative moldings, add a touch of elegance and sophistication. Consider the thickness of the frame as well. A thicker frame makes a bolder statement, while a thinner frame appears more subtle.
Methods for Attaching the Frame While Accommodating Clips
Several methods can be employed to attach a frame around a mirror secured with clips. The choice depends on the type of clips, the desired aesthetic, and the level of DIY skill.
One method involves building a frame that sits directly on the wall around the mirror, effectively creating a "picture frame" effect. This approach requires carefully measuring the distance between the mirror and the wall at the clip locations to ensure the frame sits flush against the wall without putting pressure on the mirror. The frame is then attached to the wall using construction adhesive suitable for bathroom environments and small finishing nails or screws, driven into wall studs whenever possible. This method is simple to execute, provided care is taken to measure accurately and install the frame level. The mirror clips remain accessible if needed.
Another approach is to create a frame that partially overlaps the mirror's edges. This method is particularly suitable for mirrors with edge clips that are visible. The frame is constructed with a rabbet, a recess cut into the back of the frame, that allows it to sit partially over the mirror's edge, concealing the clips. The frame can then be attached to the wall surrounding the mirror, again using construction adhesive and fasteners. Care must be taken to ensure the rabbet depth is sufficient to accommodate the thickness of the mirror and the clips without applying excessive pressure. This method offers a clean, integrated look but requires more precise woodworking skills.
A third option involves creating a frame that attaches directly to the mirror itself, using specialized mirror adhesive. This method is generally not recommended for mirrors secured with clips, as it can add additional stress to the mirror and potentially compromise the clips' integrity. If pursuing this method, it is crucial to use a mirror-specific adhesive that is designed to bond to glass and does not contain solvents that could damage the mirror's backing. Small, lightweight frames are more suitable for this approach. Furthermore, it is crucial to allow the adhesive to fully cure before subjecting the mirror to any stress. Carefully cleaning the back of the mirror with isopropyl alcohol before applying the adhesive is necessary to promote proper bonding.
For mirrors with J-clips positioned along the bottom edge, a “floating” frame approach can be implemented. In this design, the frame is constructed to sit slightly above the countertop, allowing the J-clips to remain functional without obstruction. The frame is attached to the wall as described in the first method, ensuring the lower edge of the frame clears the clips. This approach provides a visually appealing aesthetic while maintaining the integrity of the mirror's mounting system.
Installation Steps and Best Practices
The installation process begins with gathering the necessary tools and materials. These include a measuring tape, level, miter saw or hand saw, drill, screwdriver, construction adhesive, finishing nails or screws, sandpaper, paint or stain, and safety glasses. A stud finder is essential for locating wall studs for secure attachment. Dust sheets help protect the bathroom surfaces.
Before starting the installation, thoroughly clean the mirror and the surrounding wall area. This will ensure a clean surface for the adhesive to bond to and prevent dust or debris from getting trapped between the frame and the wall. Lightly sanding the back of the frame where it will contact the wall can also improve adhesion. If painting or staining the frame, do so before installation to avoid getting paint or stain on the mirror or surrounding surfaces. Allow the paint or stain to fully dry before proceeding.
Apply a bead of construction adhesive to the back of the frame, following the manufacturer's instructions. Position the frame around the mirror, ensuring it is level and properly aligned. Press the frame firmly against the wall and secure it with finishing nails or screws, driving them into wall studs whenever possible. If wall studs are not accessible, use appropriate wall anchors to provide additional support.
After securing the frame, wipe away any excess adhesive with a damp cloth. Carefully inspect the frame for any gaps or imperfections and fill them with caulk or wood filler, as needed. Allow the adhesive and caulk or wood filler to fully dry before applying a final coat of paint or stain, if desired. Once the final coat is dry, remove any protective tape or coverings from the mirror and surrounding surfaces.
Regularly inspect the frame for signs of damage or moisture intrusion. Address any issues promptly to prevent further deterioration. Clean the frame regularly with a damp cloth and mild soap to maintain its appearance. Avoid using harsh chemicals or abrasive cleaners, as they can damage the frame's finish. Consider applying a sealant to the frame periodically to protect it from moisture damage, especially if it is made of wood. A properly installed and maintained frame will significantly enhance the aesthetic appeal of the bathroom mirror while preserving its functionality.

How To Frame A Bathroom Mirror Over Plastic Clips Somewhat Simple

Diy Bathroom Mirror Frame Without Removing Clips Her Happy Home

How To Frame A Mirror With Clips In 5 Easy Steps

How To Frame A Bathroom Mirror Over Plastic Clips Somewhat Simple

How To Frame A Bathroom Mirror Over Plastic Clips Somewhat Simple

Diy Bathroom Mirror Frame Without Removing Clips Her Happy Home

How To Make An Easy Diy Bathroom Mirror Frame Momhomeguide Com

How To Build A Diy Frame Hang Over Bathroom Mirror Simple

How To Install A Mirrorchic Bathroom Mirror Frame Momhomeguide Com

How To Frame A Mirror With Clips In 5 Easy Steps

