DIY Bathroom Mirror Frame for Under $10
Upgrading a bathroom's aesthetic doesn't necessitate a costly renovation. A simple, yet impactful, change can be achieved by framing a plain bathroom mirror. This project can be completed for under $10, offering a significant visual improvement without straining the budget. This article outlines several methods for creating a stylish, budget-friendly frame, enhancing the overall bathroom design.
Utilizing Repurposed Materials
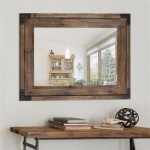
One cost-effective approach involves repurposing existing materials. Leftover wood from previous projects, such as trim, molding, or even pallet wood, can be transformed into a unique mirror frame. Measure the mirror dimensions accurately and cut the wood accordingly, ensuring precise 45-degree angles for clean corners. These pieces can be affixed directly to the mirror using strong adhesive suitable for bathroom environments. This method minimizes material costs, promoting sustainability and individuality.
For a more rustic look, consider repurposed wood with its natural imperfections and textures. A light sanding may be required to smooth rough edges. Alternatively, a coat of paint or varnish can be applied to match the existing bathroom décor or to introduce a contrasting accent. This method allows for a personalized touch and reinforces the focus on budget-friendly design.
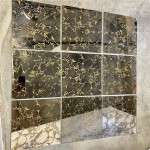
Framing with Adhesive Tile Borders
Adhesive tile borders provide another affordable and straightforward method for framing a bathroom mirror. These peel-and-stick borders come in a variety of styles, colors, and patterns, enabling customization to complement any bathroom aesthetic. Precise measurement is crucial for a clean, professional finish. The application process involves carefully peeling the backing and adhering the border to the mirror's edge, smoothing out any air bubbles as you go.
This method eliminates the need for cutting and specialized tools, making it ideal for those with limited DIY experience. The adhesive backing ensures a secure bond, and the waterproof nature of most tile borders makes them suitable for humid bathroom conditions. This approach offers a quick, clean, and affordable solution for a polished mirror frame. Furthermore, the variety of available designs allows for easy coordination with existing bathroom décor.
Creating a Frame with Rope or Twine
For a more nautical or rustic aesthetic, rope or twine can be used to create a unique and textured mirror frame. This approach involves adhering the rope or twine to the mirror's edges using a strong adhesive. This can be a continuous loop or individual pieces cut to the mirror's dimensions. The chosen material should be suitable for humid environments to ensure longevity and prevent mildew.
This method is incredibly versatile, allowing for different rope thicknesses and colors to be employed, creating various visual effects. For added visual interest, decorative elements such as shells, beads, or small stones can be incorporated during the wrapping process. This approach not only frames the mirror but also adds a unique decorative element to the bathroom. The flexibility of this method allows it to be adapted to different mirror shapes and sizes, further enhancing its value.
Employing Decorative Duct Tape
Decorative duct tape provides a surprisingly versatile and affordable option for creating a customized mirror frame. Available in a wide array of colors, patterns, and textures, duct tape offers a quick and easy way to add a pop of color or pattern to the bathroom. Simply measure and cut the tape to size, applying it carefully to the mirror's edges, ensuring a smooth, even finish.
This method offers a high degree of customization, allowing for layered designs, geometric patterns, or even personalized artwork. The durable and waterproof nature of duct tape makes it ideal for bathroom use. This approach provides an accessible and creative solution for those seeking a budget-friendly and expressive way to frame a bathroom mirror.
Using Caulk for a Seamless Frame
For a minimalist and contemporary look, a simple frame can be created using paintable caulk. Apply a bead of caulk around the perimeter of the mirror, creating the desired frame width. Use a caulking tool or a wet finger to smooth the caulk and create a clean, even line. Once the caulk is dry, it can be painted to match the wall color or create a contrasting accent.
This method creates a seamless and waterproof frame, ideal for bathrooms. It provides a clean, modern look while remaining budget-friendly. The flexibility of paintable caulk allows for effortless integration with existing bathroom color schemes. This straightforward approach is suitable for DIY enthusiasts of all skill levels, providing a professional finish with minimal effort.

Diy Bathroom Mirror Frame For Under 10 O Hayley Blog

Diy Bathroom Mirror Frame For Under 10 O Hayley Blog

Diy Bathroom Mirror Frame For Under 10 O Hayley Blog

How To Build A Diy Bathroom Mirror Frame The Easy Way

Diy Bathroom Mirror Frame For Under 10 O Hayley Blog

How To Frame A Mirror

Diy Bathroom Mirror Frame Without Removing Clips Her Happy Home

How To Frame Out That Builder Basic Bathroom Mirror For 20 Or Less

Diy Stick On Mirror Frame Sawdust Sisters

How To Build A Diy Bathroom Mirror Frame The Easy Way