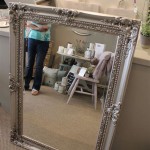
How To Hang A Mirror on a Plaster Wall
Hanging a mirror can dramatically enhance a room, creating a sense of space and reflecting light. However, plaster walls present unique challenges compared to drywall. Plaster is a more brittle material, and improperly installed fasteners can easily crack or crumble the surface, leading to unsightly damage and a mirror that falls. This article outlines a comprehensive guide to safely and effectively hanging a mirror on a plaster wall, minimizing the risk of damage and ensuring a secure and aesthetically pleasing result.
Before commencing any work, it is crucial to understand the nature of plaster walls. Traditional plaster walls are typically comprised of wooden lath strips covered with multiple layers of plaster. This construction results in a thick, dense wall that can be difficult to penetrate. Older plaster can also be extremely fragile and crumbly, making it essential to choose the correct tools and techniques. Newer plasterboard, while easier to work with, still requires careful consideration to avoid cracking. Identifying the type of plaster used is the first critical step.
Another vital consideration is the weight of the mirror. A small, lightweight mirror might be adequately supported by a simple picture hook, while a larger, heavier mirror will require more robust hardware and potentially even structural support. Overestimating the required support is always advisable to ensure the mirror remains securely in place.
Choosing the Right Hardware
Selecting the appropriate hardware is paramount for a successful and damage-free mirror installation on plaster. Several options exist, each suited to different mirror weights and wall conditions. Understanding the strengths and limitations of each type of hardware is essential for making the right choice.
Picture Hooks: These are suitable for very lightweight mirrors, typically those weighing less than 5 pounds. They consist of a small hook attached to one or more hardened steel nails designed to be hammered into the wall at an angle. While easy to install, their holding power is limited, and they are not recommended for anything beyond the smallest mirrors. Using picture hooks on aged or fragile plaster is particularly risky, as the hammering action can easily cause cracking.
Plaster Screws (also known as Plasterboard Screws): These screws are designed with a coarse thread that bites into the plaster, providing a more secure hold than standard wood screws. They are generally used with plastic anchors, which expand within the plaster to further increase their holding power. Plaster screws are suitable for mirrors weighing up to 10 pounds, provided the anchors are properly installed and the plaster is in relatively good condition.
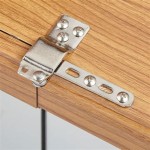
Wall Anchors: Several types of wall anchors are available, each offering varying degrees of holding power. Toggle bolts, molly bolts, and self-drilling anchors are all viable options for hanging mirrors on plaster walls. Toggle bolts are considered one of the strongest options, as they feature a hinged wing that expands behind the wall, distributing the weight over a larger area. Molly bolts work similarly, but the expansion occurs within the wall itself. Self-drilling anchors are easier to install but may not provide as much holding power as toggle or molly bolts.
Mirror Hanging Kits: These kits typically include a variety of hardware options, such as screws, anchors, and wire or D-rings for attaching to the back of the mirror. While convenient, it is important to assess the quality and suitability of the included hardware for the specific weight of the mirror and condition of the plaster wall. Often, opting for higher-quality anchors separately is the most prudent approach.
The selection of appropriate hardware should be directly based on the weight of the mirror, the condition of the plaster and the method by which the mirror attaches to the wall. Consulting with a hardware specialist can be beneficial, especially for heavy or irregularly shaped mirrors.
Preparing the Wall and Mirror
Proper preparation is critical to prevent damage to the plaster wall during the installation process. This involves carefully marking the desired location of the mirror, assessing the wall's condition, and preparing the mirror itself for hanging.
Marking the Location: Use a level and measuring tape to accurately mark the desired location of the mirror on the wall. It is essential to ensure the mirror is perfectly level before installing any hardware. A laser level can be particularly helpful for this step. Lightly marking the location with a pencil is recommended, rather than pressing hard or using a marker, which could stain the plaster.
Assessing the Wall: Carefully inspect the plaster for any signs of damage, such as cracks, crumbling, or loose areas. If any damage is present, it should be repaired before proceeding with the installation. Small cracks can be filled with plaster patching compound, while larger areas may require more extensive repair work. Allowing the patching compound to dry completely before attempting to hang the mirror is vital.
Locating Studs (Optional): While not always necessary, locating a stud behind the plaster wall can provide significantly stronger support, especially for heavier mirrors. A stud finder can be used to locate the studs, but it may not always be accurate on plaster walls due to the thickness and density of the material. If a stud is located, using screws long enough to penetrate the stud will provide a more secure hold. However, locating studs in old houses is not always easy. The location of an outlet is sometimes a good indicator of where studs are located, and studs are generally placed 16 or 24 inches apart. If the mirror is very heavy, it is best to consult with a professional.
Preparing the Mirror: Ensure the mirror is equipped with the necessary hardware for hanging, such as D-rings or wire. If the mirror is very heavy, consider adding additional D-rings or reinforcing the existing ones. Clean the back of the mirror to ensure a clean surface for attaching any new hardware.
Dust Collection: Set up dust collection methods before drilling. Using a vacuum cleaner with a hose attachment directly beneath the drilling area will collect loose debris and minimize mess during the installation. Covering the floor with drop cloths or newspapers will help protect it from falling plaster dust.
The Hanging Process: Minimizing Damage and Ensuring Stability
With the appropriate hardware selected and the wall and mirror prepared, the actual hanging process can begin. This step requires patience, precision, and a delicate touch to avoid cracking or damaging the plaster.
Drilling Pilot Holes: If using wall anchors, drilling pilot holes is typically required. Use a drill bit that is slightly smaller than the diameter of the anchor. When drilling into plaster, use a slow speed and apply gentle pressure. Avoid forcing the drill, as this can easily cause the plaster to crack or crumble. If the drill bit starts to wander, try using a small nail to create a pilot hole before drilling. For particularly fragile plaster, consider using a specialized plaster drill bit, which is designed to minimize chipping and cracking.
Installing the Anchors: Once the pilot holes are drilled, carefully insert the wall anchors. Follow the manufacturer's instructions for installation, as different types of anchors require different techniques. For toggle bolts, fold the wings of the bolt and insert them through the hole, then pull back on the bolt to engage the wings behind the wall. For molly bolts, insert the bolt through the mirror bracket and into the anchor, then tighten the bolt to expand the anchor within the wall. For self-drilling anchors, simply screw the anchor into the plaster using a screwdriver or drill.
Hanging the Mirror: With the anchors securely installed, carefully hang the mirror onto the hooks or screws. Ensure the mirror is properly seated and level. If using wire, adjust the wire length as needed to achieve the desired hanging height. Double-check the stability of the mirror by gently pushing and pulling on it. If the mirror feels loose or unstable, re-evaluate the hardware and consider using a more robust anchoring system.
Concealing Hardware: Ensure the hardware is concealed. For some mirrors, concealing the hardware is part of the design. Other designs may require the purchase of new hardware that fits the aesthetic of the mirror and complements the room. Some mirrors will require an extra step of placing something over the hardware to conceal it.
It is often advisable to work with a helper, especially when hanging large or heavy mirrors. A second person can provide support and ensure the mirror is properly aligned while the hardware is being installed. If the weight of the mirror is substantial, consider consulting with a professional installer who has experience hanging mirrors on plaster walls.
In conclusion, hanging a mirror on a plaster wall requires careful planning, preparation, and execution. By selecting the appropriate hardware, assessing the wall's condition, and following the steps outlined above, it is possible to achieve a secure and aesthetically pleasing result with minimal damage. Patience and attention to detail are key to success.

Hanging Heavy Mirror On Plaster Walls 6 Steps With Pictures Instructables

Hanging Heavy Mirror On Plaster Walls 6 Steps With Pictures Instructables
:strip_icc()/ScreenShot2022-04-28at1.12.19PM-e055476c70c6438585fa7c5cd531edcf.png?strip=all "4 Easy Ways To Hang A Heavy Mirror")
4 Easy Ways To Hang A Heavy Mirror

How To Hang A Heavy Mirror On Plaster Wall Walls

How To Hang A 100 Pound Mirror On Drywall Quora

How To Hang A Very Heavy Picture Or Mirror The Best

How To Hang A Large Or Heavy Mirror

Hanging Heavy Framed Mirrors Lath Plaster Walls The Picture Framers Grumble

A Better Way To Hang Heavy Mirror Hanging Brackets

Hanging Heavy Mirror On Plaster Walls 6 Steps With Pictures Instructables