Frameless Mirror Mounting: A Comprehensive Guide
Frameless mirrors offer a sleek and modern aesthetic, adding a touch of elegance to any space. However, mounting these mirrors requires a different approach than traditional framed mirrors. The absence of a frame means there's no lip to hide mounting hardware, making it essential to find discreet and secure solutions. This guide provides a comprehensive understanding of frameless mirror mounting, outlining the necessary steps and considerations for a successful installation.
Choosing the Right Mounting Method
The first step in mounting a frameless mirror is choosing the appropriate method based on the weight, size, and location of the mirror. Several options exist, each with its advantages and disadvantages:
1. Adhesive Mounting
Adhesive mounting is suitable for lightweight mirrors, typically smaller than 20 pounds. It offers a clean and discreet installation, eliminating the need for visible hardware. However, this method is not suitable for heavy mirrors or locations that may experience high humidity or extreme temperatures.
2. D-Ring Hangers with Wire
D-ring hangers with wire are a popular choice for medium-sized mirrors. The D-rings are attached to the back of the mirror, and a wire is strung through them to hang the mirror from a hook. This method is relatively inexpensive and provides a secure hold. However, it requires precise placement of the D-rings to ensure the mirror hangs straight.
3. Z-Clips
Z-clips are another option for mounting medium to large mirrors. They are installed directly into the wall, and the mirror slides onto the clips. This method provides a strong and secure hold and allows for easy removal if needed. However, it requires drilling into the wall and may not be suitable for all wall types.
4. J-Hooks
J-hooks are ideal for mounting heavy mirrors, particularly those exceeding 50 pounds. They are installed into the wall and can be used with a wire or chain. This method provides maximum support and stability, making it ideal for large and heavy mirrors.
Preparing the Mirror and Wall for Mounting
Once the mounting method has been chosen, it is crucial to prepare both the mirror and the wall for installation. This step ensures a smooth and secure mounting process.
1. Cleaning the Mirror and Wall
Before mounting the mirror, it is essential to thoroughly clean both the back of the mirror and the wall surface. Dust, dirt, or debris can interfere with the adhesion of adhesives or the secure installation of mounting hardware. Use a microfiber cloth and a mild cleaning solution to remove any impurities.
2. Marking the Mounting Points
After cleaning, use a pencil or marker to mark the mounting points on the wall. For adhesive mounting, mark the center of the mirror on the wall. For other methods, mark the locations of the D-rings, Z-clips, or J-hooks based on the chosen mounting method.
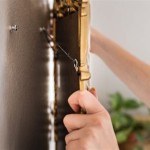
3. Drilling Pilot Holes (if necessary)
If using mounting hardware that requires drilling, drill pilot holes at the marked locations. This step prevents the drill bit from slipping and ensures a smooth and accurate installation.
Installing the Mirror
With the mirror and wall prepared, the next step is to install the mirror securely. Each mounting method requires specific instructions:
1. Adhesive Mounting
Apply the adhesive evenly to the back of the mirror, following the manufacturer's instructions. Carefully position the mirror on the marked location on the wall and press firmly. Ensure the mirror is level and securely attached before releasing it. Allow the adhesive to cure completely before hanging any objects on the mirror.
2. D-Ring Hangers with Wire
Attach the D-rings to the back of the mirror using screws or adhesive. Attach the wire to the D-rings, ensuring it is evenly distributed on both sides. Hang the wire on a hook or a picture rail, ensuring the mirror is level before releasing it.
3. Z-Clips
Install the Z-clips into the pre-drilled holes on the wall using screws. Slide the mirror onto the clips, ensuring it sits securely and is level. If necessary, use a level to adjust the mirror's position.
4. J-Hooks
Install the J-hooks into the pre-drilled holes on the wall using screws. Attach the wire or chain to the J-hooks, ensuring it is secured and evenly distributed. Hang the mirror from the wire or chain, ensuring it is level before releasing it.
Final Considerations
After installing the frameless mirror, it is crucial to consider these final considerations:
1. Safety Precautions
Ensure the mirror is securely mounted and will not fall. If using adhesive mounting, avoid hanging heavy objects on the mirror. It is also important to be mindful of the weight of the mirror and consider installing additional support if needed.
2. Maintenance
Clean the mirror regularly to maintain its appearance and prevent dust and dirt buildup. Use a microfiber cloth and a mild cleaning solution to wipe the mirror surface.
3. Removal
If you need to remove the mirror, follow the manufacturer's instructions carefully. For adhesive mounting, it is essential to use a mirror-safe adhesive remover to detach the mirror from the wall without damaging the surface. For other methods, carefully remove the mounting hardware to prevent damage to the mirror or the wall.

How To Install A Mirror Without Frame Merrypad

How To Hang A Frameless Mirror On The Wall With Pictures

How To Install A Mirror Without Frame Merrypad

4 Mirror Wall Hanging Mounting Fixing Kit Frameless Plastic Clips

How To Hang A Frameless Mirror On The Wall With Pictures

Leye 4pcs Chrome Mirror Wall Hanging Fixing Kit Frameless Clips Mounting Hanger Clamp Com

Oval Frameless Wall Mirror Installation Fab Glass And

Bleu Fix Mount Matte Black 22 X 31 Frameless Mirror 39t31 Lamps Plus

Gatco Cameo 19 1 2 X 24 Frameless Flush Mount Wall Mirror 39t14 Lamps Plus
:strip_icc()/DesireeBurnsInteriors1-f76d25cad90041c88fbae4a7dc10aab4.jpg?strip=all "2 Simple Ways To Hang A Frameless Mirror")
2 Simple Ways To Hang A Frameless Mirror