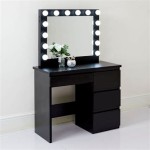
How To Make A Vanity Mirror With Lights: A Comprehensive Guide
A vanity mirror with lights, often referred to as a Hollywood mirror, provides optimal illumination for makeup application, skincare routines, and hairstyling. The even, shadow-free lighting enhances visibility and allows for precise detail work. Building a vanity mirror with lights is a manageable DIY project that can be customized to fit specific needs and aesthetic preferences. This article outlines the steps necessary to create a functional and stylish illuminated mirror.
Materials and Tools Required
Successful construction of a vanity mirror with lights begins with gathering the appropriate materials and tools. The specific quantities will depend on the desired size of the mirror and the chosen design, but the following list provides a comprehensive overview of common requirements.
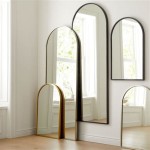
Mirror: The size of the mirror will dictate the overall dimensions of the vanity mirror. Opt for a high-quality glass mirror with a thickness of at least ¼ inch for durability. Consider the placement of the mirror and how it will be used to determine the optimal size. Options include rectangular, square, or even custom shapes.
Wood (for Frame): The frame provides structural support and aesthetic appeal. Common choices include pine, poplar, or MDF (Medium-Density Fiberboard). Pine is cost-effective and easy to work with, while poplar offers a smoother surface for painting. MDF provides a consistent surface and is less prone to warping, but it is heavier and generates more dust when cut. The thickness should be at least ¾ inch for sufficient stability.
Light Bulbs: The selection of light bulbs is crucial for achieving the desired lighting effect. LED bulbs are recommended for their energy efficiency, long lifespan, and low heat output. Choose bulbs with a color temperature that mimics natural daylight (around 5000-6500 Kelvin) for accurate color representation. The number of bulbs will depend on the size of the mirror and the desired brightness.
Light Sockets/Lamp Holders: Choose sockets that are compatible with the selected light bulbs. Screw-in lamp holders are a common and reliable option. Ensure that the sockets are rated for the voltage and wattage of the bulbs.
Wiring: Electrical wiring is essential for connecting the light sockets. Use appropriately sized gauge wiring based on the total wattage of the light bulbs. Consult local electrical codes for specific requirements.
Power Cord: A power cord provides the connection to the electrical outlet. Choose a cord with a suitable length and amperage rating. A grounded power cord is recommended for safety.
Light Switch: An inline switch or a dimmer switch allows for convenient control of the lights. Choose a switch that is rated for the voltage and amperage of the circuit.
Wood Glue: Wood glue is necessary for assembling the frame. Choose a high-quality wood glue that provides a strong and durable bond.
Screws: Screws are used to reinforce the frame and secure the mirror. Choose screws that are appropriate for the type of wood being used.
Paint or Stain: Paint or stain allows for customization of the frame's appearance. Choose a finish that complements the decor of the space where the mirror will be placed.
Primer: Primer prepares the wood surface for painting and improves adhesion. Use a primer that is compatible with the chosen paint.
Safety Glasses: Safety glasses are essential for protecting the eyes from dust and debris during cutting, drilling, and sanding.
Dust Mask: A dust mask protects the lungs from inhaling wood dust.
Measuring Tape: A measuring tape is necessary for accurate measurements.
Pencil: A pencil is used for marking measurements on the wood.
Saw: A saw is needed for cutting the wood to the desired dimensions. A miter saw is ideal for making accurate angled cuts.
Drill: A drill is used for creating pilot holes and installing screws.
Screwdriver: A screwdriver is used for tightening screws.
Wire Strippers: Wire strippers are used for removing insulation from electrical wires.
Wire Connectors: Wire connectors are used for joining electrical wires safely and securely. Wire nuts or crimp connectors are common options.
Sandpaper: Sandpaper is used for smoothing the wood surface.
Paintbrushes or Roller: Paintbrushes or rollers are used for applying paint or stain.
Clamps: Clamps are used to hold the frame pieces together while the glue dries.
Construction Process: Step-by-Step Guide
The construction process involves several key steps, from building the frame to wiring the lights. Adhering to safety precautions when working with tools and electricity is paramount.
Frame Construction: Begin by cutting the wood pieces for the frame to the desired dimensions. Use a miter saw to create angled cuts for the corners if desired. Assemble the frame pieces using wood glue and screws. Ensure that the frame is square and that the joints are secure. Use clamps to hold the frame pieces together while the glue dries. Allow the glue to dry completely before proceeding.
Sanding and Finishing: Once the frame is assembled, sand the surface to smooth out any imperfections. Start with a coarser grit sandpaper and gradually move to a finer grit. Apply a primer to the frame and allow it to dry completely. Paint or stain the frame to the desired color and finish. Apply multiple coats of paint or stain for a more durable and even finish. Allow each coat to dry completely before applying the next.
Drilling Holes for Light Sockets: Determine the spacing and placement of the light sockets. Use a drill to create holes in the frame that are large enough to accommodate the sockets. Ensure that the holes are evenly spaced and aligned. Consider using a hole saw for creating clean, circular holes.
Wiring the Light Sockets: With the frame prepared, the electrical wiring can be installed. Begin by threading the wires through the holes in the frame. Connect the wires to the light sockets according to the manufacturer's instructions. Ensure that the connections are secure and that the wires are properly insulated. Use wire connectors to join the wires safely and securely.
Installing the Light Switch and Power Cord: Connect the light switch to the wiring circuit, ensuring that it interrupts the flow of electricity to the light bulbs. Connect the power cord to the wiring circuit, following appropriate electrical safety guidelines. Ensure that the connections are secure and that the wires are properly insulated. Use a strain relief device to prevent the power cord from being pulled out of the frame.
Mounting the Mirror: Secure the mirror to the frame using mirror clips or adhesive. Ensure that the mirror is centered within the frame and that it is securely attached. If using adhesive, apply it evenly to the back of the mirror and press it firmly against the frame. Allow the adhesive to dry completely before proceeding.
Installing the Light Bulbs: Carefully screw the light bulbs into the sockets. Ensure that the bulbs are securely seated and that they are not too tight. Test the lights to ensure that they are functioning properly. If any bulbs do not light, check the wiring connections and the bulb itself.
Safety Precautions and Considerations
Safety is of paramount importance when undertaking any DIY project, particularly those involving electricity. Taking necessary precautions minimizes the risk of injury or damage.
Electrical Safety: Prior to commencing any electrical work, disconnect the power supply to avoid the risk of electric shock. Exercise caution when working with electrical wiring and follow all applicable electrical codes. If uncertain about any aspect of the electrical work, consult a qualified electrician.
Tool Safety: Wear safety glasses and a dust mask when using power tools. Follow the manufacturer's instructions for safe operation of each tool. Ensure that all tools are in good working condition before use.
Ventilation: Work in a well-ventilated area when painting or staining the frame. Avoid inhaling fumes and wear a respirator if necessary.
Mirror Handling: Handle the mirror with care to avoid breakage. Wear gloves to protect the hands from sharp edges.
Bulb Wattage: Ensure that the light sockets are rated for the wattage of the light bulbs being used. Exceeding the maximum wattage can lead to overheating and fire hazards.
Secure Mounting: Mount the finished vanity mirror securely to prevent it from falling. Use appropriate mounting hardware and ensure that the wall is strong enough to support the weight of the mirror.
By adhering to these steps, individuals can construct a functional and aesthetically pleasing vanity mirror with lights tailored to their specific needs and preferences. The project, while requiring some technical skill, is achievable for those with basic woodworking and electrical knowledge.

Diy Light Up Vanity Mirrors You Can Make Ohmeohmy Blog

10 Diy Vanity Mirror Projects That Show You In A Diffe Light

10 Diy Vanity Mirror Projects That Show You In A Diffe Light

Diy Make Up Mirror Vanity Makeup

Diy Light Up Vanity Mirrors You Can Make Ohmeohmy Blog

Gorgeous Diy Light Up Vanity Mirrors
:max_bytes(150000):strip_icc()/makesandmunchies-c136f898cca640faa72b6209012230cb.jpg?strip=all "7 Diy Lighted Mirror Ideas To Add A Little Extra Shine Your Space")
7 Diy Lighted Mirror Ideas To Add A Little Extra Shine Your Space

How To Make A Vanity Or Bathroom Mirror With Strip Lights

20 Diy Vanity Mirror Using Led Lights And Easy

How To Make A Vanity Or Bathroom Mirror With Strip Lights