Mirror Wall Tiles: Enhancing Space and Style
Mirror wall tiles represent a versatile and impactful design element in both residential and commercial spaces. Their ability to amplify light, create illusions of spaciousness, and contribute to a modern aesthetic makes them a popular choice for homeowners, interior designers, and architects. This article delves into the various aspects of mirror wall tiles, including their benefits, types, installation considerations, maintenance tips, and design applications.
The Multifaceted Benefits of Mirror Wall Tiles
Mirror wall tiles offer a range of advantages that contribute to both the aesthetic appeal and functional aspects of a room. Perhaps the most significant benefit is their capacity to enhance the natural and artificial light within a space. Mirrors reflect light, effectively doubling the perceived brightness and creating a more inviting atmosphere. This is particularly useful in rooms with limited natural light sources, such as hallways, bathrooms, or basements. Strategically placed mirror tiles can bounce light around the room, reducing the need for excessive artificial lighting and potentially lowering energy consumption.
Beyond illumination, mirror tiles excel at creating the illusion of a larger space. By reflecting the surrounding environment, they visually expand the dimensions of a room, making it feel more open and airy. This is especially valuable in smaller rooms where optimizing space is a priority. Using large mirror tiles or covering an entire wall can dramatically alter the perception of size, making a cramped space feel significantly more expansive. The effect is similar to adding a window, except the reflected view can be controlled by the existing décor and layout.
Furthermore, mirror wall tiles can serve as a striking design element in their own right. They can be incorporated into various design schemes, from minimalist and modern to glamorous and ornate. The reflective surface adds a touch of sophistication and elegance to any room. Different shapes, sizes, and arrangements of mirror tiles can be used to create unique patterns and visual interest. Whether used as a subtle accent or a bold statement, mirror tiles can elevate the overall aesthetic of a space.
Another often overlooked benefit is the potential for mirror tiles to conceal imperfections in walls. Uneven surfaces or minor blemishes can be effectively masked by a strategically placed mirror tile installation. This can be a cost-effective solution for addressing cosmetic issues without undertaking extensive repairs or renovations.
Exploring the Diverse Types of Mirror Wall Tiles
The market offers a wide array of mirror wall tiles, each with its own distinct characteristics and applications. Understanding the different types available is crucial for selecting the most suitable option for a particular project. The primary differentiating factors include size, shape, thickness, edge treatment, and backing material.
In terms of size, mirror tiles range from small mosaic pieces to large format panels that can cover entire walls. Smaller tiles are often used for creating decorative patterns or accents, while larger tiles are ideal for maximizing the illusion of space and minimizing grout lines. The shape of the tiles can also vary greatly, including squares, rectangles, triangles, hexagons, and even custom shapes. The choice of shape depends on the desired aesthetic and the overall design of the space.
The thickness of the mirror tile impacts its durability and reflectivity. Thicker tiles generally provide a more robust surface and a clearer reflection. However, they may also be heavier and require stronger adhesives for installation. The edge treatment refers to the finish applied to the edges of the tile, which can be polished, beveled, or left raw. Polished edges provide a clean and modern look, while beveled edges add a touch of elegance and dimension. Raw or unfinished edges may be suitable for certain mosaic applications where the edges are concealed by grout.
The backing material of the mirror tile is a critical factor in its performance and longevity. Most mirror tiles have a silver or aluminum backing that provides the reflective surface. This backing is typically coated with a protective layer to prevent oxidation and corrosion. The quality of the backing material significantly impacts the clarity and durability of the mirror. Some mirror tiles also have an adhesive backing for easy application, while others require separate adhesive.
Beyond these basic characteristics, specialized mirror tiles are also available. These include tinted mirrors, antiqued mirrors, and mirrors with decorative patterns or textures. Tinted mirrors add a subtle color hue to the reflection, while antiqued mirrors provide a vintage or distressed look. Mirrors with decorative patterns or textures can add a unique visual element to a space.
Essential Considerations for Installing Mirror Wall Tiles
Proper installation is crucial for ensuring the longevity, safety, and aesthetic appeal of mirror wall tiles. A meticulous approach is required, paying close attention to surface preparation, adhesive selection, tile alignment, and finishing details. While professional installation is recommended, understanding the key considerations can help homeowners make informed decisions and ensure a successful outcome.
The first step in installing mirror wall tiles is to prepare the surface. The surface must be clean, dry, level, and structurally sound. Any existing paint, wallpaper, or debris must be removed. Uneven surfaces should be leveled with a suitable patching compound. It is also essential to prime the surface to ensure proper adhesion of the tile adhesive. The type of primer will depend on the substrate material and the adhesive being used.
Selecting the appropriate adhesive is critical for a secure and long-lasting installation. Mirror mastic is specifically formulated for bonding mirrors to various surfaces. It provides a strong and permanent bond without damaging the reflective backing. It is important to choose a mastic that is compatible with the type of mirror tile and the substrate material. Follow the manufacturer's instructions carefully when applying the adhesive.
Precise tile alignment is essential for a professional-looking installation. Use a level and a measuring tape to establish a reference line and ensure that the tiles are installed straight and evenly spaced. Tile spacers can be used to maintain consistent grout lines. It is also important to plan the layout of the tiles carefully to minimize cuts and waste. Cutting mirror tiles requires specialized tools, such as a glass cutter and a tile nipper. Safety glasses and gloves should be worn when cutting mirror tiles to protect against sharp edges and flying debris.
Once the tiles are installed, allow the adhesive to cure completely before applying grout. The grout fills the spaces between the tiles, providing a watertight seal and enhancing the overall appearance. Choose a grout color that complements the mirror tiles and the surrounding décor. Apply the grout according to the manufacturer's instructions, using a grout float to work it into the joints. Remove excess grout with a damp sponge and polish the tiles with a clean cloth.
Finally, inspect the installation for any imperfections and make any necessary repairs. Ensure that all edges are clean and smooth, and that the grout lines are consistent and uniform. A properly installed mirror wall tile installation can transform a space, adding light, dimension, and style.
Maintaining the Sparkle: Cleaning and Care Tips
Maintaining mirror wall tiles involves regular cleaning and proper care to preserve their reflectivity and prevent damage. The frequency of cleaning will depend on the location of the tiles and the amount of exposure to dust, dirt, and moisture. However, regular maintenance is essential for ensuring that the mirror tiles retain their sparkle and continue to enhance the beauty of the space.
For general cleaning, a mild glass cleaner and a soft, lint-free cloth are typically sufficient. Avoid using abrasive cleaners, scouring pads, or harsh chemicals, as these can scratch or damage the mirror surface. Spray the glass cleaner onto the cloth, rather than directly onto the mirror, to prevent the cleaner from seeping behind the tiles. Wipe the surface gently in a circular motion, then buff with a dry cloth to remove any streaks.
For stubborn stains or smudges, a mixture of vinegar and water can be used. Mix equal parts of white vinegar and water in a spray bottle. Spray the solution onto the mirror and let it sit for a few minutes. Wipe the surface with a clean cloth and buff dry. Vinegar is a natural and effective cleaner that can remove grease, fingerprints, and water spots.
In areas with high humidity, such as bathrooms, it is important to prevent moisture buildup on the mirror tiles. Wipe down the tiles after showering or bathing to remove condensation. Ensure that the bathroom is well-ventilated to reduce humidity levels. Consider using a dehumidifier in particularly humid climates.
Inspect the grout lines regularly and address any cracks or damage promptly. Damaged grout can allow moisture to penetrate behind the tiles, potentially causing damage to the backing or the substrate. Repair any cracks or gaps with fresh grout, following the manufacturer's instructions.
Avoid placing heavy objects or sharp items near the mirror tiles, as these can scratch or chip the surface. If a mirror tile is damaged, it should be replaced promptly to prevent further damage or potential hazards.

Mirrored Diamond Wall Tiles Pack

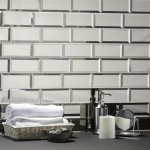
Decorative Mirror Tiles On The Wall Decor Living Room Bedroom

Mirrored Tiles Mirrorworld

Mirrored Walls And Wall Tiles Pinesway Glass Ltd

Antique Mirrored Wallpaper Mad About The House

How To Use Decorative Mirror Tiles In Interior Design

Mirror Walls And Tiles Mirrorworld

Antique Mirror Tiles Glass

Antique Mirror Tile Retro Reflections

Calcutta Mirror Tiles Afroditi