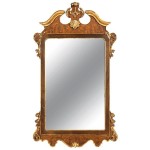
How To Put Trim Around a Mirror: A Comprehensive Guide
Adding trim around a mirror is a relatively straightforward home improvement project that can dramatically enhance the aesthetic appeal of a bathroom, bedroom, or living space. It transforms a plain, functional mirror into a decorative focal point, adding character and sophistication to the surrounding area. This guide provides a detailed, step-by-step approach to successfully installing trim around a mirror, covering everything from preparation to finishing.
Key Point 1: Planning and Material Selection
The initial phase of installing trim around a mirror is crucial for a successful outcome and involves careful planning and material selection. This stage dictates the overall look and feel of the finished product and ensures that the chosen materials are appropriate for the environment in which the mirror is located.
Firstly, accurate measurements of the mirror are paramount. Measure the height and width of the mirror precisely, noting these measurements in both inches and millimeters to minimize errors. These measurements will form the basis for calculating the length of trim required. It is advisable to add a few extra inches or centimeters to each measurement to account for potential errors during cutting or fitting.
Selecting the appropriate trim is equally important. There are numerous types of trim available, each offering a different style and aesthetic. Wood trim, such as pine, oak, or poplar, is a popular choice due to its versatility and ability to be painted or stained to match existing décor. MDF (Medium-Density Fiberboard) trim is another option, offering a smooth surface that is ideal for painting. PVC trim is a durable, moisture-resistant option suitable for bathrooms or other areas prone to humidity. The chosen material should complement the style of the room and be compatible with the intended finish.
Consider the profile of the trim. A simple, square profile offers a clean, modern look, while a more ornate, decorative profile can add a touch of elegance and sophistication. The size of the trim should also be proportional to the size of the mirror and the surrounding space. A small mirror may be overwhelmed by a large, bulky trim, while a large mirror may require a more substantial trim to make a visual impact.
In addition to the trim itself, other necessary materials include: a measuring tape, a miter saw (or miter box and hand saw), wood glue or construction adhesive, sandpaper, a pencil, painter's tape, caulk, and paint or stain (if desired). Safety glasses are also essential for protecting the eyes during cutting and sanding.
Prior to purchasing materials, it is beneficial to create a sketch of the proposed trim design. This sketch will help visualize the finished product and ensure that the chosen materials are suitable for the desired aesthetic. This planning stage prevents costly mistakes and ensures that the project proceeds smoothly.
Key Point 2: Cutting and Assembling the Trim
Once the planning and material selection are complete, the next step involves cutting and assembling the trim. This stage requires precision and attention to detail to ensure a seamless and professional-looking finish.
The most common method for joining trim pieces is a mitered corner, which involves cutting each piece at a 45-degree angle so that they meet to form a 90-degree corner. A miter saw is the preferred tool for this task, as it allows for precise and consistent cuts. Alternatively, a miter box and hand saw can be used, although this method requires more manual dexterity.
Before cutting any trim pieces, it is crucial to double-check the measurements and ensure that the miter saw is set to the correct angle. It is also advisable to practice cutting on scrap pieces of trim to familiarize oneself with the tool and ensure accurate cuts. To minimize splintering, use a fine-tooth blade and cut slowly and deliberately.
When cutting the trim, follow the measurements taken earlier, adding any necessary allowances for the mitered corners. Cut the four pieces of trim, ensuring that the angles are consistent and that the lengths are accurate. After cutting each piece, dry-fit them around the mirror to ensure that they fit together properly. This dry-fitting stage allows for adjustments to be made before applying any adhesive.
Once the trim pieces fit together correctly, the next step is to assemble them. Apply a small amount of wood glue or construction adhesive to the mitered corners of each piece. Ensure that the adhesive is applied evenly and that it does not squeeze out excessively when the pieces are joined together.
Carefully align the trim pieces and press them together firmly. Use painter's tape to hold the corners in place while the adhesive dries. The tape will prevent the corners from shifting and ensure that the joints remain tight and secure. Allow the adhesive to dry completely according to the manufacturer's instructions, typically for at least 24 hours.
After the adhesive has dried, remove the painter's tape and inspect the corners for any gaps or imperfections. If necessary, fill any small gaps with wood filler or caulk. Sand the corners smooth to create a seamless transition between the trim pieces. This step is crucial for achieving a professional-looking finish.
Key Point 3: Attaching the Trim to the Mirror and Finishing
With the trim assembled, the final stage involves attaching it to the mirror and applying any desired finishing touches. This stage requires careful attention to prevent damage to the mirror and to ensure a secure and aesthetically pleasing installation.
Before attaching the trim to the mirror, clean the surface of the mirror thoroughly with a glass cleaner. This will remove any dirt, dust, or grease that could interfere with the adhesion of the trim. Allow the mirror to dry completely before proceeding.
Apply a thin bead of construction adhesive to the back of the assembled trim. Ensure that the adhesive is applied evenly and that it comes into contact with the mirror surface. Avoid applying too much adhesive, as this can cause it to squeeze out from behind the trim.
Carefully position the trim around the mirror, ensuring that it is aligned correctly and that the corners are flush with the edges of the mirror. Press the trim firmly against the mirror surface, applying even pressure to ensure a strong bond. Use painter's tape to hold the trim in place while the adhesive dries. The tape will prevent the trim from shifting and ensure that it remains securely attached to the mirror.
Allow the adhesive to dry completely according to the manufacturer's instructions, typically for at least 24 hours. After the adhesive has dried, remove the painter's tape and inspect the trim for any gaps or imperfections. If necessary, fill any small gaps between the trim and the mirror with caulk. Smooth the caulk with a wet finger to create a seamless transition.
Once the caulk has dried, the final step is to apply any desired finishing touches. If the trim is made of wood, it can be painted or stained to match the existing décor. Sand the trim lightly before painting or staining to create a smooth surface. Apply multiple thin coats of paint or stain, allowing each coat to dry completely before applying the next.
If the trim is made of MDF or PVC, it can be painted with an appropriate primer and topcoat. Follow the manufacturer's instructions for the specific paint or primer being used. Ensure that the paint is applied evenly and that there are no drips or brush strokes.
After the paint or stain has dried completely, the trim is ready to be enjoyed. Inspect the finished product for any imperfections and make any necessary touch-ups. The addition of trim around a mirror can significantly enhance the aesthetic appeal of any room, adding character and sophistication to the surrounding space.

Easy Diy Tutorial Adding Trim Around A Giant Mirror For Ers

Easy Diy Tutorial Adding Trim Around A Giant Mirror For Ers

Diy Bathroom Mirror Frame With Molding The Happier Homemaker

How To Frame A Mirror

The Kids Bathroom Mirror Gets Framed House Of Hepworths

How To Frame Out That Builder Basic Bathroom Mirror For 20 Or Less

Adding Wood Trim To Our Vanity Mirror 10 Diy Growit Buildit

Easy Diy Tutorial Adding Trim Around A Giant Mirror For Ers

Framing A Bathroom Mirror Tempting Thyme

Diy Bathroom Mirror Frame With Molding The Happier Homemaker