How to Make a Sunburst Wall Mirror
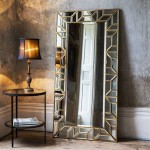
Sunburst mirrors, known for their radiating patterns resembling the sun's rays, are striking decorative pieces capable of adding visual interest and a touch of elegance to any interior. Creating one can be a rewarding DIY project, allowing for customization in size, materials, and overall aesthetic to perfectly complement existing décor. This article will provide a comprehensive guide on how to construct a sunburst mirror, outlining the necessary materials, tools, and step-by-step instructions.
The appeal of a sunburst mirror lies in its ability to function as both a reflective surface and a statement art piece. The design draws the eye, creating a focal point whether it's placed above a mantel, in an entryway, or as a centerpiece in a living room. Moreover, depending on the materials used, a sunburst mirror can be adapted to fit various design styles, from rustic and bohemian to modern and glamorous.
Before embarking on the project, careful consideration should be given to the desired size and style of the mirror. These factors will influence the quantity of materials needed and the complexity of the construction process. For instance, a larger mirror will require more "rays" and a sturdier base, while a more intricate design may necessitate more advanced cutting or shaping techniques.
Choosing the Right Materials
Selecting appropriate materials is crucial for achieving a visually appealing and structurally sound sunburst mirror. The central components include the mirror itself, the materials for the rays, and a backing to provide support and stability.
The Mirror: The size of the mirror will be the primary factor in determining the overall dimensions of the finished piece. Opt for a circular mirror, as this shape best complements the radiating design. Consider the thickness of the mirror as well; a thicker mirror will be more durable but also heavier, requiring a correspondingly robust backing structure. The mirror can be purchased from craft stores, glass suppliers, or even repurposed from an existing, unwanted mirror.
Materials for the Rays: The choice of material for the "rays" is where the maker's creativity can truly shine. Several options offer different aesthetics and levels of workability:
- Wooden Dowels: Dowels provide a clean, uniform look and are easily cut to various lengths. They can be painted, stained, or left natural for different effects.
- Paint Stir Sticks: A budget-friendly option, paint stir sticks offer a rustic charm. They can be sanded and painted to achieve a more refined appearance.
- Bamboo Skewers: For a lighter, more delicate look, bamboo skewers offer a natural texture and can be easily trimmed.
- Plastic Spoons: This unexpected material can create a modern and unique sunburst effect. The spoon heads can be painted or left as is, and the handles provide a convenient attachment point.
- Metal Strips: Metal strips, such as brass or aluminum, offer durability and a contemporary aesthetic. They may require specialized cutting tools and safety precautions.
- Cardboard: This is a cheap and easily accessible material, especially for practicing the design and getting a feel for the process. However, cardboard may not be the most durable or visually appealing option for a final piece.
Backing Material: The backing provides a solid surface for attaching the mirror and the rays, ensuring the stability of the entire structure. Plywood or MDF (medium-density fiberboard) are excellent choices due to their strength, smooth surface, and ease of cutting. The backing should be slightly larger than the mirror itself to provide ample space for attaching the rays.
Adhesive: A strong adhesive is essential for securely attaching the mirror, rays, and backing. Mirror adhesive is specifically designed to bond to glass without damaging the reflective coating. Wood glue is suitable for bonding wooden components, while epoxy resin can be used for metal or plastic materials. Always follow the manufacturer's instructions for proper application and curing time.
Finishing Materials: Depending on the chosen materials and desired aesthetic, finishing materials may include paint, stain, sealant, or decorative embellishments such as glitter, beads, or metallic leafing.
Essential Tools and Equipment
Having the right tools on hand will streamline the construction process and ensure accurate and professional results. The specific tools needed will vary depending on the chosen materials, but the following list provides a general overview:
- Measuring Tape or Ruler: Accurate measurements are crucial for ensuring symmetry and uniform spacing of the rays.
- Pencil or Marker: For marking cut lines and placement points.
- Saw (Hand Saw, Jigsaw, or Miter Saw): For cutting the backing material and the rays to the desired length and shape. A miter saw is particularly useful for creating angled cuts for a more dynamic sunburst effect.
- Sandpaper: For smoothing rough edges and preparing surfaces for painting or staining. Different grits of sandpaper may be needed for different stages of the finishing process.
- Drill with Drill Bits: For creating pilot holes for screws or for attaching hanging hardware.
- Hot Glue Gun: This is a quick and easy way to temporarily hold pieces in place while the permanent adhesive dries.
- Paintbrushes or Sponges: For applying paint, stain, or sealant.
- Safety Glasses and Dust Mask: Protecting your eyes and respiratory system is essential when working with power tools and potentially harmful materials.
- Clamps: For holding pieces securely together while the adhesive dries.
- Compass or Protractor: For accurately marking the center of the backing and dividing it into equal sections for ray placement.
Step-by-Step Construction Process
The following steps outline the general process of constructing a sunburst mirror. Adjustments may be necessary depending on the specific materials and design choices.
Step 1: Preparing the Backing:
Cut the backing material (plywood or MDF) to the desired size, ensuring it is slightly larger than the mirror. Sand the edges and surface smooth to remove any splinters or imperfections. Mark the center of the backing using a ruler and pencil. This will serve as the reference point for attaching the mirror and the rays.
Step 2: Attaching the Mirror:
Apply mirror adhesive to the back of the mirror, following the manufacturer's instructions. Position the mirror carefully in the center of the backing, aligning it with the marked center point. Apply gentle pressure to ensure good contact between the mirror and the backing. Allow the adhesive to cure completely, following the manufacturer's recommended drying time.
Step 3: Preparing the Rays:
Cut the chosen ray material (dowels, paint sticks, etc.) to the desired length. The length of the rays will determine the overall diameter of the sunburst. Consider using varying lengths for added visual interest. Sand the cut ends of the rays smooth to remove any sharp edges. If desired, paint, stain, or otherwise decorate the rays. Allow the finish to dry completely before proceeding.
Step 4: Determining Ray Placement:
Divide the circumference of the mirror into equal sections, corresponding to the desired number of rays. For example, if you want 24 rays, divide 360 degrees (a full circle) by 24, resulting in 15-degree increments. Use a protractor and pencil to mark these intervals around the edge of the mirror on the backing material.
Step 5: Attaching the Rays:
Apply adhesive (wood glue, hot glue, or epoxy resin, depending on the materials) to the base of each ray. Position the ray so that its base is aligned with one of the marked intervals on the backing, radiating outwards from the mirror. Use clamps or tape to hold the rays in place while the adhesive dries. Ensure that all rays are equidistant from the mirror's edge.
Step 6: Adding a Secondary Layer (Optional):
For a more layered and textured look, consider adding a second layer of rays. Cut the second layer of rays slightly shorter than the first layer. Attach them between the rays of the first layer, using the same adhesive and clamping techniques. This creates a more dynamic and visually complex sunburst design.
Step 7: Finishing Touches:
Once the adhesive has completely cured, remove the clamps or tape. Inspect the entire assembly for any loose or uneven rays. Touch up any paint or stain as needed. If desired, add decorative embellishments such as glitter, beads, or metallic leafing to the rays or the backing. Apply a sealant to protect the finish and prevent moisture damage.
Step 8: Adding Hanging Hardware:
Attach appropriate hanging hardware to the back of the backing material. D-rings with wire or sawtooth hangers are common options. Ensure that the hardware is securely attached and capable of supporting the weight of the mirror. Position the hardware so that the mirror will hang straight and level.
By following these steps, individuals can create a unique and personalized sunburst mirror that enhances their home décor. The project allows for customization and creative expression, resulting in a beautiful and functional piece of art.

Sunburst Mirror Diy How To Make Wall Decor Decoration Ideas

Easy Sunburst Mirror Wall Decor Diy Decoration Ideas For Home

Diy Sunburst Mirror 4 Wall Art

How To Make A Fabulous Diy Sunburst Mirror For Joyful Derivatives

How To Diy A Sunburst Mirror I Is Shady Ep 12

How To Make A Fabulous Diy Sunburst Mirror For Joyful Derivatives

How To Make A Fabulous Diy Sunburst Mirror For Gold

How To Make A Fabulous Diy Sunburst Mirror For Joyful Derivatives

Diy Sunburst Mirror Edith Evelyn

Diy Sunburst Mirror Blooming Homestead