DIY Bathroom Mirror Borders: Enhancing Style and Functionality
Bathroom mirrors are essential fixtures, serving both practical and aesthetic purposes. However, a plain, frameless mirror can often lack character. Adding a DIY border can transform a basic mirror into a statement piece, reflecting personal style and enhancing the overall bathroom décor. This article explores various DIY bathroom mirror border ideas, materials, and techniques, providing comprehensive guidance for individuals seeking to upgrade their bathroom spaces.
Considerations Before Starting Your DIY Project
Before embarking on a DIY bathroom mirror border project, meticulous planning is crucial. The first consideration is selecting the appropriate materials, taking into account the bathroom's existing design scheme, moisture levels, and desired aesthetic. Materials must be durable, water-resistant, and capable of adhering effectively to the mirror surface. Adhesives should be specifically designed for use on mirrors to prevent damage to the reflective coating.
Secondly, measurements are paramount. Accurate measurements of the mirror's dimensions are essential for ensuring a precise fit. It's advisable to add a small allowance to the border material dimensions, allowing for slight adjustments during installation. A well-measured border will not only look aesthetically pleasing but also contribute to the overall structural integrity of the installation.
Thirdly, safety should be a primary concern. When working with tools such as saws, drills, and cutting implements, appropriate safety gear, including eye protection and gloves, must be worn. The work area should be well-ventilated, especially when using adhesives or sealants that may release fumes. Care should be taken to avoid damaging the mirror surface or the surrounding wall during the installation process.
Exploring Different DIY Border Materials and Styles
The choice of material significantly impacts the final appearance of the bathroom mirror border. Several options are available, each offering distinct aesthetic qualities and installation requirements.
Wood Borders: Wood offers a classic and versatile option. Untreated wood, such as pine or cedar, can be stained, painted, or varnished to complement the existing bathroom décor. Reclaimed wood provides a rustic and environmentally friendly alternative. When using wood, it's crucial to seal it thoroughly with a water-resistant finish to prevent warping or damage from moisture. Wood borders can be attached to the mirror using construction adhesive designed for mirrors, ensuring a secure and long-lasting bond.
Tile Borders: Tile borders provide a durable and waterproof option, ideal for bathrooms with high humidity. Mosaic tiles, ceramic tiles, or glass tiles can be arranged in various patterns and colors to create a unique and visually appealing border. Tile installation involves applying thin-set mortar to the back of the tiles and adhering them to the mirror surface. Grout is then used to fill the gaps between the tiles, providing a watertight seal. It is important to use a mirror-safe adhesive for the initial tile application.
Metal Borders: Metal borders, such as aluminum, stainless steel, or copper, offer a contemporary and sleek aesthetic. Metal borders are typically pre-fabricated and can be attached to the mirror using adhesive or screws. When using screws, it's essential to pre-drill pilot holes to prevent cracking the mirror. Metal borders are highly durable and resistant to water damage, making them a practical choice for bathrooms.
Rope Borders: Rope borders provide a nautical or coastal-themed aesthetic. Natural fiber ropes, such as jute or sisal, can be glued or wrapped around the mirror's edge to create a textured and visually interesting border. Synthetic ropes offer greater resistance to moisture and are available in various colors and patterns. Rope borders are relatively easy to install and can be customized to suit individual preferences.
Stone Borders: Stone borders, such as river rocks or pebbles, add a natural and organic element to the bathroom. Stone borders can be attached to the mirror using construction adhesive. The stones can be arranged in a random or patterned design, creating a unique and visually striking border. Stone borders are highly durable and water-resistant, making them a suitable choice for bathrooms.
Step-by-Step Guide to Installing a DIY Bathroom Mirror Border
The installation process varies depending on the chosen material and style. However, the following general steps provide a comprehensive guide for installing a DIY bathroom mirror border.
Preparation: Before starting the installation, the mirror surface must be thoroughly cleaned to remove any dirt, dust, or grease. A glass cleaner and a lint-free cloth are recommended for this purpose. The surrounding wall area should also be protected with drop cloths or masking tape to prevent damage from adhesive or other materials.
Cutting and Shaping: The border material must be cut to the appropriate dimensions, ensuring a precise fit around the mirror's perimeter. For wood borders, a saw can be used to cut the wood to the desired length and width. For tile borders, a tile cutter or wet saw may be required. For metal borders, a metal cutting saw or grinder can be used. Accurate measurements and precise cutting are essential for a professional-looking finish.
Adhesive Application: A mirror-safe adhesive should be applied to the back of the border material. The adhesive should be distributed evenly to ensure a strong and consistent bond. The adhesive should be applied according to the manufacturer's instructions, paying attention to drying times and application techniques.
Border Placement: The border material should be carefully positioned around the mirror's edge, ensuring alignment and even spacing. Gentle pressure should be applied to ensure proper adhesion. Clamps or masking tape can be used to hold the border material in place while the adhesive dries. It is important to consult the adhesive's instructions for specific drying times.
Finishing Touches: Once the adhesive has dried completely, any excess adhesive should be removed with a sharp blade or solvent. Grout should be applied to tile borders to fill the gaps between the tiles. The grout should be allowed to dry according to the manufacturer's instructions before being cleaned with a damp sponge. Sealant can be applied to the edges of the border to prevent water damage and ensure a watertight seal.
Additional Considerations: For larger mirrors, it may be necessary to use additional support, such as screws or brackets, to ensure the border is securely attached. When using screws, it's essential to pre-drill pilot holes to prevent cracking the mirror. The screws should be countersunk to avoid protruding from the border surface. Brackets can be attached to the wall and used to support the border from behind.
Creative Ideas and Customization Options
Beyond the basic materials and techniques, numerous creative ideas and customization options can enhance the visual appeal of a DIY bathroom mirror border.
Patterned Borders: Instead of using a single material or color, consider creating a patterned border using a combination of different materials or colors. For example, a tile border can be created using a mosaic of different colored tiles. A wood border can be painted with a geometric pattern or stencil design.
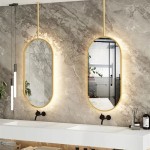
Illuminated Borders: Adding LED strip lights to the back of the border can create a soft and ambient glow, enhancing the mirror's functionality and visual appeal. The LED strip lights can be controlled with a dimmer switch to adjust the brightness. The lights should be waterproof and designed for use in bathrooms.
Textured Borders: Adding texture to the border can create a tactile and visually interesting effect. For example, a wood border can be carved with decorative patterns or sanded to create a distressed finish. A tile border can be created using tiles with a raised or textured surface.
Personalized Borders: Adding personalized elements to the border can reflect individual style and preferences. For example, a wood border can be engraved with initials or a favorite quote. A tile border can be decorated with hand-painted designs or personalized mosaic tiles.
Upcycled Borders: Utilizing upcycled materials can add a unique and environmentally friendly touch to the bathroom mirror border. For example, reclaimed wood, vintage buttons, or seashells can be used to create a one-of-a-kind border.
By considering these creative ideas and customization options, individuals can transform a basic bathroom mirror into a personalized statement piece that reflects their unique style and enhances the overall bathroom décor. Careful planning, attention to detail, and adherence to safety precautions are essential for a successful and visually stunning DIY bathroom mirror border project.

Mirror Frame Diy How To Update A Basic Bathroom Our Faux Farmhouse

Mirror Frame Diy How To Update A Basic Bathroom Our Faux Farmhouse

Diy Stick On Mirror Frame Sawdust Sisters

How To Frame Out That Builder Basic Bathroom Mirror For 20 Or Less

Easy Diy Tutorial Adding Trim Around A Giant Mirror For Ers

How To Frame A Mirror

Diy Bathroom Mirror Frame With Molding The Happier Homemaker

Diy Bathroom Mirror Frame Without Removing Clips Her Happy Home

Diy Bathroom Mirror Frame For Under 10 O Hayley Blog

How To Install A Mirrorchic Bathroom Mirror Frame Momhomeguide Com