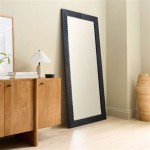
Framing a Mirror with Wood Trim
Adding a wood frame to a plain mirror elevates its appearance, transforming it from a simple functional object into a decorative piece. This project is achievable for most skill levels, requiring basic tools and readily available materials. The following guide outlines the process of framing a rectangular or square mirror with wood trim, offering a customizable approach to suit individual styles and existing décor.
Choosing the Right Materials
Selecting appropriate materials is crucial for a successful outcome. The type of wood, its dimensions, and the adhesive used will impact the frame's durability, aesthetic, and ease of construction. For the wood trim, consider options such as pine, oak, or maple. Pine is a cost-effective and readily available choice, while oak and maple offer greater hardness and a more refined finish. The dimensions of the trim should be proportional to the mirror's size. A larger mirror generally benefits from wider trim.
The adhesive employed must effectively bond wood to glass. Specialized mirror adhesives are available, formulated to prevent damage to the reflective backing. Construction adhesive can also be a suitable option, but ensure compatibility with both wood and mirror surfaces. In addition to the wood and adhesive, essential materials include measuring tape, a miter saw or hand saw with a miter box, wood glue, finishing nails, a hammer, and safety glasses.
Preparing the Mirror and Wood
Accurate measurements are paramount to a well-fitted frame. Carefully measure the mirror's length and width, recording the dimensions precisely. Transfer these measurements to the chosen wood trim, marking the cut lines for each piece. Employing a miter saw ensures clean, angled cuts at 45 degrees for seamless corners. If using a hand saw, a miter box is essential for achieving the necessary precision.
Once the wood pieces are cut, arrange them around the mirror to ensure a proper fit. This dry-fit allows for adjustments before applying adhesive. Lightly sand the edges of the wood trim to remove any splinters or rough patches, ensuring a smooth surface for finishing. This step also promotes better adhesion between the wood and the finish.
Assembling and Finishing the Frame
Begin the assembly process by applying a thin, even bead of mirror adhesive to the back of each piece of trim. Carefully position the trim pieces onto the mirror's edge, ensuring tight corners and consistent spacing. Reinforce the joints by applying wood glue to the mitered edges where the pieces meet. Secure the frame further by using finishing nails, carefully driven into the wood at an angle to avoid damaging the mirror. Countersink the nails and fill the holes with wood filler for a seamless appearance.
After the adhesive and glue have fully cured, the frame can be finished to complement the surrounding décor. Sanding the frame again with fine-grit sandpaper creates a smooth surface for the chosen finish. Options for finishing include painting, staining, or applying a clear sealant. Painting allows for versatile color choices, while staining enhances the natural beauty of the wood grain. A clear sealant protects the wood and preserves its finish.
Mounting the Framed Mirror
Once the frame is complete and the finish has dried, the mirror is ready for mounting. Consider the weight of the framed mirror when choosing appropriate hanging hardware. D-rings or wire hangers are common options. Mark the desired location for the hanging hardware on the back of the frame, ensuring even weight distribution. Install the hardware according to the manufacturer's instructions. Use suitable wall anchors and screws for secure mounting, especially for heavier mirrors.
Alternatively, for smaller, lighter framed mirrors, adhesive mounting strips can be a viable option. Ensure the strips are rated for the weight of the mirror. Clean the wall surface thoroughly before applying the adhesive strips to ensure a strong bond.
Considerations for Different Mirror Shapes
While this guide focuses on rectangular mirrors, the principles can be adapted for other shapes. Circular mirrors can be framed using flexible trim materials, such as thin wood strips or molding, carefully bent to follow the curve. For irregular shapes, creating a template from cardboard or paper can assist in accurately cutting the trim pieces. The chosen material and mounting method may also need adjustments based on the mirror’s shape and weight.

How To Frame A Mirror

Adding Wood Trim To Our Vanity Mirror 10 Diy Growit Buildit

Mirror Frame Diy How To Update A Basic Bathroom Our Faux Farmhouse

Mirror Frame Diy How To Update A Basic Bathroom Our Faux Farmhouse

Easy Diy Tutorial Adding Trim Around A Giant Mirror For Ers

How To Frame A Mirror Sand And Sisal

How To Build A Wood Frame Around Bathroom Mirror Young House Love

Diy Bathroom Mirror Frame For Under 10 O Hayley Blog

How To Frame A Bathroom Mirror Lowe S

Diy Stick On Mirror Frame Sawdust Sisters