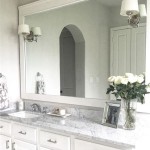
How to Install an Illuminated Bathroom Mirror
An illuminated bathroom mirror can transform your bathroom, adding a touch of luxury and practicality. It provides ample light for grooming, making it easier to apply makeup or shave. Installing an illuminated bathroom mirror can be a rewarding DIY project, but it requires careful planning and attention to detail. This article outlines the essential steps for installing an illuminated bathroom mirror, ensuring a safe and successful outcome.
Step 1: Choosing the Right Mirror and Planning the Installation
Before embarking on the installation process, careful consideration should be given to choosing the right mirror and planning the installation. First, determine the desired size and style of mirror. Consider the available space in your bathroom and the overall aesthetic you wish to achieve. Once you have selected the mirror, carefully measure the area where it will be installed. This will help you determine the placement of the mounting hardware and the electrical wiring.
Next, consider the type of lighting you require. Some illuminated mirrors have built-in LED lights, while others have separate fixtures. If you opt for a mirror with separate lights, ensure that the chosen fixtures are compatible with the existing electrical wiring. It is crucial to choose a mirror with a safety rating suitable for bathroom environments. Look for mirrors with IP ratings of at least 44, indicating protection against splashes and moisture.
Additionally, consider the type of mounting hardware required. Some mirrors come with pre-installed mounting plates, while others necessitate separate hardware. Ensure that the mounting hardware is appropriate for the wall material and the weight of the mirror. If you are unsure, seek guidance from a qualified professional.
Step 2: Preparing the Wall and Installing the Mounting Hardware
Once you have chosen the mirror and planned the installation, the next step is to prepare the wall and install the mounting hardware. Start by turning off the power to the electrical circuit that will be used to power the mirror. Locate the circuit breaker and switch it off. This is essential for safety and prevents electrical shocks during the installation process.
Next, prepare the wall for the installation. Clean the surface thoroughly using a damp cloth and mild detergent. Allow the wall to dry completely before proceeding. If the wall surface is uneven, use a patching compound to create a smooth and level surface. Allow the compound to dry thoroughly according to the manufacturer's instructions before continuing.
Now you can install the mounting hardware. If the mirror comes with pre-installed mounting plates, simply mark the positions on the wall and drill pilot holes. Then, secure the mounting plates using the provided screws. If the mirror requires separate mounting hardware, use a stud finder to locate wall studs, as these will provide the most secure support for the mirror. Mark the positions of the studs and drill pilot holes. Install the mounting hardware using the appropriate screws, ensuring that the hardware is firmly anchored to the wall studs.
Step 3: Connecting the Electrical Wiring and Testing the Mirror
Once the mounting hardware is installed, you can connect the electrical wiring. If the mirror has built-in LED lights, connect the wiring to the mirror's power cord. If the mirror has separate lights, connect the wiring to the junction box of the lights. Ensure that the wiring is properly secured and insulated, following all relevant electrical codes.
Turn the power back on at the circuit breaker and test the mirror's lighting. If the lights work correctly, gently hang the mirror on the mounting hardware. Ensure that the mirror is securely attached before proceeding to the final step.
Step 4: Final Adjustments and Completing the Installation
After hanging the mirror, inspect the installation for any imperfections. Ensure that the mirror is level and that the lights are properly aligned. If necessary, adjust the mounting position or the lighting fixtures to achieve the desired aesthetic.
Finally, clean the mirror and the surrounding area to remove any dust or debris accumulated during the installation process. Enjoy your newly installed illuminated bathroom mirror, which will enhance your bathroom's functionality and style.

Diy Led Mirror Installation Personal Tips And Review

Diy Led Mirror Installation Personal Tips And Review

How To Install Bathroom Led Mirror

How To Install Led Bathroom Mirror Step By Diy Instructions

How To Install An Led Mirror Bokih Bathroom

How To Install Led Bathroom Mirror Step By Diy Instructions

How To Install Led Bathroom Mirror Things Keep In Mind

Inlight Led Wall Mounted Lighted Vanity Mirror Installation Guide

How To Diy Vanity Mirror With Led Strip Lights

How To Install A Led Bathroom Mirror Wiring Heated