LED Tape Light Vanity Mirror
Vanity mirrors are a staple in bathrooms and bedrooms, providing essential illumination for grooming and makeup application. Traditional vanity lighting can sometimes cast harsh shadows or provide uneven light distribution. The advent of LED tape lights has revolutionized vanity mirror lighting, offering a customizable and aesthetically pleasing solution. This article explores the advantages, installation process, and selection criteria for LED tape light vanity mirrors.
Advantages of LED Tape Lights for Vanity Mirrors
LED tape lights offer several benefits over traditional vanity lighting options:
- Customizable Lighting: LED strips are flexible and can be easily cut and shaped to fit any mirror size or shape, providing even illumination across the entire surface.
- Energy Efficiency: LEDs consume significantly less energy than incandescent or halogen bulbs, resulting in lower electricity bills and a smaller environmental footprint.
- Long Lifespan: LED tape lights have a significantly longer lifespan than traditional bulbs, reducing the frequency of replacements and associated costs.
- Color Temperature Control: Many LED tape light kits offer adjustable color temperature, allowing users to switch between warm white, cool white, or daylight for different needs and preferences.
- Dimmability: Most LED tape lights are dimmable, offering precise control over brightness levels for optimal lighting conditions.
- Compact Design: The slim profile of LED tape lights allows for discreet installation, minimizing visual clutter around the mirror.
Choosing the Right LED Tape Light
Selecting the appropriate LED tape light involves considering several factors:
- Color Temperature: Warm white (2700-3000K) creates a relaxing ambiance, while cool white (4000-5000K) and daylight (6000-6500K) provide brighter, more energizing light suitable for makeup application.
- Brightness: Measured in lumens, brightness should be sufficient to illuminate the face without being overly harsh. Consider the size of the mirror and the desired lighting effect.
- CRI (Color Rendering Index): A higher CRI (90 or above) indicates better color accuracy, crucial for accurate makeup application.
- Waterproof Rating: For bathroom installations, choose waterproof LED tape lights (IP65 or higher) to protect against moisture and humidity.
- Voltage: Ensure the LED tape light is compatible with the existing electrical system (typically 12V or 24V).
Installation Process
Installing LED tape lights around a vanity mirror involves these general steps:
- Measure and Cut: Measure the perimeter of the mirror and cut the LED tape light to the appropriate length, ensuring to cut along the designated cutting marks.
- Clean the Surface: Thoroughly clean the back of the mirror or the frame where the tape will be adhered to ensure proper adhesion.
- Peel and Stick: Remove the adhesive backing from the LED tape light and carefully apply it to the desired surface, pressing firmly to secure it in place.
- Connect the Power Supply: Connect the LED tape light to the power supply, ensuring correct polarity. Test the lights before finalizing the installation.
- Conceal the Wiring: Use cable clips or channels to neatly manage and conceal the wiring, creating a clean and professional look.
- Install the Dimmer (Optional): If using a dimmable LED tape light, install the dimmer switch according to the manufacturer's instructions.
Power Supply and Control Options
LED tape lights require a separate power supply to convert standard household voltage. Control options vary and can include:
- Wall Switches: Standard on/off switches can control the power to the LED tape lights.
- Dimmer Switches: In-line or wall-mounted dimmer switches allow for adjustable brightness control.
- Remote Controls: Wireless remote controls offer convenient control over color temperature, brightness, and lighting effects.
- Smart Home Integration: Some LED tape light systems can be integrated with smart home platforms, enabling voice control and automation.
Placement and Design Considerations
The placement of LED tape lights can significantly impact the overall aesthetic and functionality of the vanity mirror:
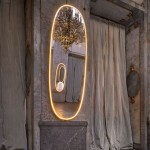
- Backlighting: Placing the LED strip behind the mirror creates a halo effect, adding depth and ambiance to the space.
- Front Lighting: Applying the tape to the front of the mirror frame provides direct illumination for makeup application.
- Side Lighting: Installing LED strips on the sides of the mirror can complement front or backlighting for more even illumination.
Maintenance and Troubleshooting
LED tape lights require minimal maintenance:
- Cleaning: Gently wipe the LED strips with a soft, damp cloth to remove dust and debris.
- Troubleshooting: If the lights flicker or fail to illuminate, check the power supply connections and ensure the correct voltage is being supplied. Consult the manufacturer's instructions for specific troubleshooting guidance.
Safety Precautions
Always prioritize safety during installation and operation:
- Disconnect Power: Always disconnect the power supply before working with any electrical components.
- Proper Ventilation: Ensure adequate ventilation around the power supply to prevent overheating.
- Professional Assistance: If unsure about any aspect of the installation process, consult a qualified electrician.

How To Diy Vanity Mirror With Led Strip Lights

How To Diy Vanity Mirror With Led Strip Lights

How To Make A Vanity Or Bathroom Mirror With Strip Lights

Diy Vanity Mirror I Used Any And Led Strip Lights Closet Lighting

Diy Led Light Strips For Mirror Practical Advice Nakashi Lighting

Mirror Light Strips Solavanti Lighting

Best Led Strip Lights For Mirror Manufacturer Light China Supplier

How To Diy Vanity Mirror With Led Strip Lights

How To Make A Vanity Or Bathroom Mirror With Strip Lights

Wall Mounted Led Vanity Mirror For Hotel Bathroom Decoration With Sandblasted Bands Design China Copper Free Made In Com