How To Measure A Bathroom Mirror
Accurate measurement of a bathroom mirror is essential for various reasons, including replacement, custom framing, or remodeling projects. Precise dimensions ensure a proper fit and aesthetic appeal within the bathroom space. Understanding the process and utilizing appropriate tools will contribute to accurate and reliable measurements.
Before initiating the measurement process, it is crucial to assemble the necessary tools and materials. A reliable measuring tape, preferably a metal one for accuracy and durability, is paramount. A level will ensure that measurements are taken horizontally and vertically. A pencil or marker will be needed to record the dimensions on a notepad or directly onto the mirror surface with removable tape, if possible. A helper may be beneficial, especially when dealing with larger mirrors, to hold the measuring tape or provide a steady hand.
Safety precautions are of utmost importance when working with mirrors. Mirrors, especially large ones, can be unwieldy and pose a risk of breakage. Wear safety glasses to protect the eyes from potential shards of glass should the mirror break or chip. If the mirror is already damaged or cracked, exercise extra caution when handling it. Consider wearing gloves to protect the hands from sharp edges.
The initial step involves determining whether the mirror is framed or frameless. This distinction is significant because the measurement process differs slightly depending on the mirror type. For a frameless mirror, the measurements will be taken directly from the glass surface. For a framed mirror, the dimensions may need to account for the frame itself.
Measuring a Frameless Bathroom Mirror
Measuring a frameless bathroom mirror requires careful attention to detail. Since there is no frame to provide a defined edge, the measurements must be taken directly from the glass surface. The following steps outline the process for accurately measuring a frameless mirror.
First, identify the widest points of the mirror, both horizontally and vertically. These points will determine the overall width and height of the mirror. Place the measuring tape along the top edge of the mirror and extend it horizontally to the opposite edge. Ensure that the tape is level and straight to obtain an accurate measurement. Record this measurement as the width of the mirror.
Next, measure the height of the mirror. Place the measuring tape along the side edge of the mirror and extend it vertically to the opposite edge. Again, ensure that the tape is level and straight. Record this measurement as the height of the mirror. It is advisable to repeat these measurements at different points along the mirror's edges to verify the accuracy and account for any potential irregularities.
When dealing with irregularly shaped frameless mirrors, such as oval or asymmetrical designs, the measurement process becomes more complex. In these cases, it is helpful to establish a reference point, such as the center of the mirror. Measure the distance from the center to the farthest point on each edge. This will provide the maximum width and height of the mirror. Additionally, consider tracing the outline of the mirror onto a large piece of paper to create a template. This template can then be used to ensure accurate cutting or fitting during replacement or installation.
Documenting the measurements is crucial. Record the width and height measurements in a clear and organized manner. Specify the units of measurement (e.g., inches, centimeters) to avoid confusion. It is also beneficial to note any special features of the mirror, such as beveled edges or cutouts for lighting fixtures. These details will be important when ordering a replacement mirror or designing a custom frame.
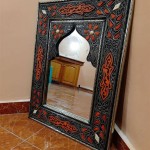
Measuring a Framed Bathroom Mirror
Measuring a framed bathroom mirror involves taking into account the dimensions of the frame in addition to the glass surface. The frame adds an extra layer of complexity, as it can affect the overall size and appearance of the mirror. The subsequent steps delineate the process for accurately measuring a framed mirror.
First, measure the overall width and height of the mirror, including the frame. Place the measuring tape along the outer edge of the frame and extend it horizontally to the opposite edge. Ensure that the tape is level and straight to obtain an accurate measurement. Record this measurement as the overall width of the mirror. Repeat this process for the height, measuring from the top edge of the frame to the bottom edge. Record this measurement as the overall height of the mirror.
Next, measure the visible glass area within the frame. This measurement is important if the intention is to replace the mirror glass without replacing the frame. Place the measuring tape along the inner edge of the frame and extend it horizontally to the opposite inner edge. Ensure that the tape is level and straight. Record this measurement as the visible glass width. Repeat this process for the height, measuring from the top inner edge of the frame to the bottom inner edge. Record this measurement as the visible glass height.
It is also useful to measure the width of the frame itself. This measurement can be helpful when selecting a new frame or determining the overall aesthetic of the mirror. Place the measuring tape along the outer edge of the frame and extend it to the inner edge. Record this measurement as the frame width. Repeat this process at different points around the frame to ensure that the width is consistent. If the frame is not uniform in width, record the minimum and maximum widths.
As with frameless mirrors, documenting the measurements is crucial. Record the overall width and height, the visible glass width and height, and the frame width in a clear and organized manner. Specify the units of measurement. Also, note the style and material of the frame, as this information may be helpful when selecting a replacement frame or matching the mirror to existing bathroom decor.
Accounting for Obstacles and Special Features
Bathrooms often contain obstacles or special features that must be considered when measuring a mirror. These obstacles may include light fixtures, electrical outlets, or other bathroom fixtures that are located near the mirror. Special features may include beveled edges, cutouts for fixtures, or unusual shapes. The correct measurement and documentation of these elements are imperative for proper installation and functionality.
When measuring a mirror that is located near a light fixture or electrical outlet, the dimensions of the fixture must be considered. Measure the distance from the edge of the mirror to the fixture. This measurement will help to ensure that the mirror does not interfere with the operation of the fixture. Also, note the location of the fixture in relation to the mirror. This information will be useful when planning the installation of a new mirror.
If the mirror has any cutouts for lighting fixtures, outlets, or other features, measure the size and location of these cutouts. These measurements will be essential when ordering a replacement mirror or modifying an existing mirror. Use a ruler or caliper to measure the diameter or dimensions of the cutout. Also, measure the distance from the edge of the mirror to the center of the cutout. This information will ensure that the cutout is properly positioned on the new mirror.
Mirrors with beveled edges require special attention during the measurement process. A beveled edge is a decorative edge that is angled or chamfered. The width of the bevel can vary, and this variation must be accounted for when measuring the mirror. Measure the overall width and height of the mirror, including the bevel. Then, measure the width of the bevel itself. This information will be useful when ordering a replacement mirror with a beveled edge.
In cases where the mirror has an unusual shape, such as an arch or a curve, it may be necessary to create a template. A template can be created by tracing the outline of the mirror onto a large piece of paper or cardboard. The template can then be used to ensure that the new mirror matches the shape of the existing mirror. When creating a template, be sure to include any cutouts or other special features.
After measuring the mirror and accounting for any obstacles or special features, it is important to double-check all measurements. Verify that the measurements are accurate and consistent. It is also helpful to take photographs of the mirror and its surroundings. These photographs can be used as a visual reference during the installation process. Proper planning and attention to detail are essential for ensuring a successful mirror installation.

Bathroom Mirror Size Calculator

Bathroom Mirror Size Calculator

How To Choose The Best Size Mirror Olde Good Things

Mirrored Cabinets And Mirrors Guide Kohler

How To Measure Your Space For A Large Wall Mirror 2 Steps

Measuring Frame Design

How To Frame A Bathroom Mirror Nest For Less

How To Create A Diy Mirror Frame For Your Bathroom

Better Bevel 24 In X Metal Framed Round Bathroom Vanity Mirror Nickel 20056 The Home Depot

How To Measure For The Perfect Bathroom Mirror Vanities Depot