How to Make a Bathroom Mirror Frame
A framed bathroom mirror adds a touch of elegance and completes the room's aesthetic. Building a frame is a manageable DIY project that can significantly enhance a bathroom's visual appeal. This article provides a comprehensive guide to constructing a bathroom mirror frame, covering material selection, measurements, assembly, and finishing.
1. Choosing the Right Materials
Material selection is crucial for a bathroom mirror frame due to the humid environment. Opt for moisture-resistant materials to prevent warping and damage. Popular choices include:
- Treated lumber: Pressure-treated wood offers excellent water resistance and durability.
- PVC trim: Polyvinyl chloride trim is entirely waterproof and comes in various styles, offering a low-maintenance solution.
- Composite wood: Engineered wood products designed for exterior use can also be suitable, but ensure they are rated for high-moisture areas.
Beyond the frame material, consider adhesives designed for humid environments, such as waterproof construction adhesive and silicone sealant. Choosing the right fasteners is equally important. Stainless steel or galvanized screws are recommended to prevent rust.
2. Accurate Measurements and Cutting
Precise measurements are essential for a professional-looking frame. Measure the mirror's dimensions carefully, adding the desired frame width to each side. For example, for a 24-inch wide mirror and a desired 2-inch frame, cut four pieces: two at 30 inches (24 + 2 + 2) and two at the mirror's height plus 4 inches (2 for each side).
A miter saw achieves the cleanest and most accurate 45-degree angle cuts required for joining the frame pieces. For a simpler approach, a hand saw and miter box can be utilized. Exercise caution and double-check all measurements before cutting.
3. Assembling the Frame
Once the pieces are cut, dry-fit them around the mirror to ensure a proper fit. Any minor adjustments can be made before applying adhesive. Apply a thin bead of waterproof wood glue to each mitered edge and join the pieces together. Reinforce the joints with clamps, ensuring the corners are square.
For added stability, consider using wood biscuits or dowels. These reinforce the joints and help align the pieces during assembly. Once the glue has dried, carefully remove the clamps.
4. Attaching the Frame to the Mirror
There are two primary methods for attaching the frame to the mirror: adhesive or clips. For the adhesive method, apply a strong, waterproof construction adhesive to the back of the frame, ensuring even distribution. Carefully position the frame onto the mirror, pressing firmly to ensure proper adhesion.
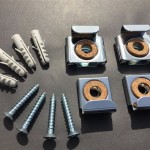
Alternatively, mirror clips can be used. These clips are secured to the back of the frame and then grip the edges of the mirror, holding it securely in place. This method allows for easier removal of the mirror if needed.
5. Finishing the Frame
The final step involves finishing the frame to protect it from moisture and enhance its appearance. Apply a coat of primer specifically designed for the chosen frame material. Once the primer has dried, apply several coats of moisture-resistant paint or sealant. Allow ample drying time between coats.
Alternatively, consider staining the wood for a more natural look. Ensure the stain is compatible with bathroom environments. Apply a protective sealant after the stain has dried. This will further protect the frame from moisture and enhance its longevity.
6. Installation Considerations
Prior to installation, ensure the wall surface is clean and dry. If installing over existing tile, use appropriate anchors and screws. The frame can be mounted directly to the wall using screws or heavy-duty adhesive, depending on its weight and the wall construction. If using adhesive, ensure it is formulated for use in bathrooms.
For a professional installation, use shims to level the frame during installation. This will ensure the mirror hangs straight and prevents any gaps between the frame and the wall. Once the frame is securely in place, apply a bead of silicone sealant around the perimeter where the frame meets the wall. This creates a waterproof seal, preventing moisture from seeping behind the frame and damaging the wall.
7. Safety Precautions
Always prioritize safety when undertaking any DIY project. Wear appropriate safety glasses and a dust mask when cutting and sanding. Ensure adequate ventilation when working with adhesives, paints, and stains. Follow all manufacturer instructions for the materials and tools being used.

Mirror Frame Diy How To Update A Basic Bathroom Our Faux Farmhouse

Diy Bathroom Mirror Frame For Under 10 O Hayley Blog

How To Frame Out That Builder Basic Bathroom Mirror For 20 Or Less

Mirror Frame Diy How To Update A Basic Bathroom Our Faux Farmhouse

Diy Stick On Mirror Frame Sawdust Sisters

How To Frame A Bathroom Mirror Easy Casa Watkins Living

How To Make A Diy Bathroom Mirror Frame Thediyplan

Diy Bathroom Mirror Frame For Under 10 O Hayley Blog

Bathroom Mirror Frames 2 Easy To Install Sources A Diy Tutorial Retro Renovation

How To Make An Easy Diy Bathroom Mirror Frame Momhomeguide Com


