How to Make a DIY Mirror Frame
Adding a custom frame to a mirror can elevate its aesthetic appeal and personalize your space. Creating a DIY mirror frame allows you to express your creativity and tailor the design to your preferences. Whether you prefer a rustic, modern, or eclectic style, this project offers a satisfying way to enhance your home decor. This guide will provide step-by-step instructions on how to craft a DIY mirror frame, covering materials, tools, and techniques.
Choosing Materials and Tools
The first step in crafting a DIY mirror frame is selecting the right materials and tools for your project. The materials you choose will determine the overall look and style of your frame. Common options include:
- Wood: Wood is a classic and versatile material for framing mirrors. Choose from various types like pine, oak, or walnut, depending on your desired aesthetic and budget.
- Metal: Metal frames offer a modern and industrial feel. Aluminum, brass, or iron are popular choices, with each offering unique visual characteristics.
- Plastic: Plastic frames can be lightweight and affordable, making them suitable for smaller mirrors or projects with a contemporary look.
- Rope: For a rustic or bohemian style, rope can create a unique and textured frame.
Beyond the framing material, you'll need essential tools for construction and assembly. These include:
- Measuring tape: Measure the mirror accurately for precise frame dimensions.
- Saw: Cut the framing material to size. A miter saw provides clean, angled cuts for corners.
- Screwdriver or drill: Secure the frame pieces together if using wood or metal.
- Staple gun or glue: Attach the frame to the mirror if using rope or other flexible materials.
- Sandpaper: Smooth out any rough edges and prepare the frame for finishing.
- Paint or stain: Customize the color and finish of your frame to match your decor.
- Clamps: Hold the frame together while securing it to the mirror.
Creating a Mirror Frame from Wood
Creating a wood frame for your mirror is a classic approach that offers versatility in style and design. Here's a step-by-step guide:
- Measure and Cut: Measure all sides of your mirror and add the desired frame width to each side. Cut four pieces of wood to these dimensions using a saw. For mitered corners, use a miter saw and cut each piece at a 45-degree angle.
- Assemble the Frame: Align the wood pieces and secure them together using wood glue and screws. If using mitered corners, ensure they fit perfectly and create a clean, sharp corner.
- Sand and Finish: Once the glue has dried, sand the entire frame to smooth out any rough edges. Apply a coat of paint, stain, or varnish to achieve your desired finish. Allow the finish to dry completely before proceeding.
- Attach the Frame: Position the frame around the mirror, ensuring it's centered. Use glue, staples, or screws to attach the frame securely to the mirror. Consider using a strong adhesive specifically designed for adhering to glass.
- Hang Your Mirror: Once the frame is securely attached, you can hang the mirror using a suitable hanging system, such as D-rings and wire, or an adhesive hook.
Creating a Rope Frame
A rope frame offers a rustic and textured look, adding a unique dimension to your mirror. Here's a guide to crafting a rope frame:
- Measure and Cut: Measure all sides of your mirror and add the desired frame width to each side. Cut four pieces of rope to these dimensions. Since rope is flexible, it's best to use a ruler and marker to mark the desired lengths before cutting.
- Secure the Rope: Place the mirror flat on a work surface. Start with one side of the mirror and attach the rope using a staple gun or strong glue. Wrap the rope around the corner and continue securing it to the next side of the mirror. Repeat this process for all four sides.
- Trim and Finish: Once the rope is secured, use scissors to trim any excess rope neatly. If desired, you can add a decorative touch to the corners by using decorative knots or braiding the rope.
- Hang your Mirror: You can use adhesive hooks or hanging wire to hang your rope-framed mirror, depending on the weight of the mirror and your desired hanging method.
Creating a Metal Frame
Metal frames provide modern, industrial, or vintage aesthetics, depending on the chosen metal and finishing techniques. Here's a guide to creating a metal frame:
- Measure and Cut: Measure all sides of your mirror and add the desired frame width to each side. Cut four pieces of metal to these dimensions using metal shears or a metal-cutting saw. Use a miter saw for precise angled cuts if creating a mitered frame.
- Assemble the Frame: Align the metal pieces and secure them together using metal screws or rivets. For mitered corners, ensure the cuts are precise and the corners are flush.
- Finish the Frame: Once the frame is assembled, sand the edges for smoothness. Apply a primer to the metal, followed by a coat of paint or metallic spray paint to achieve your desired finish. Allow the finish to dry completely.
- Attach the Frame: Position the metal frame around the mirror, ensuring it's centered. Use glue, staples, or screws to attach the frame securely to the mirror. Ensure the chosen attachment method is suitable for the weight of the metal frame and the mirror.
Remember to measure carefully and allow ample time for the glue and paint to dry completely. You can experiment with different textures, colors, and finishes to create a unique and personalized mirror frame.

How To Build A Mirror Frame Simple Woodworking

30 Diy Mirror Frames Scratch And Stitch
:max_bytes(150000):strip_icc()/bloomingdiyer-372b1cae2a6c43af917f3bea506c11da.jpg?strip=all "26 Diy Mirror Frame Ideas To Inspire Your Next Project")
26 Diy Mirror Frame Ideas To Inspire Your Next Project

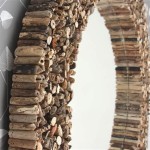
Easy Driftwood Mirror

How To Make An Easy Diy Bathroom Mirror Frame

50 Easy Diy Mirror Frame Ideas You Can Make Right Now

How To Build A Diy Frame Hang Over Bathroom Mirror Love Our Real Life

How To Easily Make Mirror Frame Easy Diy Hot Glue S Best Out Of Waste

Diy Stick On Mirror Frame Sawdust Sisters

Diy Decorative Mirror Frame Ideas And Projects Picture Instructions