Decorative Wood Trim For Mirrors: Elevating Aesthetics and Functionality
Decorative wood trim offers a versatile and impactful way to enhance the aesthetic appeal of mirrors. From subtle enhancements to dramatic transformations, the application of wood trim can significantly alter the character of a mirror, seamlessly integrating it into the overall design scheme of a space. This article explores the various aspects of decorative wood trim for mirrors, examining the benefits, types, installation techniques, and design considerations necessary to achieve optimal results.
Mirrors, inherently reflective surfaces, serve both functional and decorative purposes. They provide practical utility for grooming and self-assessment while simultaneously contributing to the perceived size and brightness of a room. Incorporating decorative wood trim amplifies these qualities, adding texture, depth, and a sense of sophistication. The choice of wood species, profile, finish, and style all contribute to the final aesthetic outcome, allowing for tailored customization to suit diverse interior design preferences.
Enhanced Aesthetic Appeal
The primary advantage of using decorative wood trim on mirrors lies in its ability to elevate the aesthetic appeal of the mirror itself and the surrounding environment. A plain, frameless mirror, while functional, can often appear stark and impersonal. Adding wood trim introduces visual interest, transforming the mirror into a focal point or a complementary element within the room’s design narrative. The selection of wood grain, color, and profile shape influences the overall style, ranging from rustic and traditional to modern and minimalist.
The addition of trim can create a sense of visual weight and presence, particularly for larger mirrors. This is especially beneficial in situations where the mirror is intended to be a statement piece. Conversely, thinner, more delicate trims can provide a subtle enhancement, adding a touch of refinement without overpowering the surrounding décor. The versatility of wood trim allows it to adapt to a wide range of design aesthetics, making it a popular choice for both residential and commercial applications.
Furthermore, the finish applied to the wood trim plays a crucial role in determining the overall aesthetic impact. Natural wood finishes, such as clear varnish or oil, highlight the inherent beauty of the wood grain, creating a warm and inviting atmosphere. Painted finishes, on the other hand, offer a broader range of color options, allowing for seamless integration with existing color schemes or the introduction of a contrasting accent color. Stained finishes provide a middle ground, enhancing the wood grain while imparting a specific color tone.
Material Selection and Profile Considerations
The choice of wood species is a significant factor in determining the appearance and durability of the mirror trim. Hardwoods, such as oak, maple, and cherry, are renowned for their strength, longevity, and distinctive grain patterns. These woods are well-suited for high-traffic areas or situations where durability is a primary concern. Softwoods, such as pine and fir, are more economical and easier to work with, making them suitable for projects where budget is a key consideration. However, softwoods are generally more susceptible to dents and scratches.
Beyond the inherent qualities of the wood itself, the profile of the trim plays a critical role in shaping the overall aesthetic. A wide array of profile options are available, ranging from simple, geometric shapes to intricately carved designs. Common profiles include:
- Flat Trim: A simple, unadorned profile that offers a clean and modern look.
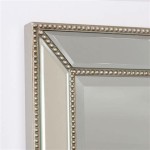
- Beaded Trim: Features a rounded bead along the edge, adding a touch of elegance and refinement.
- Cove Trim: Concave profile that creates a subtle shadow line, adding depth and visual interest.
- Ogee Trim: S-shaped profile that offers a more traditional and ornate look.
- Rope Trim: Features a twisted rope design, adding a textural element and a sense of sophistication.
The selection of the appropriate profile depends on the desired aesthetic and the overall design style of the space. A minimalist interior might benefit from a simple flat trim, while a more traditional setting could accommodate a more elaborate ogee or rope trim. The size and scale of the trim should also be proportionate to the size of the mirror and the surrounding area.
The finishing process contributes significantly to the overall longevity and aesthetic appeal of the wood trim. Proper sealing and finishing protect the wood from moisture, scratches, and UV damage, ensuring that the trim maintains its beauty for years to come. Common finishing options include painting, staining, varnishing, and oiling. The choice of finish should be guided by the desired aesthetic and the intended use of the mirror. In humid environments, such as bathrooms, it is particularly important to select a moisture-resistant finish.
Installation Techniques and Best Practices
The installation of decorative wood trim for mirrors requires careful planning and execution to ensure a secure and aesthetically pleasing result. Several installation methods can be employed, depending on the type of trim, the size of the mirror, and the desired level of permanence. Some common installation techniques include:
- Adhesive Application: Construction adhesive, specifically formulated for wood, can be used to securely attach the trim to the mirror surface. This method is relatively simple and requires minimal tools, making it suitable for smaller projects. However, it is essential to ensure that the adhesive is compatible with both the wood and the mirror backing and that the surfaces are properly cleaned and prepared before application.
- Mechanical Fasteners: Small nails or screws can be used to mechanically fasten the trim to a backing board or to the wall behind the mirror. This method provides a more secure and durable attachment, particularly for larger and heavier trim pieces. However, it requires careful planning and execution to avoid damaging the mirror or the surrounding wall.
- Combination Approach: A combination of adhesive and mechanical fasteners can provide the optimal balance of security and ease of installation. Adhesive provides immediate bonding, while mechanical fasteners offer long-term stability.
Before commencing installation, it is crucial to accurately measure and cut the trim pieces to ensure a precise fit. Miter cuts, typically at a 45-degree angle, are commonly used to create seamless corners. A miter saw provides the most accurate and efficient method for making these cuts. Once the trim pieces are cut, they should be carefully dry-fitted to ensure proper alignment before applying adhesive or fasteners.
Surface preparation is a critical step in the installation process. The mirror surface should be thoroughly cleaned and free of any dirt, dust, or grease. The back of the trim should also be cleaned and lightly sanded to improve adhesion. When using adhesive, apply a generous bead along the back of the trim and press it firmly against the mirror surface. Use clamps or tape to hold the trim in place while the adhesive cures. When using mechanical fasteners, pre-drill pilot holes to prevent splitting the wood and carefully drive the fasteners into place.
Safety is paramount during the installation process. Always wear appropriate safety glasses and gloves to protect your eyes and hands. Use caution when working with power tools and follow the manufacturer's instructions carefully. Ensure that the work area is well-ventilated when using adhesives or finishes. By following these guidelines, you can ensure a safe and successful installation of decorative wood trim for mirrors.
In conclusion, decorative wood trim provides a compelling option for enhancing the visual appeal and functional value of mirrors. The careful selection of wood species, profile shape, and finish, combined with appropriate installation techniques, can transform a plain mirror into a distinctive design element that complements and enhances the overall aesthetic of any space. The considerations outlined in this article provide a foundation for informed decision-making and successful implementation of decorative wood trim for mirrors.

Easy Diy Tutorial Adding Trim Around A Giant Mirror For Ers

How To Frame A Mirror

Mirror Frame Diy How To Update A Basic Bathroom Our Faux Farmhouse

Mirror Frame Diy How To Update A Basic Bathroom Our Faux Farmhouse

Mirror Molding The Easy Upgrade To Boring Bathrooms Mirrorchic

How To Frame A Mirror Sand And Sisal

How To Upgrade A Builder Grade Mirror Bob Vila

Baroque Oval Mirror Frame Large Wooden Ornate Trim Architectural Salvage Antique

30 Ways To Decorate With Mirrors The Cottage Market House Interior Design

Mirror Trim Ideas For Your Bathroom Mirrormate