DIY Framed Bathroom Mirror with Clips: A Comprehensive Guide
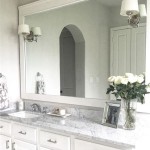
A frameless bathroom mirror, while contemporary and minimalist, sometimes lacks the visual anchor and aesthetic appeal that a framed mirror can provide. Adding a frame to an existing bathroom mirror is a relatively straightforward DIY project that can significantly enhance the room’s overall design. Using clips to secure the frame offers a clean, professional, and often more forgiving installation compared to adhesives or direct mounting. This article details the necessary steps, materials, and considerations for creating a framed bathroom mirror using clips.
Choosing the Right Materials and Tools
The success of any DIY project hinges on having the right tools and materials. Selecting these components carefully ensures not only a more efficient process but also a durable and visually appealing finished product. For this project, the primary components involve the frame itself, the clips for securing the frame, and the tools necessary for measuring, cutting, and installing the frame.
The frame material is paramount. Wood is a popular choice, offering versatility in terms of style, finish, and cost. Options include pine, which is affordable and easy to work with, but may require more preparation for moisture resistance. Hardwoods like oak or maple offer greater durability and a richer aesthetic, but are typically more expensive and require more specialized tools for cutting and shaping. MDF (Medium-Density Fiberboard) is another cost-effective option, known for its smooth surface and ease of painting, but it is particularly susceptible to moisture damage and requires diligent sealing. Consider PVC trim boards as well, since they are a waterproof alternative to wood, though design options may be limited.
The selection of the appropriate clips is equally crucial. Mirror clips come in various materials (plastic, metal), sizes, and styles. Metal clips, such as chrome or brushed nickel, often provide a more robust and aesthetically pleasing option, particularly when aiming for a modern or sophisticated look. Plastic clips are generally more economical, but may not offer the same level of durability or visual appeal. The size of the clips should be appropriate for the thickness of the frame being used. Also, consider the clip style: some are adjustable, allowing for minor variations in frame thickness or mirror placement. Spring-loaded clips are also available, offering a secure and flexible hold.
Essential tools include a measuring tape, a level, a pencil, a miter saw (or hand saw with a miter box), a drill with appropriate drill bits, sandpaper, wood filler (if using wood), paint or stain (and associated applicators), safety glasses, and gloves. A stud finder can be beneficial for locating wall studs to provide secure anchoring for the clips, especially if the mirror is large and heavy.
Prior to commencing the project, it is advisable to create a detailed materials list and ensure that all necessary items are readily available. This minimizes interruptions and helps to maintain a smooth workflow. Furthermore, take proper safety precautions by wearing safety glasses and gloves when cutting, sanding, or drilling. Always work in a well-ventilated area, especially when applying paints or stains.
Step-by-Step Installation Process
Framing a bathroom mirror involves a careful and methodical approach to ensure a professional and secure result. The installation process can be broken down into several key stages, including measuring, cutting, assembling the frame, preparing the mirror surface, and installing the frame with clips.
The first stage, accurate measurement, is critical for a well-fitting frame. Measure the dimensions of the existing mirror with precision, noting both the width and the height at multiple points to account for any slight variations. Add the desired width of the frame material to each dimension. For example, if the mirror is 24 inches wide and 36 inches high, and the frame material is 2 inches wide, the outer dimensions of the frame should be 28 inches wide and 40 inches high. It is always prudent to double-check measurements before proceeding to the cutting stage.
Cutting the frame pieces requires careful attention to detail and the use of appropriate tools. Using a miter saw or a hand saw with a miter box, cut the frame pieces to the calculated dimensions, ensuring accurate 45-degree angles at each corner. The accuracy of the angles is crucial for a seamless and professional-looking frame. After cutting, dry-fit the frame pieces around the mirror to confirm the accuracy of the cuts. Make any necessary adjustments before proceeding to the assembly stage.
Assembling the frame involves joining the four frame pieces together to form a complete rectangular frame. Apply wood glue to the mitered edges and clamp the frame together using corner clamps or bar clamps. Ensure that the frame is square by measuring the diagonals; they should be equal in length. Allow the glue to dry completely according to the manufacturer's instructions, typically for at least 24 hours. Once the glue is dry, remove the clamps and sand any rough edges or imperfections. If using wood, fill any gaps or imperfections with wood filler, allow it to dry, and sand it smooth. Apply the desired finish to the frame, such as paint or stain, following the manufacturer's instructions. Multiple coats may be necessary for optimal coverage and durability. Allow the finish to dry completely before proceeding to the next stage.
Preparing the mirror surface involves cleaning the mirror and marking the clip locations. Clean the mirror thoroughly to remove any dirt, dust, or fingerprints. Use a glass cleaner and a lint-free cloth for best results. Position the assembled frame around the mirror and mark the locations for the clips on the wall behind the mirror. The number of clips required will depend on the size and weight of the mirror and frame. Generally, at least four clips are recommended, one at each corner. For larger mirrors, additional clips may be necessary along the sides and top. Ensure the clips are placed symmetrically and evenly spaced. Use a level to ensure the clips are aligned horizontally and vertically.
The final stage involves installing the frame with clips. Pre-drill holes at the marked locations on the wall, using a drill bit appropriate for the wall material (e.g., drywall, plaster, or tile). If drilling into tile, use a specialized tile drill bit to prevent cracking. Insert wall anchors into the pre-drilled holes. Position the clips over the wall anchors and secure them with screws. Tighten the screws until the clips are firmly attached to the wall, but avoid over-tightening, which could damage the wall or the clips. Carefully slide the mirror and frame into the clips, ensuring that the frame is securely held in place. Double-check that the mirror is level and adjust the clips as necessary.
Troubleshooting and Maintenance
Even with careful planning and execution, challenges may arise during the DIY framing process. Addressing these issues effectively ensures a successful and long-lasting result. Regular maintenance is also crucial for preserving the appearance and structural integrity of the framed mirror.
One common issue is inaccurate measurements. If the frame pieces are not cut to the correct dimensions, the frame may not fit properly around the mirror. If the frame is too small, it will need to be recut. If the frame is too large, minor adjustments can be made by sanding or trimming the edges. However, excessive discrepancies may require recutting the frame pieces entirely. Always double-check measurements before cutting to minimize the risk of errors.
Another potential problem is misaligned miter joints. If the miter joints are not accurately aligned, the frame will not be square and the corners will not meet properly. This can be caused by inaccurate cuts or improper clamping during assembly. Ensure that the miter saw or miter box is properly calibrated and that the frame pieces are securely clamped during gluing. If the miter joints are slightly misaligned, wood filler can be used to fill the gaps. However, significant misalignment may require disassembling the frame and recutting the affected pieces.
Clip placement is also essential for a secure and level installation. If the clips are not properly aligned, the mirror may be crooked or unstable. Use a level to ensure that the clips are aligned horizontally and vertically. If the clips are not securely attached to the wall, the mirror may be at risk of falling. Use wall anchors appropriate for the wall material and ensure that the screws are tightened securely. If the wall material is weak or damaged, consider using larger wall anchors or repositioning the clips to a more stable location.
Maintaining the framed mirror involves regular cleaning and inspection. Clean the mirror regularly with a glass cleaner and a lint-free cloth to remove any dirt, dust, or fingerprints. Avoid using abrasive cleaners or scouring pads, which could scratch the mirror or damage the frame finish. Inspect the frame regularly for any signs of damage, such as cracks, chips, or peeling paint. Repair any damage promptly to prevent further deterioration. If the frame is made of wood, apply a sealant or varnish periodically to protect it from moisture. Inspect the clips regularly to ensure that they are securely attached to the wall and that the mirror is securely held in place. Tighten any loose screws as necessary. By addressing these issues promptly and performing regular maintenance, the framed bathroom mirror can be enjoyed for years to come.

Diy Bathroom Mirror Frame Without Removing Clips Her Happy Home

Mirror Frame Diy How To Update A Basic Bathroom Our Faux Farmhouse

Diy Stick On Mirror Frame Sawdust Sisters

How To Make An Easy Diy Bathroom Mirror Frame Momhomeguide Com

How To Make An Easy Diy Bathroom Mirror Frame Momhomeguide Com

How To Frame A Mirror Sand And Sisal

Diy Bathroom Mirror Frame Without Removing Clips Her Happy Home Mirrors Apartment Decor

Easy Diy Tutorial Adding Trim Around A Giant Mirror For Ers

How To Frame A Bathroom Mirror Over Plastic Clips Somewhat Simple

How To Frame A Bathroom Mirror Over Plastic Clips Somewhat Simple