DIY Full-Length 3-Way Mirror
A full-length 3-way mirror offers a comprehensive view of one's appearance, valuable for checking outfits, assessing posture, and practicing presentations. While commercially available options exist, constructing a DIY 3-way mirror allows for customization of size, materials, and finishes to perfectly suit individual needs and aesthetics. This article provides a detailed guide to building a full-length 3-way mirror.
Materials Required: The project requires three identical mirrors, preferably full-length. The specific dimensions depend on individual needs. Additional materials include wood for the frame, hinges, screws, measuring tools (tape measure, square), a saw (circular saw or hand saw), a drill, sandpaper, wood glue, and finishing materials (paint, stain, or varnish).
Mirror Selection: Choosing the right mirrors is crucial. Standard mirror thicknesses are typically between 1/8 inch and 1/4 inch. Thicker mirrors offer greater durability but increase the overall weight and cost. Consider the existing décor when selecting the mirror shape, whether rectangular, square, or a more decorative style. Ensure the mirrors are free from cracks or imperfections.
Frame Construction: The frame provides structural support and houses the mirrors. Hardwoods like oak or maple offer durability and a polished look, while softer woods like pine are more economical and easier to work with. Cut the wood pieces according to the desired dimensions of the mirror frame, ensuring accurate measurements for a snug fit. The frame pieces should be slightly larger than the mirrors to allow for secure mounting.
Assembling the Frame: Assemble the frame using wood glue and screws. Apply wood glue to the joining edges of the frame pieces and clamp them together securely. Pre-drill pilot holes to prevent the wood from splitting and then drive screws into the joints for added strength. Ensure the frame is square and level throughout the assembly process. Check the corners with a square and make adjustments as necessary.
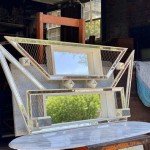
Attaching the Side Mirrors: Position the two side mirrors onto the frame backing. Use hinges to connect the side mirrors to the center mirror frame. Ensure the hinges are strong enough to support the weight of the mirrors and allow them to fold inwards and outwards smoothly. The placement of the hinges is crucial for proper alignment and functionality. Mark the hinge locations carefully and pre-drill pilot holes before attaching the hinges with screws.
Mounting the Center Mirror: Securely attach the center mirror to the backing of the frame. This can be achieved using mirror adhesive, clips, or a combination of both. Mirror adhesive provides a strong bond but requires careful application to avoid any seepage onto the mirror surface. Clips offer a more adjustable option and allow for easy replacement if needed. Ensure the center mirror is flush with the frame for a clean, professional finish.
Finishing Touches: Once the mirrors are securely attached, sand any rough edges or imperfections on the frame. Apply the chosen finish, whether paint, stain, or varnish, to protect the wood and enhance the aesthetic appeal. Multiple coats may be required for optimal coverage and durability. Allow sufficient drying time between coats. Install mounting hardware on the back of the frame for hanging the completed 3-way mirror.
Safety Precautions: When working with glass mirrors and power tools, prioritize safety. Wear safety glasses to protect eyes from potential shards of glass or wood debris. Handle the mirrors carefully to avoid cracking or chipping. Use appropriate safety equipment when operating power tools and follow manufacturer instructions. When cutting wood, ensure the work area is well-ventilated.
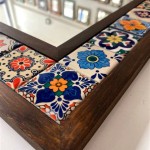
Customization Options: The basic design can be adapted to suit individual preferences and needs. Consider adding decorative molding to the frame for an ornate look. Incorporate LED lighting strips around the perimeter of the mirrors to enhance visibility. Choose different wood finishes to complement existing furniture or décor. The addition of shelves or hooks to the frame can further enhance functionality.
Positioning and Usage: Place the 3-way mirror in a well-lit area to optimize its functionality. Natural light is ideal, but supplemental lighting can be used as needed. Ensure the mirror is positioned on a stable surface and securely mounted to the wall to prevent tipping. Adjust the side mirrors to achieve the desired viewing angles.

Do It Yourself Ladies Diyl 3 Way Mirror All You Need 1 Power Drill Long Mirrors 4 6 Door Hinges Some S Obvi Remodel Bedroom Diy Home

Pin By Christina Jones On Done It Three Way Mirror Diy Wardrobe

Tutorial Diy Three Way Mirror Sewing Craftgossip Com 3 Mirrors

Full Length Three Way Rolling Mirror Diy Jewelry Storage

Cbhm Three Way Mirror For B Bedroom Diy Home

Diy Tri Fold Mirror Trifold

Tri Fold Mirror For A Stylish Home

Trifold Mirror With Sideways Shelf Affordable Home Decor

3 Way Mirror Trifold Tri Fold Makeup Diy Haircut Tool To Self Cut Trim Or Shave At Home Travel With Height Adjustable Telescoping Hooks Com

3 Way Mirror For Dressing Room And Closet