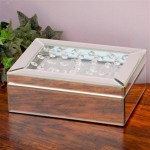
DIY Mirrored Side Table: A Touch of Glamour for Your Home
A mirrored side table can add a touch of elegance and sophistication to any room. The reflective surfaces create an illusion of space, making even small rooms feel larger. This article will guide you through creating your own mirrored side table, offering a cost-effective alternative to purchasing a pre-made piece. With a bit of patience and the right materials, you can construct a bespoke table that perfectly complements your existing decor.
Choosing the Right Materials
The foundation of your mirrored side table lies in the quality of the materials chosen. Selecting appropriate materials ensures durability and a professional finish. The core structure can be built from various materials, including wood, MDF (medium-density fiberboard), or even repurposed furniture. Wood offers a classic look and can be stained or painted to match existing furniture. MDF is a cost-effective and readily available option known for its smooth surface, ideal for adhering mirror tiles. Repurposing an old nightstand or small table adds a sustainable element to the project.
For the mirrored surface, adhesive mirror tiles are the most common and user-friendly choice. These tiles are readily available in various sizes and shapes, offering flexibility in design. Ensure the tiles are specifically designed for adhesive application to furniture. Standard glass mirrors, while potentially cheaper, require specialized cutting and mounting techniques, making them less suitable for DIY projects. High-quality adhesive is essential for a lasting bond between the tiles and the table surface. Consider using a construction adhesive specifically designed for mirrors to ensure a secure and durable hold.
Finally, finishing touches such as paint, sealant, or decorative trim can elevate the final look of your mirrored side table. Metallic paints in gold, silver, or copper can add a touch of glamour, while a clear sealant protects the mirrored surface from scratches and smudges. Decorative molding can be applied to the edges of the tabletop for a more refined and polished appearance.
Constructing the Table Frame
Before beginning assembly, it's crucial to have a clear plan. Sketching a design helps visualize the final product and ensures accurate measurements. Determine the desired height, width, and depth of the table, keeping in mind the intended placement and functionality. If repurposing an existing piece of furniture, assess its structural integrity and make necessary repairs before proceeding.
For building a table from scratch using wood or MDF, precise cutting and joining are essential. A miter saw ensures clean, accurate cuts, while wood glue and screws provide a strong and stable frame. If constructing a table with legs, ensure they are securely attached to the tabletop using appropriate hardware and joinery techniques. Reinforce joints with corner braces for added stability, especially if the table will be subjected to regular use.
Sanding the entire frame smooth is critical before applying the mirror tiles. This creates a level surface for adhesion and ensures a professional finish. Use progressively finer grits of sandpaper to achieve a smooth, even surface, removing any splinters or rough edges. Wipe down the frame with a tack cloth to remove any sanding dust before proceeding to the next step.
Applying the Mirror Tiles
Applying the mirror tiles is a meticulous process that requires patience and precision. Start by carefully planning the layout of the tiles to minimize seams and ensure a symmetrical appearance. Begin applying the tiles from the center of the tabletop, working outwards towards the edges. This ensures a balanced and visually appealing result.
Peel off the backing paper from each tile individually and carefully position it on the table surface. Apply even pressure to ensure a secure bond between the tile and the adhesive. Maintain consistent spacing between tiles to create clean grout lines. Small plastic spacers can be used to ensure uniformity. Avoid pressing too hard, as this could crack the mirror tiles.
Once all tiles are applied, allow the adhesive to cure completely according to the manufacturer's instructions. This may take several hours or even overnight. After the adhesive has cured, apply grout to the spaces between the tiles, if desired. This adds a finished look and further protects the edges of the tiles. Wipe away excess grout with a damp cloth and allow it to dry completely. Finally, apply a sealant to the mirrored surface to protect it from scratches and smudges, enhancing its longevity.

Diy Mirror Side Table Collective Gen

Diy Glam Mirror Side Table With Storage

Home Decor Diy Mirrored Side Tables Easy Inexpensive

Diy Pro Geneva Vanderzeil Transforms An Old Cabinet Into Elegant Mirrored End Table Daily Mail

Mirrored Side Table Diy Craftgawker

Diy Glam Mirror Side Table With Storage

Diy Pro Geneva Vanderzeil Transforms An Old Cabinet Into Elegant Mirrored End Table Daily Mail

Diy Mirror Coffee Table With Led Lights And Diamond Rhinestones Glam Furniture Mirrored Tables

Diy Mirrored Side Table Made Out Of Cardboard

Diy Mirrored Coffee Table Hometalk