Framing A Bathroom Mirror: A Comprehensive Guide
Bathroom mirrors are ubiquitous fixtures, primarily serving a functional purpose. However, their aesthetic impact on the overall bathroom design is often underestimated. Simply replacing a builder-grade, unframed mirror with a framed one can dramatically elevate the space's style and perceived value. This article provides a detailed guide on framing a bathroom mirror, covering various framing options, installation techniques, and considerations for achieving a professional and aesthetically pleasing result.
Understanding the Benefits of Framing a Bathroom Mirror
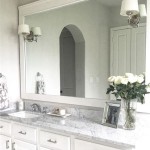
Framing a bathroom mirror offers several advantages beyond mere aesthetics. One key benefit is the creation of a focal point within the bathroom. An unframed mirror, particularly a large one, can appear cold and indistinct. Adding a frame provides definition and draws the eye, anchoring the mirror within the room's design scheme.
Furthermore, a frame can enhance the perceived value of the bathroom. A well-chosen frame can complement existing fixtures, such as faucets, lighting, and cabinet hardware, creating a cohesive and polished look. This is especially important in bathrooms intended for guests or potential homebuyers.
Beyond aesthetics and value, framing a mirror can also serve a practical purpose. A frame can help to conceal imperfections along the edges of the mirror, especially if it was cut or installed improperly. It can also provide a small degree of protection against chipping or cracking along the edges.
Finally, framing allows for customization and personalization. The vast array of available frame styles, materials, and finishes ensures that a homeowner can find a frame that perfectly matches their individual taste and the overall design of their bathroom.
Exploring Framing Options: Styles, Materials, and Techniques
The selection of a frame for a bathroom mirror involves careful consideration of several factors, including the desired aesthetic, the existing bathroom décor, and the budget. There are numerous styles and materials available, each offering unique characteristics and advantages.
Traditional frames, often crafted from wood, are a popular choice for bathrooms with a classic or formal design. Common wood types include oak, maple, and cherry, which can be stained or painted to match the bathroom's color palette. Intricate moldings and decorative carvings can add a touch of elegance and sophistication.
Modern and contemporary bathrooms often benefit from frames with clean lines and minimalist designs. Metal frames, such as brushed nickel, chrome, or black matte, are excellent choices for achieving this aesthetic. Alternatively, frameless mirrors with beveled edges can provide a subtle and sophisticated look.
For bathrooms with a rustic or farmhouse-inspired design, reclaimed wood frames are a popular option. These frames often feature natural imperfections and textures, adding character and warmth to the space. Distressed paint finishes can further enhance the rustic appeal.
Beyond traditional materials, there are also options such as resin or composite frames. These materials are often more resistant to moisture and humidity, making them ideal for bathroom environments. They are also available in a wide range of colors and styles, offering flexibility in design.
The method of attaching the frame to the mirror is another important consideration. Several options are available, including adhesive-backed frames, clip-on frames, and custom-built frames that are attached directly to the wall around the mirror. Each method has its own advantages and disadvantages in terms of ease of installation, durability, and adjustability.
Adhesive-backed frames are typically the easiest to install, as they simply adhere to the surface of the mirror. However, they may not be as durable as other options and may not be suitable for larger or heavier frames. Clip-on frames are attached to the mirror using clips or brackets, providing a more secure and stable attachment. Custom-built frames are the most labor-intensive option but offer the greatest degree of customization and control over the final appearance.
Step-by-Step Guide to Installing a Bathroom Mirror Frame
Installing a bathroom mirror frame can be a manageable DIY project with the right tools and preparation. The following steps provide a comprehensive guide to installing a frame, regardless of the chosen style or material.
Step 1: Measure the Mirror. Accurate measurements are crucial for ensuring a proper fit. Measure the width and height of the mirror precisely, taking into account any beveled edges or irregularities. Add the desired width of the frame to each measurement to determine the overall dimensions of the framed mirror. Consider the thickness of the frame material when calculating these dimensions.
Step 2: Choose and Purchase the Frame. Based on the desired style, material, and measurements, select a frame that is appropriate for the bathroom décor. If purchasing a pre-made frame, ensure that it is slightly larger than the mirror dimensions to allow for slight adjustments during installation. If building a custom frame, carefully cut the frame pieces to the required dimensions using a miter saw or other appropriate cutting tool.
Step 3: Prepare the Mirror Surface. Clean the surface of the mirror thoroughly with a glass cleaner to remove any dirt, dust, or fingerprints. This will ensure a strong and secure bond between the frame and the mirror. Allow the mirror to dry completely before proceeding. Use masking tape to protect the wall surrounding the mirror.
Step 4: Apply Adhesive (if applicable). If using an adhesive-backed frame, carefully peel off the protective backing and align the frame with the mirror edges. Apply even pressure to ensure a firm and secure bond. If using a separate adhesive, apply a bead of mirror adhesive to the back of the frame, following the manufacturer's instructions. Avoid using excessive adhesive, as it may squeeze out from under the frame and create a mess. Use construction adhesive that is specifically designed for mirrors to avoid damaging the reflective backing.
Step 5: Attach the Frame. Carefully position the frame around the mirror, ensuring that it is aligned properly with the edges. Apply gentle pressure to secure the frame to the mirror. If using clips or brackets, attach them to the back of the frame before positioning it around the mirror. Ensure that the clips are securely fastened to both the frame and the mirror.
Step 6: Secure the Frame (if necessary). If the frame is particularly heavy or if the adhesive bond is not sufficient, consider adding additional support using small screws or nails. Drill pilot holes through the frame and into the wall behind the mirror, taking care not to damage the mirror itself. Secure the frame to the wall using appropriate screws or nails. Alternatively, use construction adhesive to secure the frame directly to the wall.
Step 7: Clean Up and Finishing Touches. Once the frame is securely attached, remove any excess adhesive or debris. Clean the surface of the mirror and the frame with a glass cleaner. Inspect the installation for any imperfections and make any necessary adjustments. Add any finishing touches, such as caulk or paint, to conceal gaps or seams. Remove the masking tape carefully without damaging the surrounding wall.
Considerations for Choosing the Right Frame
Several factors should be considered when selecting a frame for a bathroom mirror. The size and shape of the mirror are important considerations, as are the overall design and color scheme of the bathroom.
For smaller bathrooms, a thin frame can help to create a more open and airy feel. A thicker frame may overwhelm the space and make it feel cramped. For larger bathrooms, a bolder and more substantial frame can add visual weight and create a focal point.
The shape of the mirror should also be considered when selecting a frame. A rectangular mirror typically looks best with a rectangular frame, while a round mirror may benefit from a more decorative or ornate frame. Consider the proportions of the mirror and the frame to ensure a balanced and harmonious appearance.
The existing design and color scheme of the bathroom should also influence the choice of frame. A frame that complements the existing fixtures, such as faucets, lighting, and cabinets, will create a cohesive and polished look. Consider the materials and finishes of these fixtures when selecting a frame to ensure a consistent aesthetic.
Finally, the budget is an important consideration. Frames can range in price from relatively inexpensive adhesive-backed frames to more expensive custom-built frames. Determine a budget before beginning the selection process and choose a frame that offers the best value for the money. Consider the long-term durability and maintenance requirements of the frame when making a decision.
By carefully considering these factors, homeowners can select a bathroom mirror frame that enhances the aesthetic appeal of their bathroom, increases its perceived value, and provides a durable and long-lasting solution.

How To Install A Mirrorchic Bathroom Mirror Frame Momhomeguide Com

Mirror Frame Diy How To Update A Basic Bathroom Our Faux Farmhouse

How To Frame A Mirror

Mirror Frame Diy How To Update A Basic Bathroom Our Faux Farmhouse

How To Frame Out That Builder Basic Bathroom Mirror For 20 Or Less

Framing A Bathroom Mirror Tempting Thyme

Diy Framed Bathroom Mirrors Living With Lady

Diy Stick On Mirror Frame Sawdust Sisters

Diy Bathroom Mirror Frame With Molding The Happier Homemaker

Diy Bathroom Mirror Frame Without Removing Clips Her Happy Home