Framing Bathroom Mirrors
Framing a bathroom mirror elevates the room's aesthetic, adding a touch of sophistication and personality. Whether undertaking a bathroom renovation or simply seeking a quick refresh, a framed mirror can significantly impact the overall design. This article explores the various aspects involved in framing bathroom mirrors, from choosing the right frame materials to understanding the installation process.
Selecting the Right Frame Material
The bathroom environment presents unique challenges for framing materials due to humidity and potential water exposure. Opting for moisture-resistant materials is crucial to ensure the frame's longevity and prevent issues such as warping, rotting, or discoloration. Several suitable options exist, each offering distinct aesthetic qualities.
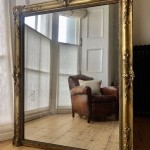
Wood frames, while classic and versatile, require careful consideration in a bathroom setting. Select treated wood specifically designed for high-moisture areas or opt for naturally water-resistant varieties like cedar or teak. Proper sealing and finishing are vital for protecting the wood from moisture damage and preserving its appearance.
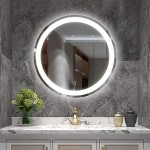
Metal frames provide a sleek and contemporary look while offering excellent durability and moisture resistance. Aluminum, stainless steel, and brass are popular choices. These materials withstand humidity well and require minimal maintenance. Powder-coated finishes add an extra layer of protection and offer various color options.
Composite materials, such as PVC and polystyrene, offer a cost-effective and moisture-resistant alternative to wood. These materials can mimic the look of wood or other finishes, providing design flexibility without the vulnerability to moisture damage. Composite frames are lightweight and easy to install, making them a practical choice for DIY projects.
Measuring and Preparing for Installation
Accurate measurements are essential for a successful framing project. Begin by carefully measuring the mirror's dimensions, noting the length and width. Consider the desired frame width and add this measurement to the mirror's dimensions to determine the overall frame size. Precise measurements ensure the frame fits snugly and securely around the mirror.
Before commencing installation, prepare the mirror surface and the surrounding wall area. Clean the mirror thoroughly to remove any dust or debris that could interfere with adhesion. If the wall surface is uneven or damaged, repair it before proceeding with the installation. This ensures a smooth and stable surface for attaching the frame.
Gather the necessary tools and materials for the installation process. These typically include a measuring tape, level, adhesive suitable for bathroom environments, finishing nails or screws, and a caulking gun. Having all necessary supplies readily available streamlines the installation process and minimizes potential delays.
Installation Methods and Techniques
Several methods exist for installing a bathroom mirror frame, each with its own advantages and considerations. The chosen method often depends on the frame material, the mirror's weight, and the desired aesthetic.
Adhesive application is a common method for lightweight frames and mirrors. Construction adhesive specifically formulated for bathroom environments provides a strong and water-resistant bond. Apply the adhesive to the back of the frame and carefully position it around the mirror, ensuring even pressure throughout. Secure the frame with painter's tape until the adhesive fully cures.
For heavier frames or mirrors, using clips or brackets provides additional support and stability. These hardware components attach to the wall and the frame, securely holding the mirror in place. This method allows for easier removal or replacement of the mirror in the future.
For a seamless and finished look, consider using decorative molding or trim to create the frame directly on the wall around the mirror. This method integrates the frame into the wall design and allows for customization of the frame's shape and style. Precise cutting and mitering of the molding are essential for a professional appearance.
After installing the frame, apply a bead of sealant around the perimeter where the frame meets the mirror and the wall. This sealant creates a watertight barrier, preventing moisture from seeping behind the frame and damaging the mirror or wall. Choose a sealant that is mildew-resistant and compatible with the frame material.
Framing a bathroom mirror is a rewarding project that can significantly enhance the room's overall appearance. By carefully considering material selection, measurement accuracy, and appropriate installation techniques, individuals can achieve a professional and long-lasting result.

How To Frame A Mirror

How To Frame A Bathroom Mirror Easy Casa Watkins Living

How To Install A Mirrorchic Bathroom Mirror Frame Momhomeguide Com

Mirror Frame Diy How To Update A Basic Bathroom Our Faux Farmhouse

How To Frame Out That Builder Basic Bathroom Mirror For 20 Or Less

Diy Framed Bathroom Mirrors Living With Lady

Mirror Frame Diy How To Update A Basic Bathroom Our Faux Farmhouse

How To Frame Out That Builder Basic Bathroom Mirror For 20 Or Less Design Mirrors Diy

How To Frame Out That Builder Basic Bathroom Mirror For 40 Off

Framing A Bathroom Mirror Tempting Thyme