How to Antique Mirror Tiles
Antique mirror tiles, with their captivating depth and ethereal shimmer, are a popular choice for adding a touch of elegance and sophistication to any space. Whether you're revamping a bathroom, adorning a living room wall, or crafting a unique piece of furniture, these versatile tiles can transform your design vision into reality. Creating antique mirror tiles yourself is a rewarding and achievable project, allowing you to customize the look and feel to perfectly complement your style. This guide will delve into the process of antiquing mirror tiles, providing step-by-step instructions and tips for achieving stunning results.
Understanding Antique Mirror Tiles
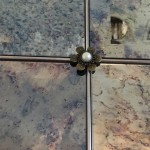
Antique mirror tiles are essentially standard mirror tiles that have undergone a process to create the appearance of age and patina. This process typically involves etching or distressing the surface, resulting in subtle variations in reflectivity and a charmingly imperfect finish. The depth and character of the antiquing can be controlled by adjusting the techniques employed. The allure of antique mirror tiles lies in their ability to evoke a sense of history and grandeur, adding a touch of vintage charm to contemporary settings.
Essential Materials and Tools
Before embarking on your antiquing journey, ensure you have the necessary materials and tools at hand. These include:
- Mirror tiles: Choose the size and quantity of mirror tiles needed for your project. Consider the desired overall effect and the scale of the space.
- Sandpaper: A variety of grits, such as 100, 200, and 400, will be used for sanding and achieving the desired degree of distress.
- Etching cream: This cream chemically etches the mirror surface, creating a frosted effect. Choose a cream specifically designed for glass or mirror etching.
- Paintbrush: A soft-bristled brush is essential for applying the etching cream evenly and precisely.
- Gloves and eye protection: Always wear gloves and eye protection when working with etching cream, as it can be irritating to skin and eyes.
- Masking tape: Use this to protect areas you don't want to etch, creating defined patterns or designs.
- Protective covering: Lay down a protective covering, such as a drop cloth or plastic sheeting, to safeguard your workspace from spills or splashes.
- Cleaning cloth: Use a clean cloth to wipe away excess etching cream and residue.
Steps to Antique Mirror Tiles
Once you have gathered your materials, follow these steps to antique your mirror tiles:
- Prepare the work area: Clear a well-ventilated space and lay down your protective covering. Ensure the work surface is smooth and stable.
- Sand the edges (optional): Sanding the edges of the mirror tiles with fine-grit sandpaper (400 grit) can create a slightly softened and aged appearance. This step is optional but adds a subtle touch of artistry to your design.
- Apply etching cream: Wearing gloves and eye protection, apply etching cream to the mirror tile surface using a paintbrush. The amount of cream applied will determine the depth and intensity of the antiquing effect. For a subtle patina, apply a thin layer. For a more pronounced effect, apply a thicker layer.
- Create patterns (optional): Use masking tape to create specific patterns or designs on the mirror tile surface before applying the etching cream. This technique allows for unique and personalized antiquing effects.
- Allow etching to dry: Follow the instructions on the etching cream packaging regarding drying time. Typically, allowing the cream to dry for several minutes or even overnight can enhance the etching effect.
- Remove etching cream: Once the etching cream has dried, use a clean cloth to wipe away the cream and residue. Be gentle to avoid scratching the mirror surface.
- Sand for a distressed look (optional): To further enhance the distressed look, use medium-grit sandpaper (200 grit) to lightly sand specific areas of the mirror tile surface. This creates subtle variations in reflectivity and depth.
- Clean and dry: Thoroughly clean the mirror tiles with a damp cloth and dry them completely. This removes any remaining residue and ensures a clean finish.
Tips for Achieving a Unique Look
To enhance the visual appeal of your antique mirror tiles, consider these tips:
- Experiment with etching techniques: Use various techniques like dabbing, swirling, or painting the etching cream to achieve unique textures and effects.
- Combine different etching patterns: Create intricate patterns by applying etching cream in varying degrees of thickness and layering different etching techniques.
- Add color: After etching, apply a thin layer of metallic paint to add a hint of color and enhance the antique effect.
- Apply a sealant: A sealant can protect the mirror tiles from moisture and damage, preserving their beauty for years to come.

Antique Mirror Tiles Vintage Müller Designs

Antique Mirror Tiles 6 Pack

Inspiration Antique Mirror Tiles Mirrored Subway Tile Diy

How To Antique A Mirror Easy No Scratching The Navage Patch

Antique Mirror Tiles Backsplash Müller Designs

72 Best Antique Mirror Splashback Ideas

Aged Foxed Antique Distressed Mirror Tile Oxford Composite

Antique Mirrored Wallpaper Mad About The House

Antique Mirror Tiles Glass

Antique Mirror Splashback