How to Build a Vanity Mirror
A vanity mirror is a staple in any bathroom or bedroom. It provides a clear and magnified view for makeup application, hair styling, and general grooming. While you can purchase a vanity mirror from various stores, building your own offers a unique and personalized touch to your space. This guide will provide you with the essential steps and tips to build a vanity mirror that meets your specific needs and aesthetic preferences.
1. Gathering Materials and Tools
The first step in constructing a vanity mirror is to gather the necessary materials and tools. The specific materials will vary depending on the design and desired features of your mirror. Here is a list of common materials and tools often used:
- Mirror: Choose a mirror size and shape that suits your space and aesthetic. You can find various options at hardware stores or online retailers.
- Wood or Metal Frame: The frame will provide support and structure to the mirror. Opt for a material and style that complements your overall interior design.
- Hardware: This includes screws, nails, hinges, brackets, and any other fasteners required to secure the mirror and frame.
- Wood Glue: Use wood glue to bond the frame pieces together for a strong and durable construction.
- Paint or Stain: Choose a color or stain that matches your desired aesthetic and complements the surrounding furniture or decor.
- Tools: A saw, drill, tape measure, level, sandpaper, paintbrush, and screwdriver are essential tools for this project.
It is essential to carefully consider your design choices and the specific materials required based on the chosen frame style and desired features. For instance, if you plan to incorporate lighting, additional materials like light fixtures, wiring, and electrical components will be necessary.
2. Constructing the Frame
Once you have gathered the necessary materials and tools, you can begin building the frame for your vanity mirror. The following steps provide a general guideline for framing construction:
- Measure the mirror and cut the frame pieces according to the dimensions. Ensure that the frame is slightly larger than the mirror to allow for a border.
- Use wood glue to join the frame pieces together, ensuring they are aligned and square. Clamp the pieces together while the glue dries.
- Once the glue has dried, reinforce the frame by adding screws or nails at the joints. Use a drill to pre-drill holes before screwing in the fasteners to prevent splitting.
- Sand the frame to create a smooth and even surface. This step helps to remove any rough edges or imperfections. Start with coarse-grit sandpaper and gradually move to finer grits for a smoother finish.
- Apply paint or stain to the frame as desired. Use multiple coats of paint or stain for a more even and durable finish. Allow each coat to dry completely before applying the next.
Variations in frame construction can occur based on the chosen materials and desired design. For example, you may choose to incorporate decorative elements like molding or decorative trim to enhance the aesthetic appeal.
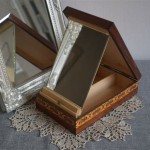
3. Attaching the Mirror
Once the frame is complete, you can attach the mirror. The following steps provide guidance for attaching the mirror securely to the frame:
- Position the mirror on the frame, ensuring that it is centered and aligned. Use a level to verify its alignment.
- If the mirror is heavy, consider using mirror clips or brackets for additional support. These are typically attached to the rear of the frame and hold the mirror securely in place.
- Use screws or nails to attach the mirror to the frame. If using screws, pre-drill holes to prevent splitting the frame. Ensure the screws are secured appropriately to prevent the mirror from falling.
- If you are using a mirror with a backing, ensure that the backing is securely attached and does not interfere with the attachment of the mirror to the frame.
Ensure the mirror is securely attached to the frame, especially if the mirror is heavy or placed in a high-traffic area. This will prevent it from falling and causing damage or injury.
4. Finishing Touches
Once the mirror is attached to the frame, you can add finishing touches to complete the vanity mirror. These include:
- Adding decorative elements: Consider adding decorative elements like molding, trim, or embellishments to enhance the aesthetic appeal of the mirror. This will add visual interest and personalization to the piece.
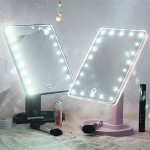
- Installing lighting: Incorporating lighting around the mirror can greatly enhance its functionality. You can choose from various lighting options, including LED strips, sconces, or vanity lights. Make sure to install the lighting safely and according to electrical codes.
- Applying a protective finish: Apply a clear coat of varnish or sealant to the frame to protect it from scratches, moisture, and wear. This will help to maintain the appearance of the mirror and prolong its lifespan.
Personalizing the vanity mirror with finishing touches allows you to create a unique piece that reflects your individual style and preferences.

10 Diy Vanity Mirror Projects That Show You In A Diffe Light

Diy Light Up Vanity Mirrors You Can Make Ohmeohmy Blog

10 Diy Vanity Mirror Projects That Show You In A Diffe Light

Diy Make Up Mirror Vanity Makeup

Diy Light Up Vanity Mirrors You Can Make Ohmeohmy Blog

Diy Vanity Mirror With Lights Under 150

10 Diy Vanity Mirror Projects That Show You In A Diffe Light

How To Diy Your Dream Vanity Mirror With Lights

Diy Step By Vanity Mirror With Dimmable Led Lights And Usb

How To Build A Vanity Mirror Ana White