How To DIY a Mirror Wall
A mirror wall can dramatically transform a space, creating the illusion of greater size and reflecting light to brighten the room. While professionally installed mirror walls can be expensive, a DIY approach offers a cost-effective alternative. This article provides a comprehensive guide to creating a mirror wall, outlining the necessary materials, tools, and step-by-step instructions.
Planning and Preparation
Careful planning is crucial for a successful mirror wall installation. This stage involves determining the desired location, measuring the wall space accurately, and selecting appropriate mirror types and sizes.
- Measure the Wall: Accurately measure the width and height of the wall designated for the mirror installation. Precise measurements are essential for calculating the required mirror area and determining the optimal arrangement.
- Choose Mirror Type: Consider various mirror options, such as individual tiles, large panels, or custom-cut pieces. Factor in the desired aesthetic, budget, and installation complexity when making this selection.
- Calculate Mirror Quantity: Based on the wall dimensions and chosen mirror size, calculate the precise number of mirrors needed. It is advisable to purchase a few extra mirrors to account for potential breakage or cutting errors.
- Prepare the Wall Surface: Ensure the wall surface is clean, smooth, and free of any debris or imperfections. Fill any holes or cracks with spackle and sand the surface smooth for optimal adhesion.
Gathering Necessary Materials and Tools
Assembling the correct materials and tools streamlines the installation process and ensures a professional finish.
- Mirrors: Procure the chosen mirrors in the required quantity, ensuring they are the correct size and type.
- Mirror Adhesive: Select a high-quality mirror adhesive specifically designed for bonding mirrors to walls. Consult product specifications to ensure compatibility with the chosen mirror and wall materials.
- Measuring Tape: A reliable measuring tape is essential for accurate measurements throughout the installation process.
- Level: A level ensures the mirrors are installed straight and evenly, contributing to a polished final appearance.
- Safety Equipment: Protect eyes and hands with safety glasses and gloves while handling mirrors and adhesive.
- Spacers (Optional): If desired, spacers can be used to create even gaps between mirror tiles, enhancing the visual aesthetic.
- Caulk Gun (for adhesive in tubes): If using adhesive in tubes, a caulk gun is necessary for application.
- Utility Knife: A utility knife is useful for opening mirror packaging and making minor adjustments.
Installation Process
This section details the step-by-step process for installing the mirrors, ensuring a secure and visually appealing outcome.
- Apply Adhesive: Following the manufacturer's instructions, apply the mirror adhesive to the back of each mirror or directly to the wall in designated spots. Ensure adequate coverage for secure bonding.
- Position the First Mirror: Carefully position the first mirror against the wall, using the level to ensure it is perfectly straight. Apply gentle pressure to secure the bond.
- Continue Installing Mirrors: Proceed with installing the remaining mirrors, maintaining consistent spacing and alignment. Use spacers, if desired, to ensure uniform gaps between tiles.
- Allow Adhesive to Dry: Allow the adhesive to dry completely according to the manufacturer's instructions. Avoid disturbing the mirrors during this period.
Finishing Touches
The final steps involve cleaning the mirrors and making any necessary adjustments for a polished and professional look.
- Clean the Mirrors: Once the adhesive is dry, clean the mirrors with a glass cleaner to remove any smudges or fingerprints. Use a soft cloth to avoid scratching the mirror surface.
- Inspect for Imperfections: Carefully inspect the mirror wall for any imperfections, such as uneven spacing or misaligned tiles. Make any necessary adjustments while the adhesive is still pliable.
- Seal Edges (Optional): For added protection against moisture and dust, consider sealing the edges of the mirror installation with a clear silicone sealant. This is especially recommended for bathroom installations.
Safety Considerations
Working with mirrors involves inherent risks. Adhering to safety precautions is essential for preventing accidents and ensuring personal safety.
- Wear Protective Gear: Always wear safety glasses and gloves to protect against potential shards of glass and adhesive.
- Handle Mirrors Carefully: Handle mirrors with care to avoid breakage. Large mirrors may require two people to lift and position safely.
- Work in a Well-Ventilated Area: Ensure adequate ventilation when working with mirror adhesives to minimize exposure to fumes.
- Dispose of Broken Glass Properly: In the event of breakage, carefully collect and dispose of broken glass fragments to prevent injuries.
By following these detailed instructions and observing safety precautions, individuals can successfully create a stunning DIY mirror wall, enhancing the aesthetic and spaciousness of their living environment.

Diy A Mirrored Wall Using Square Plates Home Studio Mirror

Diy Wall Mirror Pleass Use Horilla Glue Heavy Duty Tape It Sticks To Tiktok

Diy Large Grid Mirror Pine And Poplar

Mirror The White Thistle

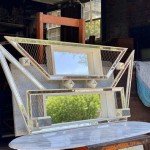
Diy Industrial Mirror Wall Under 85

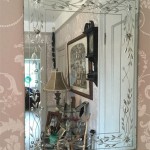
Diy Mirrored Wall

30 Diy Mirror Projects That Are Fun And Easy To Make

Diy Wall Mirrors Thirty Best Home Decor Projects

Diy Large Paneled Wall Mirror Shanty 2 Chic

16 Brilliant Diy Projects To Make Mirrors For Home Decorations Doors Decor