How To Frame A Bathroom Mirror With Trim
Framing a bathroom mirror with trim elevates the visual appeal of the space, adding a touch of elegance and custom design. This seemingly simple project can greatly impact the overall aesthetic of the bathroom. This article provides a comprehensive guide on how to achieve professional-looking results when framing a bathroom mirror.
Essential Materials and Tools
Before starting the project, gathering the necessary materials and tools ensures a smooth and efficient workflow. Proper preparation is key to a successful outcome.
* Trim molding (wood, MDF, or PVC) * Measuring tape * Miter saw or miter box and hand saw * Wood glue * Finishing nails * Nail gun or hammer * Caulk * Putty knife * Safety glasses * Sandpaper
Measuring and Cutting the Trim
Accurate measurements are crucial for achieving a seamless frame. Precise cuts ensure the trim pieces fit together perfectly around the mirror.
* Measure the mirror's length and width accurately. * Determine the desired width of the frame. * Cut the trim pieces at 45-degree angles using a miter saw or miter box and hand saw, ensuring tight-fitting corners. * Double-check measurements before making final cuts.
Applying the Trim to the Mirror
Applying the trim requires precision and care to ensure secure adhesion and a professional finish. Using the appropriate adhesive is vital for long-lasting results.
* Apply a thin bead of wood glue to the back of each trim piece. * Position the trim pieces firmly against the mirror, aligning the edges precisely. * Secure the trim with finishing nails spaced evenly along the length of each piece. * Use a nail set to countersink the nail heads slightly below the surface of the trim.
Caulking and Finishing
Caulking seals the gaps between the trim and the mirror, providing a polished and moisture-resistant finish. Proper caulking techniques are essential for a professional appearance.
* Apply a thin, even bead of caulk along the seams where the trim meets the mirror. * Smooth the caulk with a damp finger or putty knife to create a seamless seal. * Wipe away any excess caulk promptly to prevent it from drying and becoming difficult to remove.
Painting or Staining the Trim (Optional)
Painting or staining the trim allows for customization and coordination with the bathroom's décor. This step enhances the overall aesthetic appeal of the framed mirror.
* Sand the trim lightly to ensure a smooth surface for paint or stain adhesion. * Apply primer to the trim before painting (if applicable). * Paint or stain the trim according to manufacturer's instructions, applying multiple coats as needed. * Allow sufficient drying time between coats.
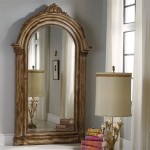
Selecting the Right Trim
Choosing the appropriate trim style and material is crucial for achieving the desired aesthetic. The trim should complement the existing bathroom décor and the mirror's shape and size.
* Consider the overall style of the bathroom (modern, traditional, etc.) when selecting the trim profile. * Choose a trim material that is suitable for the bathroom environment (moisture-resistant MDF or PVC is recommended). * The width of the trim should be proportional to the size of the mirror. Thicker trim is generally suitable for larger mirrors.
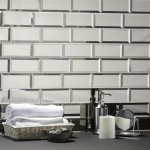
Preparing the Mirror Surface
Proper preparation of the mirror surface ensures optimal adhesion of the trim. Cleaning and degreasing the mirror's surface are essential for achieving a strong bond.
* Clean the mirror surface thoroughly with glass cleaner to remove any dust, dirt, or smudges. * Degrease the mirror surface with rubbing alcohol to ensure optimal adhesion of the trim. * Allow the mirror surface to dry completely before applying the trim.
Addressing Common Challenges
Anticipating and addressing potential challenges ensures a successful and frustration-free project. Understanding common issues and their solutions contributes to a smoother process.
* Uneven mirror edges: Use shims to create a level surface for the trim. * Gaps between trim pieces: Fill small gaps with wood filler before caulking. * Difficult-to-cut trim: Score the trim multiple times with a utility knife before cutting to prevent splintering.
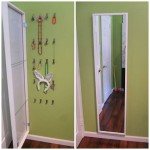
Mirror Removal (Optional)
While not always necessary, removing the mirror before framing can simplify the process, particularly for larger or heavier mirrors. This allows for greater precision and ease of handling.
* If the mirror is attached with clips, carefully remove them. * If the mirror is glued to the wall, use a putty knife or pry bar to gently separate it from the wall. * Ensure proper support for the mirror during removal to prevent breakage.

Diy Bathroom Mirror Frame With Molding The Happier Homemaker

Easy Diy Tutorial Adding Trim Around A Giant Mirror For Ers

How To Frame A Mirror

How To Frame Out That Builder Basic Bathroom Mirror For 20 Or Less

The Kids Bathroom Mirror Gets Framed House Of Hepworths

Framing A Mirror Without Miter Cuts The Kim Six Fix

Mirror Frame Diy How To Update A Basic Bathroom Our Faux Farmhouse

Easy Diy Tutorial Adding Trim Around A Giant Mirror For Ers

How To Frame Out That Builder Basic Bathroom Mirror For 20 Or Less Design Mirrors Diy Elegant

How To Build A Wood Frame Around Bathroom Mirror Young House Love