How to Frame a Mirror Using Crown Molding in Revit
Framing a mirror with crown molding in Revit can elevate a project's realism and aesthetic appeal. This detailed guide outlines the process, enabling users to achieve professional results within the software environment.
Modeling the Mirror
Before commencing the framing process, the mirror itself needs to be modeled. This provides the necessary foundation for accurate placement of the crown molding.
* Open a new Revit project or use an existing one. * Navigate to the Architecture tab and select the "Wall" tool. * Create a wall where the mirror will be placed. * Switch to a 3D view for better visualization. * Using the "Model In-Place" component family creator, build a simple rectangular extrusion representing the mirror. * Assign a reflective material to the mirror surface in the Material Browser for realistic rendering. * Place the mirror model onto the wall surface using appropriate placement tools.Creating the Crown Molding Profile
A custom crown molding profile can be generated within Revit, providing flexibility in design and ensuring precise dimensions.
* Open the Family Editor by creating a new Family or editing an existing one. Choose the "Profile" family template. * Use the drawing tools (lines, arcs, etc.) in the Family Editor to draw the desired crown molding profile. * Ensure the profile is drawn to scale and with accurate dimensions. * Save the profile family for future use.Applying the Crown Molding
With the mirror and crown molding profile prepared, the molding can be applied to create the frame.
* In the project environment, load the previously created crown molding profile family. * Select the “Wall Sweep” tool from the Architecture tab. * In the Wall Sweep Type Properties, select the custom crown molding profile. * Pick the wall where the mirror is located as the path for the wall sweep. * Adjust the location line of the wall sweep so that it aligns with the edge of the mirror model. This typically involves offsetting the location line slightly from the wall face. * If the mirror is recessed into the wall, adjust the Wall Sweep’s vertical offset accordingly.Creating Corner Conditions
Achieving seamless corners with crown molding requires careful mitering. Revit simplifies this process with its built-in miter functionality for wall sweeps.
* The "Wall Sweep" tool automatically creates mitered corners where wall sweeps intersect. * Verify that the "Miter" option is enabled in the Wall Sweep Type Properties. * If custom adjustments are required, use the "Edit Profile" option within the Wall Sweep Type Properties. This allows for fine-tuning of the miter angles and profile adjustments specific to corner conditions.Material Application
The final visual impact depends heavily on the appropriate material selection and application.
* Open the Material Browser and select or create a material appropriate for the crown molding. Consider factors such as color, reflectivity, and texture. * Apply the chosen material to the wall sweep in the project environment. * Adjust material parameters as needed to achieve the desired visual effect. This may include adjusting reflectivity, glossiness, or bump mapping.Refining and Adjusting
Revit offers a range of tools to fine-tune the framed mirror assembly.
* Utilize visibility and graphics overrides to control the display of elements during the design process. * The "Modify" tools allow for adjustments to the position, size, and shape of both the mirror and the crown molding frame. * Use the "Align" tool to ensure precise alignment between the mirror and the frame. * "Join Geometry" can be used to merge elements for a cleaner model and more efficient performance. However, exercise caution when using join geometry, as it can impact the ability to edit individual elements.Documentation and Presentation
Clear and accurate documentation is crucial for successful project execution.
* Create elevation views and sections to document the framed mirror assembly. * Use dimensions and annotations to clearly communicate the sizes and placements of all components. * Generate high-quality renderings to showcase the design and material choices effectively. * Export views and sheets in appropriate formats (DWG, PDF, etc.) for collaboration and construction documentation.
How To Upgrade Your Builder Grade Mirror Frame It

Mirror Molding Framing A With Crown Mirrormate

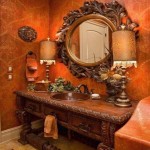
Bathroom Mirror Framed With Crown Molding Large Mirrors Frame Makeover

How To Frame A Mirror For Dramatic Upscale Look

Mirror Molding The Easy Upgrade To Boring Bathrooms Mirrorchic

Framing A Mirror Without Miter Cuts The Kim Six Fix

Crown Molding Shelves Foter Home Decor Diy

Crafty Again

How To Frame A Mirror With Molding And Save Over 300

Diy Mirror Frame Remodelaholic