How To Frame a Bathroom Mirror With Metal Clips
Framing a bathroom mirror with metal clips offers a sleek, modern alternative to traditional framing methods. This approach is often quicker, less messy, and easily reversible, making it a popular choice for DIY enthusiasts and renters alike. This article will outline the necessary steps and considerations for successfully framing a bathroom mirror using metal clips.
Choosing the Right Metal Clips
The first step involves selecting appropriate metal clips. Several factors influence this decision, including mirror thickness, desired aesthetic, and overall budget. Clips are available in various finishes, such as brushed nickel, chrome, and black, allowing for coordination with existing bathroom fixtures. Pay close attention to the clip's gripping mechanism and weight capacity to ensure compatibility with the mirror's dimensions and weight. Measure the mirror's thickness accurately to ensure a snug fit. Clips that are too loose may not hold the mirror securely, while overly tight clips could potentially damage the glass.
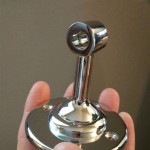
Different clip styles exist, each offering a unique look. "J" clips grip the mirror's edge from the top and side, offering a minimalist profile. "U" clips, resembling a staple, provide a more substantial hold and a slightly different aesthetic. "L" shaped clips offer support from below and the side, and are particularly suitable for heavier mirrors. Consider the desired visual impact when choosing the clip style.
Preparing the Mirror and Wall
Before installing the clips, thorough preparation is essential. The wall surface must be clean and dry to ensure proper adhesion. Clean the area where the clips will be mounted with a suitable cleaning solution to remove any dust, grease, or residue. For tiled surfaces, ensure the grout lines are clean and free of debris. The mirror itself should also be cleaned thoroughly. Use a glass cleaner specifically designed for mirrors to avoid streaks and residue that could interfere with the clips' grip.
Accurate measurements are crucial for even spacing and a professional finish. Measure the mirror's dimensions precisely and mark the desired location on the wall. Use a level to ensure the markings are straight and the mirror will hang evenly. Consider the desired gap between the mirror and the wall, as this will influence clip placement. A small gap allows for ventilation and prevents moisture buildup behind the mirror.
Installing the Metal Clips
Once the preparatory steps are complete, begin installing the clips. Follow the manufacturer's instructions for specific guidance regarding mounting hardware and installation procedures. Generally, clips are affixed to the wall using screws and wall anchors, especially for heavier mirrors. For lighter mirrors, adhesive-backed clips may be sufficient. However, screws provide a more secure and permanent solution.
Begin by installing the bottom clips first. This provides a support base for the mirror during installation. Carefully position the mirror onto the bottom clips, ensuring it sits securely. Then, install the side and top clips, evenly spaced, to secure the mirror in place. Ensure the clips are aligned correctly and flush against the mirror's edge for a clean, professional look. Double-check the mirror's alignment with a level after installing all clips.
Considerations for Different Wall Types
Different wall types require specific considerations during installation. For drywall, ensure appropriate wall anchors are used to provide adequate support, especially for heavier mirrors. With tile, utilize a tile drill bit to avoid cracking the tile. Exercise caution near plumbing and electrical lines when drilling. For plaster walls, pilot holes may be necessary to prevent crumbling. Consult a professional if you are unsure about the best approach for your specific wall type.
Additionally, consider the bathroom environment. Bathrooms are prone to humidity, which can affect certain metal finishes over time. Opt for clips made from corrosion-resistant materials, such as stainless steel or brass, to ensure longevity and prevent rust or discoloration. Proper ventilation in the bathroom is also essential to minimize moisture buildup and protect the clips and mirror.

How To Frame A Mirror With Clips In 5 Easy Steps

Diy Bathroom Mirror Frame Without Removing Clips Her Happy Home

Diy Bathroom Mirror Frame Without Removing Clips Her Happy Home

How To Frame A Bathroom Mirror Over Plastic Clips Somewhat Simple

How To Make An Easy Diy Bathroom Mirror Frame Momhomeguide Com

How To Build A Diy Frame Hang Over Bathroom Mirror Love Our Real Life

How To Frame A Mirror With Clips In 5 Easy Steps

How To Frame A Bathroom Mirror Over Plastic Clips Somewhat Simple

How To Build A Diy Bathroom Mirror Frame The Easy Way

Mirror Clips Hometalk