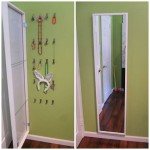
How To Install a Large Frameless Bathroom Mirror
Installing a large frameless bathroom mirror can dramatically enhance a bathroom's aesthetic. However, the size and weight of these mirrors present specific installation challenges requiring careful planning and execution. This guide provides a comprehensive overview of the process, outlining the necessary tools, materials, and steps for successful installation.
Planning and Preparation
Accurate measurements are crucial. Measure the intended wall space carefully, noting any obstructions such as light fixtures or electrical outlets. Consider the mirror's weight and ensure the wall can support it. Drywall typically requires additional support for heavier mirrors. Consult a professional if unsure about the wall's load-bearing capacity.
Necessary Tools and Materials
Gathering the correct tools and materials beforehand streamlines the installation process. Required items include:
- Measuring Tape: For precise measurements of the mirror and wall space.
- Level: To ensure the mirror hangs straight both horizontally and vertically.
- Pencil: For marking the mirror's position on the wall.
- Stud Finder: To locate wall studs for secure mounting.
- Drill: For pre-drilling pilot holes for screws.
- Screwdriver: For driving screws into the wall and securing the mirror.
- Mirror Adhesive: Specifically designed for mirrors, providing a strong and lasting bond.
- J-Channels or Z-Clips: These specialized clips provide secure support for the mirror.
- Safety Glasses: To protect eyes from dust and debris during drilling and installation.
- Work Gloves: To protect hands during handling of materials and tools.
- Shims: To adjust the mirror's position and ensure it hangs level.
- Masking Tape: To protect the wall and mirror during installation.
Preparing the Wall Surface
Clean the wall surface thoroughly to remove any dust, dirt, or grease. A clean surface ensures proper adhesion of the mirror adhesive and clips. If painting the wall, allow ample drying time before installing the mirror.
Marking the Mirror Position
Using the measurements taken earlier, mark the desired position of the mirror on the wall with a pencil. Use a level to ensure the lines are perfectly horizontal and vertical. Double-check the measurements to confirm accuracy before proceeding.
Installing the Mounting Hardware
The choice of mounting hardware depends on the mirror's weight and the wall's construction. J-channels are suitable for lighter mirrors, while heavier mirrors typically require Z-clips. For J-channels, attach the bottom channel to the wall first, ensuring it is level. For Z-clips, install the clips on the wall at the marked locations, following the manufacturer's instructions for spacing.
Applying Mirror Adhesive
Mirror adhesive provides additional support and prevents the mirror from shifting. Apply the adhesive to the back of the mirror in vertical lines, following the manufacturer's instructions for spacing and quantity. Avoid applying adhesive too close to the mirror's edges.
Mounting the Mirror
Carefully lift the mirror and position it onto the installed mounting hardware. For J-channels, slide the mirror into the bottom channel and then secure it into the top channel. For Z-clips, carefully engage the clips with the corresponding slots on the back of the mirror. Gently press the mirror against the wall to ensure proper adhesion.
Securing and Adjusting the Mirror
Once the mirror is in place, use shims as needed to adjust its position and ensure it hangs level. Once satisfied with the positioning, secure the mirror further using screws through the pre-drilled holes in the mounting hardware. Be careful not to overtighten the screws, which could crack the mirror.
Finishing Touches
Carefully remove any excess adhesive that may have seeped out from behind the mirror using a razor blade. Clean the mirror surface with a glass cleaner to remove any fingerprints or smudges. Inspect the installation to ensure the mirror is securely mounted and level.
Safety Precautions
Always prioritize safety during installation. Wear appropriate safety glasses and work gloves. If using power tools, ensure they are in proper working order. When handling large and heavy mirrors, it is recommended to have a helper to assist with lifting and positioning.
Alternative Installation Methods
While J-channels and Z-clips are common methods for installing frameless mirrors, other options exist, such as using adhesive only or specialized mounting systems. Consult with a professional for advice on the most suitable method for your specific situation, especially for exceptionally large or heavy mirrors.
Considerations for Different Wall Types
Installation methods may vary depending on the wall type. Drywall requires specific anchors to support the weight of the mirror. Concrete or tile walls require different drill bits and mounting hardware. Always consult the manufacturer's instructions for the appropriate hardware and installation procedures for your particular wall type.

How To Install A Mirror Without Frame Merrypad

How To Hang A Frameless Mirror On The Wall With Pictures

How To Install A Mirror Without Frame Merrypad

How To Hang A Frameless Mirror On The Wall With Pictures

How To Hang A Hanging Mirror Without Accompanying Hardware

How To Hang A Frameless Mirror June 2024 Your Guide Hanging

How To Frame Out That Builder Basic Bathroom Mirror For 20 Or Less
:strip_icc()/DesireeBurnsInteriors1-f76d25cad90041c88fbae4a7dc10aab4.jpg?strip=all "2 Simple Ways To Hang A Frameless Mirror")
2 Simple Ways To Hang A Frameless Mirror

Where And How To Install Frameless Mirrors Wassup Mate

How To Hang A Large Wall Mirror Step By Tutorial