How To Install a Bathroom Mirror Frame
Adding a frame to a bathroom mirror elevates the room's aesthetic, providing a polished and finished look. This project is achievable for most DIY enthusiasts with basic tools and careful planning. This guide outlines the steps involved in installing a bathroom mirror frame.
Preparation is Key: Before beginning, accurate measurements are crucial. Measure the mirror's height and width precisely. These measurements determine the frame's interior dimensions. When purchasing or building a frame, ensure these interior dimensions align perfectly with the mirror's outer dimensions. This guarantees a snug fit.
Gathering the Necessary Tools and Materials: Having all the necessary tools readily available streamlines the installation process. Typical tools include a measuring tape, level, pencil, safety glasses, drill with appropriate drill bits, screwdriver, construction adhesive, finishing nails, and a hammer. Materials needed include the chosen frame, appropriate fasteners, and potentially wood shims for adjustments.
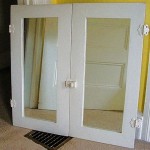
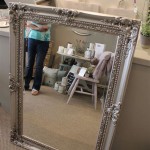
Choosing the Right Frame: Frame selection depends on personal preference and bathroom decor. Various materials are available, including wood, metal, and plastic. Wood frames offer a classic look and can be stained or painted to match existing bathroom fixtures. Metal frames offer a modern aesthetic, while plastic frames provide a budget-friendly and moisture-resistant option. Consider the bathroom's humidity levels when selecting a frame material.
Dry Fitting the Frame: Before applying adhesive, a dry fit is essential. This involves placing the frame over the mirror to ensure a proper fit. This step allows for adjustments or modifications to the frame before permanent adhesion. Slight gaps can be addressed later with wood filler, but significant discrepancies require further adjustments to the frame itself.
Applying Adhesive: Construction adhesive provides a strong bond between the frame and the mirror. Apply adhesive to the back of the frame in a consistent bead, ensuring even coverage along all edges. Follow the adhesive manufacturer's instructions for proper application and drying time. Some adhesives require a short open time before attaching the frame to the mirror.
Securing the Frame to the Mirror: After applying the adhesive, carefully position the frame over the mirror, ensuring proper alignment. Firmly press the frame against the mirror surface to create a strong bond. Use painter's tape to hold the frame in place while the adhesive cures. The tape prevents the frame from shifting during the drying process and ensures a secure attachment.
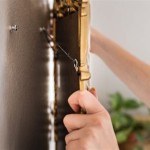
Adding Additional Support (Optional): Depending on the frame's size and weight, additional support may be necessary. Small finishing nails driven through the frame and into the wall provide extra stability. Pre-drilling pilot holes prevents the frame from splitting. Countersinking the nails allows for covering the nail heads with wood filler for a seamless finish. This step is especially important for larger or heavier frames.
Using Shims for Adjustments: If the wall surface is uneven, shims are helpful in achieving a level frame installation. Place shims behind the frame as needed to create a flush fit against the wall. This prevents the frame from appearing tilted or crooked. Trim any excess shim material protruding from the frame edges for a clean appearance.
Finishing Touches: Once the adhesive has fully cured, remove the painter's tape. If nails were used, fill the nail holes with wood filler and allow it to dry completely. Sand the filled areas smooth and then paint or stain the frame according to the desired finish. This completes the installation process, resulting in a professionally framed bathroom mirror.
Maintaining the Framed Mirror: Regular cleaning helps maintain the frame's appearance and prolong its lifespan. Use a damp cloth and mild cleaning solution to wipe down the frame, avoiding abrasive cleaners that could damage the finish. Regularly inspect the frame and address any signs of wear or damage promptly to prevent further deterioration.
Safety Considerations: Throughout the installation process, prioritize safety. Wear safety glasses to protect eyes from dust and debris. Use caution when operating power tools and follow manufacturer instructions carefully. Properly ventilate the area when working with adhesives or other chemicals.
Alternatives to Traditional Framing: For those seeking a frameless look, adhesive mirror clips offer an alternative mounting solution. These clips adhere directly to the mirror and the wall, providing a clean and modern aesthetic. This method eliminates the need for a traditional frame and offers a minimalist design option.

Mirror Frame Diy How To Update A Basic Bathroom Our Faux Farmhouse

How To Install A Mirrorchic Bathroom Mirror Frame Momhomeguide Com

How To Frame Out That Builder Basic Bathroom Mirror For 20 Or Less

Bathroom Mirror Frames 2 Easy To Install Sources A Diy Tutorial Retro Renovation

Diy Bathroom Mirror Frame With Molding The Happier Homemaker

Mirror Frame Diy How To Update A Basic Bathroom Our Faux Farmhouse

Diy Stick On Mirror Frame Sawdust Sisters

Mirror Frame Diy How To Update A Basic Bathroom Our Faux Farmhouse

Easy Diy Tutorial Adding Trim Around A Giant Mirror For Ers

How To Frame A Bathroom Mirror