How to Install a Frameless Mirror on Drywall
Installing a frameless mirror on drywall can significantly enhance the aesthetic appeal of a room, creating a sense of spaciousness and modern elegance. While seemingly straightforward, successfully mounting a frameless mirror requires careful planning, precise execution, and the use of appropriate materials to ensure both safety and longevity. This article provides a detailed guide on how to approach this project, covering essential preparations, installation techniques, and important considerations for achieving a professional-looking result.
Before commencing the installation process, it is crucial to understand the unique characteristics of frameless mirrors. Unlike framed mirrors, they lack the structural support provided by a frame, making the adhesive bond and mounting hardware the primary means of securing the mirror to the wall. Furthermore, the exposed edges of a frameless mirror can be vulnerable to chipping or cracking during handling and installation, necessitating extra caution throughout the project.
Prior to any physical work, a thorough assessment of the drywall and the intended location for the mirror is paramount. Drywall, while common, can vary in thickness and density, impacting its ability to support weight. Identifying the presence of studs behind the drywall is also critical, as these offer significantly stronger anchor points compared to relying solely on drywall anchors. Ignoring these factors can lead to the mirror detaching from the wall, posing a safety hazard and potentially damaging the mirror and surrounding surfaces.
Preparing the Surface and Gathering Materials
The success of a frameless mirror installation hinges significantly on proper surface preparation. The drywall surface must be clean, dry, and free of any loose paint, dust, or debris. Any imperfections, such as small holes or cracks, should be repaired before proceeding. A smooth, even surface will ensure optimal adhesion of the mirror adhesive and prevent any uneven pressure points that could potentially stress the mirror.
Begin by thoroughly cleaning the drywall using a mild detergent solution and a clean cloth. Ensure the surface is completely dry before moving on to the next step. If there are any glossy areas on the drywall, lightly sand them to create a more porous surface for better adhesive bonding. Remove any sanding dust with a damp cloth.
Next, inspect the drywall for any minor imperfections. Small holes or cracks can be filled using drywall compound, also known as "mud." Apply the compound using a putty knife, ensuring it is flush with the surrounding surface. Allow the compound to dry completely according to the manufacturer's instructions, and then lightly sand it smooth. Again, remove any sanding dust.
Gathering the necessary materials and tools before starting the installation is essential for a smooth and efficient process. The required items typically include:
- Frameless mirror
- Mirror adhesive (specifically designed for mirrors and drywall)
- Mirror mastic
- Construction level
- Measuring tape
- Pencil
- Safety glasses
- Gloves
- Drill with appropriate drill bits (for drywall anchors and stud finding)
- Drywall anchors (if studs are not available)
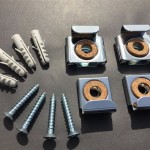
- Screws (compatible with the chosen drywall anchors)
- Edge protectors or mirror clips (optional, for added security)
- Caulk gun (for applying adhesive and sealant)
- Painter's tape
- Clean cloths
- Stud finder (optional, but highly recommended)
Choosing the correct mirror adhesive is paramount. Standard construction adhesives may contain solvents that can damage the reflective backing of the mirror, leading to discoloration and eventual failure. Always opt for an adhesive specifically formulated for mirror installation, which will be clearly labeled as such.
Locating Studs and Applying Adhesive
Identifying the location of wall studs is a critical step, as these provide the strongest anchor points for mounting the mirror. Using a stud finder, carefully scan the wall in the area where the mirror will be installed. Mark the location of each stud with a pencil. If a stud finder is unavailable, tapping along the wall can help identify studs by listening for a solid sound compared to the hollow sound between studs.
If studs are located, plan to use screws to attach the mirror directly to the studs whenever possible. This will provide the most secure and reliable installation. If studs are not available in the desired location, high-quality drywall anchors will need to be used. Select anchors that are rated to support the weight of the mirror, adding a safety margin for peace of mind.
Before applying the adhesive, perform a "dry fit" of the mirror to ensure it aligns properly with the desired location and any surrounding fixtures or elements. Use a construction level to ensure the mirror will be perfectly level once installed. Mark the outline of the mirror on the wall with a pencil. This will serve as a guide during the adhesive application.
Apply the mirror adhesive to the back of the mirror in vertical beads, spaced approximately 4-6 inches apart. The beads should be thick enough to create a good bond but not so thick that they ooze out from behind the mirror when it is pressed against the wall. Avoid applying adhesive to the edges of the mirror to prevent it from squeezing out and making a mess.
In addition to the adhesive, consider using mirror mastic, a thicker, more robust adhesive, particularly for larger or heavier mirrors. Mastic can provide additional support and prevent the mirror from sliding down the wall during the initial curing period. Apply the mastic in small dabs or patches between the beads of mirror adhesive.
Mounting the Mirror and Ensuring Stability
Carefully lift the mirror and align it with the marked outline on the wall. Gently press the mirror against the wall, ensuring even pressure is applied across the entire surface. Avoid applying excessive pressure, which could potentially damage the mirror.
If using screws to attach the mirror to studs, pre-drill pilot holes through the drywall and into the studs at the marked locations. Use screws that are long enough to penetrate deeply into the studs, providing a secure hold. Use washers to prevent the screw heads from damaging the mirror surface.
If using drywall anchors, follow the manufacturer's instructions for installation. This typically involves drilling holes into the drywall, inserting the anchors, and then screwing the mirror into the anchors. Ensure the anchors are properly seated and that the screws are tightened securely, but avoid over-tightening, which could strip the anchor or damage the drywall.
To provide additional support and prevent the mirror from sliding down the wall while the adhesive cures, use painter's tape to hold the mirror in place. Apply strips of tape across the top and bottom edges of the mirror, securing it firmly to the wall. Leave the tape in place for at least 24-48 hours, or as recommended by the adhesive manufacturer, to allow the adhesive to fully cure.
Edge protectors or mirror clips can be used to provide additional security and protect the exposed edges of the frameless mirror. These are typically small, metal or plastic clips that are attached to the wall and hold the mirror in place. If using edge protectors, install them before mounting the mirror, ensuring they are properly aligned and spaced.
Finishing Touches and Final Inspection
Once the adhesive has fully cured and the painter's tape has been removed, inspect the installation for any gaps or imperfections along the edges of the mirror. If necessary, apply a thin bead of clear silicone caulk along the edges to seal any gaps and prevent moisture from seeping behind the mirror. Use a caulk gun to apply the caulk evenly and smoothly, and then use a wet finger or a caulk smoothing tool to create a clean, professional finish.
Clean the surface of the mirror with a glass cleaner and a soft cloth to remove any fingerprints, smudges, or adhesive residue. Inspect the mirror for any scratches or damage that may have occurred during the installation process. If any scratches are present, they may be able to be buffed out using a specialized mirror polishing compound.
Finally, double-check that the mirror is securely attached to the wall and that there are no signs of movement or instability. If any issues are detected, address them immediately to prevent potential safety hazards. A properly installed frameless mirror will remain securely in place for years to come, enhancing the beauty and functionality of the space.

How To Install A Mirror Without Frame Merrypad

How To Hang A Frameless Mirror On The Wall With Pictures

How To Hang A Frameless Mirror June 2024 Your Guide Hanging

Mirror Installation Without Clips

How To Hang A Mirror With Clips

How To Hang A Frameless Mirror On Wall 3 Methods

Install A Recessed Vanity Mirror

Here S How To Easily Hang A Frameless Wall Mirror

How To Hang A Frameless Mirror On The Wall With Pictures

How To Hang A Large Or Heavy Mirror

