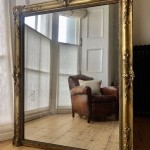
How To Make A Large Wall Mirror Frame
Creating a custom frame for a large wall mirror offers the opportunity to personalize a space and complement existing decor. This process, while requiring some effort, can be accomplished with readily available tools and materials. This guide outlines the steps involved in constructing a substantial and visually appealing frame.
Planning and Measurement: Accurate measurements are crucial for a well-fitting frame. Measure the mirror's length and width precisely. Consider the desired frame width; wider frames create a bolder statement. Add twice the frame width to both the length and width of the mirror to determine the final dimensions of the frame's exterior.
Material Selection: Wood is a popular choice for mirror frames due to its versatility and aesthetic appeal. Select a wood type that complements the surrounding decor and offers sufficient strength for the frame's size. Popular options include pine, oak, and maple. The wood should be straight and free of knots and warps, especially for larger frames.
Cutting the Frame Pieces: Using a miter saw ensures accurate 45-degree angle cuts essential for creating neat corners. Cut four pieces of wood: two to the calculated length and two to the calculated width. Double-check measurements before cutting to avoid wasting material. Precision in this step is critical for a professional-looking finished product.
Assembling the Frame: Wood glue and clamps are crucial for securing the frame pieces. Apply a generous amount of wood glue to the mitered edges of each piece. Join the pieces together, forming a rectangular frame. Use clamps to hold the frame firmly in place while the glue dries. Follow the glue manufacturer's instructions for drying times.
Reinforcing the Frame: Large mirrors, particularly heavy ones, require additional support. Adding corner brackets or braces strengthens the frame and prevents warping over time. These can be attached to the back of the frame using screws. Alternatively, consider using wood glue and screws along the mitered joints for added reinforcement.
Finishing the Frame: Sanding the frame creates a smooth surface for painting or staining. Start with a coarser grit sandpaper and progressively move to finer grits for a polished finish. Remove any dust with a tack cloth before applying the finish. The choice of paint or stain depends on the desired aesthetic and can be customized to match the existing decor.
Attaching the Mirror: Once the frame is dry, carefully place the mirror into the frame. Ensure there is sufficient clearance on all sides. Specialized mirror clips, available at hardware stores, are recommended for securing the mirror to the frame. These clips hold the mirror firmly in place while allowing for expansion and contraction due to temperature changes.
Adding Backing and Hanging Hardware: A backing board provides additional stability and protects the mirror. Cut a piece of thin plywood or hardboard to the same dimensions as the frame's exterior. Attach it to the back of the frame using small nails or staples. Install appropriate hanging hardware, such as D-rings and wire, on the back of the frame. Ensure the hardware is rated to support the combined weight of the mirror and frame.
Considerations for Very Large Mirrors: For exceptionally large or heavy mirrors, additional support may be necessary. Consider adding a French cleat hanging system for greater stability. This system distributes the weight evenly across the wall, reducing stress on the frame and preventing the mirror from shifting.
Safety Precautions: When working with power tools, always wear appropriate safety glasses and a dust mask. Take care when handling glass mirrors to avoid cuts. If the mirror is particularly large or heavy, enlist the help of another person to avoid injury. Properly dispose of any broken glass or sharp objects.
Alternative Frame Materials: While wood is a common choice, other materials can also be used. Metal frames offer a modern and sleek aesthetic, while reclaimed wood provides a rustic charm. Consider using molding or decorative trim to enhance the frame's appearance. The choice of material depends on the overall design aesthetic and the desired level of customization.
Frame Design Options: Simple, straight frames are timeless and versatile. For a more ornate look, consider adding decorative elements such as carvings, moldings, or inlays. Research different frame styles to find one that complements the mirror and the surrounding decor.
:max_bytes(150000):strip_icc()/kaylasimonehome-905941da7dd04a08af07c415df2a1fd8.jpeg?strip=all "20 Diy Mirror Frame Ideas To Inspire Your Next Project")
20 Diy Mirror Frame Ideas To Inspire Your Next Project

How To Frame A Mirror

How To Add A Wood Frame Large Wall Mirror For Under 20 Dream Design Diy

How To Add A Wood Frame Large Wall Mirror For Under 20 Dream Design Diy

Diy Wood Mirror Frame For Bathroom Vanity Tidbits

How To Add A Wood Frame Large Wall Mirror For Under 20 Dream Design Diy

Remodelaholic Framing A Large Bathroom Mirror Makeover Mirrors

30 Diy Mirror Frames Scratch And Stitch

How To Add A Wood Frame Large Wall Mirror For Under 20 Dream Design Diy

Diy Modern Mirror Re Frame What Not To Do Kayla Simone Home