How To Make A Mirror With Lights Around It
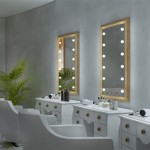
Adding lights around a mirror elevates its functionality and aesthetic appeal, transforming it into a statement piece. This illumination enhances visibility for tasks like applying makeup or shaving while simultaneously adding a touch of glamour to any space. This article will guide you through the process of creating a lighted mirror, outlining the necessary materials, tools, and steps involved.
Planning and Preparation: Before commencing the project, careful planning is crucial. Determine the size and shape of the mirror, which will dictate the dimensions of the frame and the number of lights required. Consider the location of the mirror, as this will influence the type of lighting and wiring needed. For bathrooms, waterproof lighting fixtures are essential.
Materials Required: The materials list includes the mirror itself, wooden boards for the frame, light fixtures (LED strip lights, vanity bulbs, or globe lights), wiring, a power supply, mounting hardware, wood glue, wood screws, and finishing materials (paint, stain, or sealant).
Tools Required: Gather the necessary tools, including a measuring tape, pencil, saw (miter saw for angled cuts), drill, screwdriver, wire strippers, wire connectors, safety glasses, and a level.
Building the Frame: The frame provides the structure for the mirror and houses the lights. Measure and cut the wooden boards to the desired dimensions, ensuring accurate angles for a seamless fit. A miter saw is recommended for precise angled cuts. Assemble the frame using wood glue and wood screws, reinforcing the joints for stability. The frame's depth should accommodate the wiring and light fixtures.
Choosing and Installing the Lights: Several lighting options exist, each with its unique advantages. LED strip lights offer flexibility and even illumination, while vanity bulbs provide a classic Hollywood-style look. Globe lights create a more vintage or whimsical ambiance. When choosing lights, consider the color temperature (warm, cool, or neutral) and brightness (lumens). Adhere the LED strips or install bulb sockets according to the manufacturer's instructions, ensuring they are evenly spaced around the frame's inner perimeter.
Wiring the Lights: This step requires careful attention to safety. If using a plug-in power supply, connect the wires from the lights to the power supply's wires, ensuring proper polarity. Use wire connectors to secure the connections and wrap them with electrical tape for added insulation. For hardwired connections, consult a qualified electrician to ensure compliance with local electrical codes.
Mounting the Mirror: Securely attach the mirror to the frame's backing using mirror adhesive or clips. Ensure the mirror is centered and level within the frame. Before mounting the entire unit to the wall, test the lights to confirm they are functioning correctly.
Finishing Touches: Apply paint, stain, or sealant to the frame for protection and aesthetic enhancement. Choose a finish that complements the surrounding décor. Allow the finish to dry completely before mounting the mirror.
Mounting the Lighted Mirror: Use appropriate mounting hardware to hang the completed lighted mirror on the wall. Ensure the wall anchors and screws are suitable for the weight of the mirror. Use a level to ensure the mirror hangs straight. Once mounted, connect the power supply to an outlet or complete the hardwiring process, if applicable.
Safety Precautions: Throughout the process, prioritize safety. Wear safety glasses when cutting wood or working with electrical components. Always disconnect the power supply before working with wiring. If unsure about any electrical aspect, consult a qualified electrician.
Customization Options: The design of the lighted mirror can be customized to fit individual preferences. Consider adding a dimmer switch to control the brightness of the lights. Decorative elements like molding or trim can be added to the frame for a more ornate appearance. The frame can also be upholstered with fabric for a softer, more luxurious feel.
Alternative Methods: For those seeking a simpler approach, pre-made lighted mirror kits are available. These kits often include the mirror, frame, lights, and wiring, simplifying the assembly process. Another option is repurposing an existing mirror by adding lights around its perimeter. This can be achieved by attaching LED strip lights directly to the mirror's frame or wall.
Maintenance: Regular cleaning of the mirror and frame will maintain its appearance. Use a soft cloth and appropriate cleaning solution for the frame material. Check the light bulbs or LED strips periodically and replace them as needed. Ensure the wiring remains secure and free from damage.
:max_bytes(150000):strip_icc()/makesandmunchies-c136f898cca640faa72b6209012230cb.jpg?strip=all)
7 Diy Lighted Mirror Ideas To Add A Little Extra Shine Your Space

How To Make Cute Lighted Leaning Mirror

10 Diy Vanity Mirror Projects That Show You In A Diffe Light

Diy Light Up Vanity Mirrors You Can Make Ohmeohmy Blog

How To Make A Diy Hollywood Style Mirror Sarah Thain

Diy Light Up Vanity Mirrors You Can Make Ohmeohmy Blog

20 Easy Creative Diy Mirror Frame Ideas Espejo De Bricolaje Vanity Decoración Habitación Del Maquillaje

Diy Make Up Mirror Vanity Makeup

How Do You Put Led Lights On A Round Mirror Ehomemart

Mirror With Lights Around It A Sophisticated Design Marvel

