How To Make Frames For Bathroom Mirrors
A bathroom mirror frame can elevate the entire space, adding a touch of sophistication and personality. Whether you prefer a sleek modern design or a rustic farmhouse charm, crafting a frame for your bathroom mirror is a rewarding DIY project that allows you to customize the look to your exact preferences. This guide will walk you through the process of making a bathroom mirror frame from scratch, providing you with the necessary steps and tips for a successful and beautiful outcome.
Choosing the Right Materials
The first step in making a bathroom mirror frame is selecting the right materials. The ideal material should be moisture-resistant, durable, and aesthetically pleasing for the bathroom environment. Here are some popular options:
Wood:
Wood is a classic and versatile material for framing, offering various finishes and textures. Choose wood species known for their moisture resistance, such as cedar, teak, or redwood.PVC Board:
This option is lightweight, waterproof, and economical. It comes in various colors and can be easily cut and shaped.Metal:
For a modern and industrial look, consider using metal like aluminum, brass, or iron. Metal frames can be painted or left in their natural finish.Tile:
Mosaic tiles or larger ceramic tiles can create a unique and eye-catching frame. Consider using waterproof adhesive for secure installation.
The chosen material will influence the overall look and feel of the bathroom mirror frame. Take into account the existing decor and your personal style preferences to make an informed decision.
Measuring and Cutting the Frame
Once you have chosen the material, you need to measure and cut the frame pieces accurately. This ensures a perfect fit around the mirror. Here's a step-by-step guide:
- Measure the mirror: Using a measuring tape, carefully measure the width and height of the mirror. Add the desired frame width to each dimension to determine the overall size of the frame.
- Cut the frame pieces: Based on the calculated dimensions, cut four pieces of your chosen material to form the frame's sides. Ensure all pieces have perfectly straight edges for a sharp and clean finish.
- Miter the corners: For a professional look, miter the corners of the frame pieces. This involves cutting the ends at a 45-degree angle to create a seamless join. Use a miter saw or a hand saw with a miter box for precise cuts.
Precise measurements and accurate cuts are essential for a well-made frame. Double-check your measurements and use appropriate tools to ensure a perfect fit.
Assembling the Frame
With the frame pieces cut and ready, you can start assembling them into a complete frame. Here are the steps involved:
- Join the pieces: Use wood glue, construction adhesive, or a combination of both to join the mitered corners of the frame. Apply glue sparingly and clamp the corners together until the glue dries completely.
- Reinforce the corners: To further strengthen the frame, consider using corner brackets or screws. These are essential for heavier frames and provide additional support.
- Finish the frame: Once the glue has dried, lightly sand the frame to smooth any rough edges. Apply a primer and paint or stain the frame according to your preferred finish.
Take your time during the assembly process and ensure all components are securely joined. A well-constructed frame will last for years to come.
Attaching the Mirror to the Frame
The final step is attaching the mirror to the frame. This is crucial for a secure and stable installation. Here's how to do it:
- Prepare the frame: Before attaching the mirror, ensure the back of the frame is clean and free of any debris. You may need to use a level to ensure the frame is straight and even.
- Use adhesive: Apply a thin layer of construction adhesive to the back of the frame, ensuring even coverage around the perimeter.
- Secure the mirror: Carefully position the mirror onto the adhesive-coated frame. Gently press the mirror into place, wiping away any excess adhesive.
- Use additional fasteners: For added security, you can use strategically placed screws or clips to attach the mirror to the frame. Ensure the fasteners are long enough to pass through the frame and attach securely to the mirror.
Once the mirror is securely attached to the frame, allow the adhesive to dry completely before hanging the mirror.
Finishing Touches
After the adhesive has dried and the mirror is securely attached, you can add finishing touches to enhance the overall look of the bathroom mirror frame:
- Decorative elements: Consider adding decorative elements like molding, trim, or embellishments to the frame.
- Hardware: Choose appropriate hardware, such as hooks or knobs, to match the frame's style.
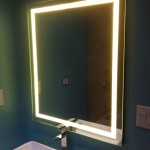
- Lighting: Install lighting around the frame to highlight it and the mirror.
These finishing touches can personalize the frame and create a cohesive and visually appealing bathroom design.

Mirror Frame Diy How To Update A Basic Bathroom Our Faux Farmhouse

Diy Stick On Mirror Frame Sawdust Sisters

Diy Framed Bathroom Mirrors Living With Lady

Diy Bathroom Mirror Frame With Molding The Happier Homemaker

Bathroom Mirror Frames 2 Easy To Install Sources A Diy Tutorial Retro Renovation

How To Frame Out That Builder Basic Bathroom Mirror For 20 Or Less

Mirror Frame Diy How To Update A Basic Bathroom Our Faux Farmhouse

Diy How To Frame A Builder Grade Bathroom Mirror Home And Hallow

Diy Bathroom Mirror Frame For Under 10 O Hayley Blog

How To Install A Mirrorchic Bathroom Mirror Frame Momhomeguide Com