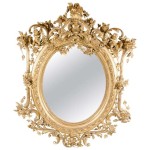
Paint the Antique Gold Mirror Frame This article details the process of achieving an antique gold finish on a mirror frame through painting techniques. The method involves preparation, base coating, applying metallic gold paint, and aging the finish using specific treatments. This achieves a classic, sophisticated aesthetic suitable for various interior design styles.
Before commencing any painting project, meticulous preparation is crucial. Failure to properly prepare the surface can result in uneven paint adhesion, premature chipping, and an overall aesthetically suboptimal outcome. The initial assessment of the mirror frame's existing condition dictates the precise preparation steps required.
If the frame already possesses a finish, it must be thoroughly assessed for any damage, loose paint, or imperfections. Cracks, chips, or peeling paint can impede the successful application of the subsequent layers. Addressing these issues before proceeding is essential for ensuring a smooth and durable final finish.
The initial step involves cleaning the mirror frame. Use a mild detergent and water solution to remove any dirt, dust, grease, or other contaminants that may be present. Avoid abrasive cleaners, as they can scratch or damage the existing finish. Rinse the frame thoroughly with clean water and allow it to dry completely before proceeding to the next stage.
Once the frame is clean and dry, inspect it for any significant imperfections, such as cracks, dents, or holes. Fill these imperfections with wood filler, spackle, or another appropriate patching compound, depending on the frame's material. Allow the filler to dry completely according to the manufacturer's instructions.
After the filler has dried, sand the entire surface of the frame to create a smooth and even base for the paint. Begin with a medium-grit sandpaper (e.g., 120-grit) to remove any rough spots or imperfections. Then, switch to a fine-grit sandpaper (e.g., 220-grit) to create a smooth, polished surface. Pay particular attention to areas where filler was applied to ensure a seamless blend with the surrounding areas.
After sanding, remove all sanding dust with a tack cloth or a damp cloth. Ensure the surface is completely clean and dry before proceeding to the priming stage. Priming is essential, even if the existing finish appears to be in good condition, as it provides a uniform surface for the paint to adhere to and helps to block any underlying colors or stains from bleeding through.
Apply a coat of high-quality primer to the entire mirror frame. Choose a primer that is compatible with the frame's material and the type of paint that will be used. Apply the primer in thin, even coats, using a brush or spray gun, depending on the size and complexity of the frame. Allow the primer to dry completely according to the manufacturer's instructions before proceeding to the next step.
Applying the Base Coat and Metallic Gold Paint
The base coat provides the underlying color that will peek through the antiquing process. A dark color such as black, deep brown, or a dark red is commonly used. This dark color serves as a contrast, enhancing the vintage effect of the antique gold finish.
Apply the chosen base coat to the entire frame, using a brush, roller, or spray gun. Ensure even coverage, avoiding drips or runs. Allow the first coat to dry completely before applying a second coat, if necessary, to achieve full opacity. Allow the final coat to dry thoroughly according to the manufacturer's instructions before proceeding to the next step of applying the metallic gold paint.
The selection of the metallic gold paint is critical in achieving the desired antique gold appearance. Consider factors such as the sheen level, color tone, and durability of the paint when making your decision. Metallic gold paints are available in various formulations, including oil-based, water-based, and aerosol varieties. Water-based acrylics are often preferred for their ease of use and clean-up.
Apply a thin, even coat of the metallic gold paint over the dried base coat. Use a soft-bristled brush, foam brush, or spray gun to avoid brushstrokes or uneven coverage. Multiple thin coats are preferable to a single thick coat, as they allow for better control over the final appearance and reduce the risk of drips or runs. Allow each coat to dry completely before applying the next.
Once the metallic gold paint has dried completely, assess the finish. If necessary, apply additional coats until the desired level of coverage and sheen is achieved. Allow the final coat to dry thoroughly before proceeding to the antiquing techniques.
Antiquing Techniques for an Aged Appearance
Several techniques can be employed to create an antique effect on the gold finish. These methods typically involve distressing the surface, applying glazes or washes, or using specialized antiquing products.
One common technique involves using fine-grit sandpaper or steel wool to gently distress the edges and raised areas of the frame. This removes some of the gold paint, revealing the dark base coat underneath and creating a worn, aged appearance. Exercise caution when sanding to avoid removing too much paint and exposing bare substrate.
Another technique involves applying an antiquing glaze or wash. These products are typically translucent or semi-transparent and are designed to settle into the crevices and details of the frame, darkening them and enhancing the three-dimensional effect. Apply the glaze or wash with a brush or cloth and then wipe away the excess with a clean cloth, leaving the desired amount of antiquing effect. Allow the glaze or wash to dry completely according to the product instructions.
Dry brushing is another effective method for creating an aged look. This involves dipping a dry brush into a small amount of dark paint or glaze and then lightly brushing it over the surface of the frame. The dry brush creates a textured, streaked effect that highlights the details and adds depth to the finish.
For a subtle antiquing effect, apply a tinted wax to the frame. Use a soft cloth or brush to apply the wax, working it into the crevices and details. Then, buff the wax with a clean cloth to remove the excess and create a soft sheen. The tinted wax will darken the details and add a warm, aged tone to the gold finish.
Craquelure effects, simulating the fine cracks seen in old paintings, can also be achieved. Specialized crackle glazes or paints, applied after the gold coat, shrink as they dry, revealing the base coat below and creating a network of fine lines. These products require careful application following the manufacturer's directions.
Experimentation with different techniques and products is encouraged to achieve the desired antique gold appearance. Consider testing the techniques on a scrap piece of wood or cardboard before applying them to the mirror frame to ensure satisfactory results.
Sealing and Protecting the Antique Gold Finish
Once the antiquing techniques are complete and the desired appearance is achieved, it's essential to seal and protect the finish. This will help to prevent chipping, scratching, and fading, and ensure the longevity of the painted frame. Apply a clear protective topcoat to the entire mirror frame. Choose a topcoat that is compatible with the type of paint used and provides the desired level of sheen (e.g., matte, satin, or gloss).
Apply the topcoat in thin, even coats, using a brush, spray gun, or sponge applicator. Avoid applying too much topcoat at once, as this can result in drips or runs. Allow each coat to dry completely before applying the next. Two or three coats of topcoat are typically sufficient to provide adequate protection.
Alternatively, paste wax can be used as a protective layer for painted surfaces. This wax provides a durable, water-resistant finish that enhances the antique charm. Apply the wax in thin, even coats with a soft cloth, working it into the surface. Allow the wax to dry, and then buff the surface to a soft sheen.
After the topcoat has dried completely, carefully inspect the frame for any imperfections or areas that require touch-ups. If necessary, use a fine-tipped brush or artist's brush to apply small amounts of paint or glaze to correct any flaws. Allow the touch-ups to dry completely before handling the frame.
Allow the sealed and finished mirror frame to cure for several days or weeks before hanging or displaying it. This will allow the paint and topcoat to fully harden and adhere to the surface, ensuring the longevity and durability of the finish. The mirror can then be carefully re-installed into the frame.
Proper maintenance is essential to preserve the condition of the antique gold finish. Dust the frame regularly with a soft cloth to remove any accumulated dirt or debris. Avoid using abrasive cleaners or harsh chemicals, as these can damage the paint and topcoat. With proper care, the antique gold mirror frame will provide years of aesthetic enjoyment.

How To Paint A Mirror Frame Antique Gold The Honeycomb Home

How To Paint A Mirror Frame Gold Remodelando La Casa

How To Paint A Mirror Frame Gold Remodelando La Casa

How To Paint A Mirror Frame Antique Gold The Honeycomb Home

How To Paint A Mirror Frame Gold Remodelando La Casa

How To Paint A Mirror Frame Gold Easily In Two Steps

Diy Gold Antiqued Frame My Vintage Porch

How Do You Distress A Gold Mirror Frame Hometalk

Diy Antique Gold Mirror Using Rub N Buff

How To Paint An Antique Gold Faux Finish Just It Blog


