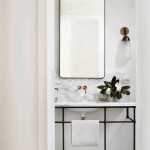
How to Install a Frameless Mirror on a Wall
Installing a frameless mirror can elegantly enhance any room, creating an illusion of spaciousness and adding a touch of modern sophistication. While the minimalist design appears simple, proper installation requires careful planning and execution. This guide provides a comprehensive walkthrough of the process.
Preparing for Installation
Before beginning the installation, gathering the necessary tools and preparing the wall and mirror is crucial for a successful outcome. This preparation ensures a secure and aesthetically pleasing result.
- Gather Tools and Materials: Accumulate all required tools and materials before starting. This includes the frameless mirror, a measuring tape, a level, a pencil or marker, mirror adhesive, construction adhesive (optional), masking tape, mirror clips (optional), safety glasses, and gloves.
- Prepare the Wall Surface: Ensure the wall surface is clean, dry, and smooth. Clean any dust, dirt, or grease with a suitable cleaner. If the wall has any imperfections, such as holes or cracks, fill and sand them smooth. A primed and painted surface is ideal.
- Measure and Mark Mirror Placement: Carefully measure the dimensions of the mirror and mark the desired position on the wall using a pencil or marker. Use a level to ensure the markings are perfectly horizontal and vertical.
Applying the Adhesive
Applying the adhesive correctly is paramount for securely affixing the frameless mirror to the wall. Following these steps will ensure a strong and lasting bond.
- Choose the Right Adhesive: Select a high-quality mirror adhesive specifically designed for this purpose. Consult the adhesive manufacturer's instructions for compatibility with the mirror and wall materials.
- Apply Adhesive to the Mirror Back: Apply the adhesive to the back of the mirror according to the manufacturer's instructions. Typically, this involves applying dabs or lines of adhesive at regular intervals across the mirror's back. Avoid applying adhesive too close to the edges, as this can cause it to squeeze out during installation.
- Consider Construction Adhesive (Optional): For added security, especially with heavier mirrors, consider applying construction adhesive to the wall within the marked outline. This provides an extra layer of bonding.
Mounting the Mirror
Mounting the mirror requires precision and a steady hand. Taking the time to properly position and secure the mirror will prevent issues later.
- Position and Press the Mirror: Carefully position the mirror onto the wall, aligning it with the marked outline. Firmly press the mirror against the wall, ensuring even contact with the adhesive.
- Secure with Masking Tape: Apply strips of masking tape across the mirror's surface to hold it in place while the adhesive cures. This prevents slippage and maintains the desired position during the drying process.
- Check for Levelness: Use a level to verify that the mirror remains perfectly level. Make any necessary adjustments before the adhesive fully sets.
Adding Support and Finishing Touches
Providing additional support and adding finishing touches ensures the long-term stability and aesthetic appeal of the installed mirror.
- Install Mirror Clips (Optional): For extra security, especially in high-traffic areas or with larger mirrors, consider installing mirror clips. These clips provide additional support and prevent the mirror from shifting over time.
- Allow Adhesive to Cure: Allow the adhesive to cure completely according to the manufacturer's instructions. This typically takes 24 to 72 hours. Do not remove the masking tape until the adhesive is fully cured.
- Remove Masking Tape and Clean: Once the adhesive is cured, carefully remove the masking tape. Clean any excess adhesive or fingerprints from the mirror surface using a suitable glass cleaner.
Troubleshooting
Addressing potential issues proactively can prevent complications and ensure a successful installation.
- Uneven Surface: If the wall surface is uneven, use shims behind the mirror to create a level surface before applying adhesive. This ensures proper adhesion and prevents cracking.
- Heavy Mirrors: For exceptionally heavy mirrors, use additional support mechanisms, such as J-bars or French cleats, along with adhesive for added security.
- Adhesive Issues: If adhesive squeezes out from behind the mirror during installation, carefully remove it with a damp cloth before it dries. Avoid using excessive adhesive to prevent this issue.
Safety Precautions
Prioritizing safety during the installation process is paramount for preventing accidents and injuries.
- Wear Safety Glasses and Gloves: Always wear safety glasses and gloves when working with adhesives and glass to protect against potential hazards.
- Handle with Care: Frameless mirrors can be delicate. Handle them with care during the entire installation process to prevent breakage.
- Seek Professional Help: If unsure about any aspect of the installation, seek professional assistance from a qualified glazier or handyman.

How To Install A Mirror Without Frame Merrypad

How To Hang A Frameless Mirror On The Wall With Pictures

How To Hang A Frameless Mirror On The Wall With Pictures

How To Hang A Frameless Mirror On The Wall With Pictures

How To Install A Mirror Without Frame Merrypad

How To Hang A Frameless Mirror On Wall
:strip_icc()/DesireeBurnsInteriors1-f76d25cad90041c88fbae4a7dc10aab4.jpg?strip=all "2 Simple Ways To Hang A Frameless Mirror")
2 Simple Ways To Hang A Frameless Mirror

Oval Frameless Wall Mirror Installation Fab Glass And

How To Hang A Frameless Mirror June 2024 Your Guide Hanging

Mirror Installation Without Clips