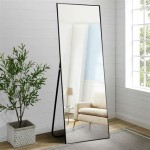
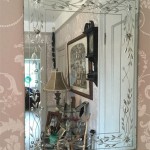
How To Put Up a Mirror Without a Frame
Hanging a frameless mirror presents a unique opportunity to enhance a space with a clean, minimalist aesthetic. Unlike framed mirrors, these offer an uninterrupted reflective surface, creating a sense of openness and expanding the perceived dimensions of a room. However, due to the lack of a frame, securing a frameless mirror requires careful planning and execution to ensure stability, safety, and a professional-looking result. This article provides a detailed guide on different methods for mounting frameless mirrors, covering considerations for various wall types and mirror sizes.
Understanding Wall Structure and Mirror Weight
Before initiating the installation process, a thorough assessment of the wall's structure is paramount. Different wall types, such as drywall, plaster, concrete, or tile, necessitate specific anchoring solutions. Drywall, while common, offers limited weight-bearing capacity and requires the use of anchors designed for drywall applications. Plaster walls, often found in older homes, can be more challenging due to their tendency to crumble. Concrete walls provide robust support but require specialized drilling equipment. Tile walls demand extreme caution to avoid cracking the tiles during drilling.
Furthermore, the mirror’s weight is a critical factor in determining the appropriate mounting method and the type of hardware required. A small, lightweight mirror may be adequately supported by adhesive or lightweight anchors. Heavier mirrors, however, necessitate more substantial anchoring systems, capable of distributing the weight evenly across the wall structure. Neglecting to account for the mirror's weight can lead to instability, potential damage to the wall, and the risk of the mirror falling.
To determine the wall type, a small, inconspicuous test hole can be drilled. The material extracted from the hole will indicate the wall's composition. For drywall, the material will be powdery and soft. Plaster will be denser and more crumbly. Concrete will be hard and granular. If uncertainty persists, consulting a professional is advisable. Once the wall type and mirror weight are established, selecting the appropriate mounting method becomes more straightforward.
Adhesive Mounting: A Simple Solution for Lightweight Mirrors
Adhesive mounting offers a relatively simple and damage-minimizing method for hanging frameless mirrors, particularly those that are lightweight. This approach eliminates the need for drilling, making it suitable for renters or individuals who prefer to avoid creating holes in their walls. However, the success of adhesive mounting hinges on the quality of the adhesive, the cleanliness of the surfaces, and the weight of the mirror.
Mirror-specific adhesive is crucial. Construction adhesive or other generic adhesives are not recommended as they may damage the reflective backing of the mirror or fail to provide adequate adhesion. Mirror adhesive is formulated to be compatible with the silvering on the back of the mirror and to provide a strong, permanent bond with both the mirror and the wall surface.
Surface preparation is equally important. The back of the mirror and the wall surface must be clean, dry, and free from dust, grease, or loose particles. Isopropyl alcohol can be used to clean both surfaces. Allow the surfaces to dry completely before applying the adhesive. Applying the adhesive according to the manufacturer's instructions is vital. Typically, the adhesive is applied in vertical beads or strips across the back of the mirror. Avoid applying adhesive to the very edges of the mirror, as this can create a visible squeeze-out when the mirror is pressed against the wall.
Once the adhesive is applied, carefully position the mirror on the wall. Press firmly and evenly across the entire surface to ensure good contact. Use painter's tape to hold the mirror in place while the adhesive cures. The curing time varies depending on the adhesive product, but typically ranges from 24 to 72 hours. Avoid disturbing the mirror during the curing process. After the curing period, remove the painter's tape. The mirror should now be securely mounted to the wall. It is important to note that removal of an adhesive-mounted mirror can be difficult and may result in damage to the wall surface.
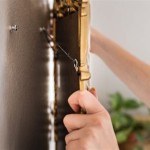
Mechanical Fasteners: Ensuring Secure and Stable Mounting
For heavier frameless mirrors, or when a more secure mounting solution is desired, mechanical fasteners provide a reliable alternative to adhesive mounting. This method involves drilling holes in the wall and using screws and anchors to support the mirror. The selection of appropriate anchors and screws is critical for ensuring the stability and safety of the installation.
Several types of anchors are available, each designed for different wall types and weight-bearing capacities. Drywall anchors, such as plastic anchors, self-drilling anchors, or toggle bolts, are designed for drywall. Plastic anchors are suitable for lightweight mirrors, while self-drilling anchors and toggle bolts offer greater weight-bearing capacity. Expansion anchors are used for concrete walls, providing a secure hold in the dense material. When installing in tile, specialized tile drill bits are required to prevent cracking. In plaster walls, using plaster washers in conjunction with screws is important to prevent the screw head from pulling through the plaster.
Mirror clips are commonly used with mechanical fasteners to hold the mirror in place. These clips come in various styles, including fixed clips, adjustable clips, and spring-loaded clips. Fixed clips provide a simple and cost-effective solution, while adjustable clips allow for minor adjustments to the mirror's position after installation. Spring-loaded clips provide constant pressure against the mirror, ensuring a secure fit.
Before drilling, accurately mark the locations for the mounting holes, using a level to ensure proper alignment. Drill pilot holes according to the size and type of anchors being used. Insert the anchors into the holes and then attach the mirror clips to the wall using screws. Carefully position the mirror within the clips, ensuring that it is level and secure. Tighten the screws on the clips as needed to hold the mirror firmly in place. It is important to avoid overtightening the screws, as this can damage the mirror or the wall surface.
Mirror Mastic and J-Channels: A Hybrid Approach
A hybrid approach combining adhesive (mirror mastic) with a J-channel provides a particularly secure and aesthetically pleasing mounting solution for larger frameless mirrors. The J-channel, a metal or plastic channel shaped like the letter "J," is installed at the bottom edge of the mirror to provide support and prevent slippage. The mirror mastic then provides additional adhesion across the entire back surface of the mirror.
The installation process begins with securing the J-channel to the wall. The J-channel should be level and securely fastened using screws and appropriate anchors for the wall type. The length of the J-channel should match the width of the mirror. Next, apply mirror mastic to the back of the mirror in vertical beads or strips, similar to the adhesive-only method. Carefully lift the mirror and place it into the J-channel, ensuring that the bottom edge of the mirror is fully supported.
Once the mirror is in place, use temporary supports, such as wood shims or painter's tape, to hold the mirror against the wall while the mastic cures. Apply the supports at the top edge of the mirror. The curing time for mirror mastic is typically 24 to 72 hours. Avoid disturbing the mirror during the curing process. After the curing period, remove the temporary supports. The J-channel provides continuous support at the bottom, while the mastic ensures a strong bond across the entire back surface. This method offers a high degree of stability and is particularly well-suited for large, heavy frameless mirrors.
Choosing the right mounting method depends on careful assessment of the mirror’s weight and the wall composition. Selecting the optimal mounting strategy ensures a stable and visually appealing result. Safety precautions, such as wearing eye protection during drilling and having assistance when handling heavy mirrors, should always be observed.

How To Install A Mirror Without Frame Merrypad

How To Install A Mirror Without Frame Merrypad

How To Hang A Frameless Mirror On Wall E Architect

How To Hang A Frameless Mirror On The Wall With Pictures

How To Hang A Frameless Mirror On The Wall With Pictures

How To Hang A Frameless Mirror June 2024 Your Guide Hanging

How To Hang A Frameless Mirror On The Wall With Pictures

How To Hang A Frameless Mirror On Wall
:strip_icc()/DesireeBurnsInteriors1-f76d25cad90041c88fbae4a7dc10aab4.jpg?strip=all "2 Simple Ways To Hang A Frameless Mirror")
2 Simple Ways To Hang A Frameless Mirror

How To Hang A Hanging Mirror Without Accompanying Hardware