Mirror Frame Kit Options at Home Depot
Home Depot offers a variety of mirror frame kits, providing a convenient and cost-effective way to enhance the aesthetic appeal of existing mirrors. These kits cater to different styles and skill levels, allowing homeowners to transform a plain, utilitarian mirror into a decorative focal point. This article explores the types of mirror frame kits available at Home Depot, factors to consider when selecting a kit, installation tips, and alternative options for framing mirrors.
Understanding the Types of Mirror Frame Kits
Mirror frame kits generally fall into two primary categories: adhesive-backed frames and clip-on frames. Each type presents distinct advantages and disadvantages related to installation complexity, customization options, and overall aesthetic impact.
Adhesive-backed frames typically consist of pre-cut lengths of molding with adhesive strips applied to the back. These frames are designed for easy installation – simply peel off the protective backing and attach the molding segments directly to the surface of the mirror. This type is ideal for individuals seeking a quick and straightforward upgrade without the need for specialized tools or advanced DIY skills. However, adhesive-backed frames may offer limited customization options in terms of molding style and size. Furthermore, once applied, removing an adhesive-backed frame can be challenging and may potentially damage the mirror's silvering.
Clip-on frames, conversely, attach to the mirror using metal clips or brackets that are secured to the wall behind the mirror. This method offers a more versatile and durable framing solution. Clip-on frames allow for greater customization in terms of molding profiles, finishes, and overall design. They also provide the option to easily remove or replace the frame without damaging the mirror. However, installing clip-on frames typically requires more precise measurements and a greater degree of DIY skill, often involving drilling and the use of specialized hardware. The installation process is generally more time-consuming compared to adhesive-backed frames.
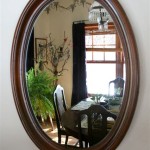
Within these two broad categories, Home Depot offers a range of sub-categories based on molding material, style, and finish. Molding materials include wood, composite materials like MDF (Medium Density Fiberboard), and metal. Wood frames offer a classic and timeless aesthetic, while MDF frames provide a more affordable and moisture-resistant alternative. Metal frames offer a modern and contemporary look.
Style options range from simple, clean lines to ornate, decorative designs. Finish options include painted, stained, and metallic finishes, allowing homeowners to coordinate the frame with their existing décor. The availability of different styles enables homeowners to achieve a specific aesthetic, from traditional to contemporary, rustic to modern. Home Depot's online and in-store displays often provide visual examples of how various frame styles can complement different bathroom and home décor themes.
Key Factors to Consider When Selecting a Mirror Frame Kit
Choosing the appropriate mirror frame kit requires careful consideration of several factors, including mirror size and shape, desired aesthetic, installation skill level, and budget. Ignoring these factors can lead to an unsatisfactory outcome or even damage to the mirror.
Accurate measurements of the mirror are essential. Precise dimensions are necessary to ensure the frame fits properly and creates a seamless, professional-looking finish. Home Depot's website and in-store staff can provide guidance on how to accurately measure a mirror for framing purposes. It’s crucial to account for any beveled edges or irregular shapes when taking measurements.
The desired aesthetic should complement the overall style of the room. Consider the existing color palette, furniture style, and architectural details when selecting a frame style and finish. A rustic wood frame might be a good choice for a farmhouse-style bathroom, while a sleek metal frame might be more appropriate for a modern bathroom. Home Depot offers a variety of tools, both online and in-store, to help customers visualize how different frames will look with their existing décor. These tools often include online design visualizers and in-store displays featuring framed mirrors in various settings.
Installation skill level plays a significant role in determining the suitability of a particular frame kit. Adhesive-backed frames are generally easier to install, requiring minimal tools and experience. Clip-on frames, on the other hand, require more precise measurements, drilling, and the use of specialized hardware, making them more suitable for individuals with some DIY experience. Home Depot provides detailed installation instructions with each frame kit, and online tutorials and videos are often available to guide customers through the process. If uncertain about tackling the installation, professional installation services are available through Home Depot.
Budget is another important consideration. The price of mirror frame kits can vary widely depending on the material, style, and complexity of the design. Wood frames tend to be more expensive than MDF frames, and ornate frames typically cost more than simple frames. When setting a budget, consider the cost of the frame kit itself, as well as any additional tools or materials that may be required for installation. Home Depot frequently offers sales and promotions on mirror frame kits, so it's worth checking for deals before making a purchase.
Installation Tips and Best Practices
Proper installation is crucial for achieving a professional-looking and long-lasting result. Whether installing an adhesive-backed frame or a clip-on frame, following these tips and best practices can help ensure a successful project.
Before starting the installation, thoroughly clean the mirror surface. Use a glass cleaner or a mixture of vinegar and water to remove any dirt, dust, or fingerprints. This ensures a strong bond between the adhesive and the mirror surface. For clip-on frames, cleaning the back of the mirror and the wall is also recommended to ensure proper adhesion of the mounting hardware.
For adhesive-backed frames, carefully align each molding segment before attaching it to the mirror. Use a level to ensure the frame is straight and even. Once the adhesive is applied, it can be difficult to reposition the frame without damaging the mirror. Press firmly on each segment to ensure a secure bond. Some adhesive-backed frames may require additional support during the curing process, such as painter's tape or clamps. Follow the manufacturer's instructions for optimal curing time and support methods.
For clip-on frames, accurately mark the location of the mounting holes on the wall. Use a stud finder to locate wall studs and anchor the clips to the studs whenever possible. This provides a more secure and stable mounting. If studs are not available, use appropriate wall anchors to support the weight of the mirror and frame. Drill pilot holes before inserting screws to prevent the wall from cracking. Carefully tighten the screws, but avoid overtightening, which can damage the wall or the mounting hardware. Once the clips are securely attached to the wall, carefully hang the mirror onto the clips. Ensure the mirror is level and secure before releasing it.
When cutting molding to size, use a miter saw or a miter box and hand saw to create clean, precise cuts. Accurate cuts are essential for creating seamless corners and a professional-looking finish. For adhesive-backed frames, pre-cut corners are often available, eliminating the need for miter cuts. For clip-on frames, miter cuts are typically required. Practice making miter cuts on scrap pieces of molding before cutting the actual frame pieces. Use sandpaper to smooth any rough edges or imperfections after cutting.
Consider using corner blocks or rosettes to add decorative detail to the frame. Corner blocks are small, decorative pieces that are attached to the corners of the frame, covering the miter joints and adding a touch of elegance. Rosettes are similar to corner blocks, but they are typically more ornate and decorative. Corner blocks and rosettes can be purchased at Home Depot and are available in a variety of styles and finishes.
Alternative Options for Framing Mirrors
While mirror frame kits offer a convenient solution, alternative options exist for framing mirrors, providing greater customization and design flexibility. These alternatives may involve more advanced DIY skills or require professional assistance.
Custom-built frames allow for complete control over the design, materials, and finish. This option involves purchasing lumber or molding and constructing a frame from scratch. Custom-built frames offer the greatest degree of personalization and allow for unique and creative designs. However, this option requires advanced woodworking skills, specialized tools, and a significant investment of time and effort. Home Depot can provide the necessary lumber, molding, and hardware for constructing a custom-built frame, and their knowledgeable staff can offer guidance and advice on the process.
Using pre-made picture frames is another alternative. This option involves purchasing a picture frame that is slightly larger than the mirror and adapting it to fit the mirror. This can be a cost-effective and relatively simple way to frame a mirror, especially if looking for a specific style or finish that is not available in mirror frame kits. To adapt a picture frame, the back of the frame may need to be modified to accommodate the thickness of the mirror. The mirror can be secured to the frame using clips, adhesive, or a combination of both.
Frameless edge treatments provide a minimalist and contemporary alternative to traditional frames. These treatments involve adding decorative elements directly to the edge of the mirror, such as beveled edges, etched designs, or decorative films. Frameless edge treatments can create a sleek and sophisticated look without the added bulk of a traditional frame. These treatments are typically applied by professional glass shops, but some DIY options are available, such as self-adhesive decorative films.
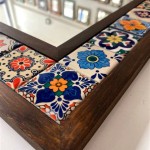
Repurposing materials to create unique and custom frames offers a creative and sustainable approach. This option involves using reclaimed wood, vintage trim, or other found objects to construct a one-of-a-kind frame. Repurposed frames can add character and charm to a room, reflecting a personal style and commitment to sustainability. Home Depot offers a variety of paints, stains, and sealants to help customize the finish of a repurposed frame. The possibilities are limited only by imagination and resourcefulness.

Mirrorchic Sonoma 48 In X 36 Diy Mirror Frame Kit Nickel Not Included E7k 400 16 The Home Depot

Mirrorchic 36 In X Distressed Walnut Diy Mirror Frame Kit Not Included E580011 03 The Home Depot

Mirrorchic Tuxedo 60 In X 42 Mirror Frame Kit Walnut Not Included E1383480 03 The Home Depot

Mirrorchic Driftwood 42 In X 36 Mirror Frame Kit White Not Included E600325 01 The Home Depot

Mirrorchic American Barn 24 In X 42 Diy Mirror Frame Kit White Not Included E2766 1605 01 The Home Depot

Mirredge 60 In X 1 5 Acrylic Framing Installation Kit 14111 The Home Depot

Mirrorchic 72 In W X 42 H Diy Mirror Frame Kit Gray Slate Not Included E1766 1609 The Home Depot

Mirrorchic Cardiff Sand 60 In W X 36 H Diy Mirror Frames Kit E868 678 18 The Home Depot

Mirrorchic Black Smoke 3 In X 66 36 Diy Mirror Frame Not Included E966 330 013 The Home Depot

Mirrorchic Venezia 66 In X 42 Diy Mirror Frame Kit Broe Not Included E20m200 12 The Home Depot