Removing a Builder-Grade Bathroom Mirror
Builder-grade bathroom mirrors, while functional, often lack the aesthetic appeal homeowners desire. Replacing these mirrors with more stylish options is a common bathroom upgrade. However, before selecting a new mirror, the existing one must be removed safely and effectively. This process requires careful preparation and the correct tools to prevent damage to the wall and the mirror itself.
Before beginning the removal process, gather the necessary tools. These typically include a utility knife, putty knife, pry bar, safety glasses, work gloves, and drop cloths. A heat gun or hair dryer can also be helpful. Depending on the mirror's mounting method, additional tools like a reciprocating saw or screwdriver may be required.
Assessing the mirror's installation method is crucial for determining the appropriate removal technique. Builder-grade mirrors are commonly installed using adhesive, clips, or a combination of both. Mirrors attached solely with adhesive require a different approach than those held in place with clips. Identifying the mounting method prevents unnecessary damage to the wall and simplifies the removal process.
If the mirror is adhered to the wall, carefully insert the utility knife blade between the mirror and the wall at one corner. Slowly and gently work the blade along the edges, severing the adhesive. A heat gun or hair dryer can soften the adhesive, making it easier to separate the mirror from the wall. Warm the adhesive in small sections, working slowly to prevent cracking the mirror. As sections of the adhesive are released, use the putty knife to maintain separation and prevent the adhesive from re-bonding.
For mirrors installed with clips, locate the clips behind the mirror. These are typically found along the top and bottom edges. Using a screwdriver or pry bar, carefully loosen and remove the clips. Once the clips are detached, the mirror can be lifted away from the wall. Exercise caution during this step as the mirror may be heavier than anticipated.
Sometimes, mirrors are installed using both adhesive and clips. In these cases, the clips must be removed first. After the clips are detached, use the utility knife and putty knife method, as described earlier, to separate the mirror from the adhesive. This combined approach ensures complete removal and minimizes the risk of damaging the wall.
Once the mirror is detached from the wall, carefully lift it away from the wall. If the mirror is large or heavy, enlist the help of another person to prevent dropping and breaking it. Dispose of the old mirror according to local regulations. Some municipalities consider mirrors hazardous waste due to their sharp edges and potential for injury.
After removing the mirror, the wall may require patching and repair. Adhesive residue can be removed with a solvent appropriate for the wall material. Consult the solvent manufacturer's instructions for safe and effective use. Fill any holes or imperfections with spackling compound, allowing it to dry completely before sanding and painting. This prepares the wall for the installation of a new mirror or other bathroom fixtures.
Safety should be the paramount concern throughout the mirror removal process. Always wear safety glasses to protect eyes from flying debris and work gloves to prevent cuts from sharp edges. Cover the surrounding area with drop cloths to protect flooring and other surfaces from damage. If working with a heat gun, follow the manufacturer's instructions carefully to avoid burns or fire hazards. Proper ventilation is also crucial when using solvents or adhesives.
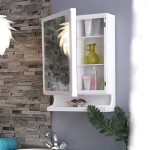
Choosing the right replacement mirror involves considering various factors, including size, style, and mounting method. Measure the space carefully to ensure the new mirror fits correctly. Explore different styles and finishes to find a mirror that complements the bathroom's overall design. Consider the mounting method as well, opting for a method that is secure and aesthetically pleasing. Some popular mounting methods include clips, adhesive, and J-bars.
Installing the new mirror requires precise measurements and careful attention to detail. Follow the manufacturer's installation instructions for the specific mirror and mounting method. Ensure the mirror is level and securely attached to the wall. Depending on the mounting method, additional tools and hardware may be required. Take the time to properly install the new mirror to ensure its longevity and prevent future issues.
Removing a builder-grade bathroom mirror can be a straightforward DIY project with proper preparation and execution. Following these steps and adhering to safety guidelines will ensure a successful removal and pave the way for a stylish bathroom upgrade.

How To Safely And Easily Remove A Large Bathroom Builder Mirror From The Wall Site Title

How To Remove A Frameless Mirror Like Nervous Grandma

How To Remove A Bathroom Mirror Lowe S

How To Remove Builder Mirrors Sawdust Girl

How To Safely And Easily Remove A Large Bathroom Builder Mirror From The Wall Site Title

How To Remove A Frameless Mirror Like Nervous Grandma

How To Remove Builder Mirrors Sawdust Girl

How To Remove A Builder Grade Mirror Signed Samantha

How To Remove A Builder Grade Mirror Signed Samantha

Removing A Glued On Mirror From Wall