Replacement Mirror For Bathroom Vanity
A bathroom vanity mirror plays a crucial role in daily routines, from teeth brushing to makeup application. Over time, mirrors can become damaged, outdated, or simply no longer suit the bathroom's aesthetic. Replacing a bathroom vanity mirror can significantly refresh the space and improve its functionality. This article will guide homeowners through the process of selecting and installing a replacement mirror for their bathroom vanity.
Measuring and Choosing the Right Mirror
Accurate measurements are paramount when selecting a replacement mirror. Use a tape measure to determine the precise width and height of the existing mirror or the vanity opening where the new mirror will be installed. Consider the overall dimensions of the bathroom and vanity size to ensure the new mirror is proportionally appropriate. A mirror too large can overwhelm the space, while a mirror too small might appear underwhelming.
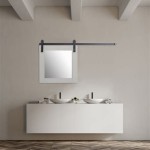
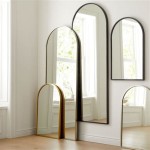
Various mirror styles are available, including framed, frameless, and beveled options. Framed mirrors offer a decorative element that complements the bathroom's design. Frameless mirrors provide a clean, modern look. Beveled mirrors, featuring angled edges, add a touch of elegance and depth. Consider the existing bathroom décor and personal preferences when selecting a mirror style.
Mirror thickness is another important factor. Thicker mirrors are generally more durable and less prone to distortion. Common thicknesses range from 1/4 inch to 1/2 inch. The thickness of the mirror may also influence the mounting hardware required.
Preparing for Installation
Before installing the new mirror, gather the necessary tools and materials. These typically include a drill, screwdriver, appropriate wall anchors and screws (depending on the wall type), safety glasses, and gloves. If removing an existing mirror, use extreme caution. Cover the mirror's surface with masking tape to prevent shattering and wear protective gear. Carefully pry the mirror from the wall, using a putty knife if necessary. If the mirror is glued to the wall, a specialized mirror removal tool may be required.
Once the old mirror is removed, inspect the wall for any damage. Repair any holes or imperfections using spackle and allow it to dry completely before proceeding with the installation. Clean the wall surface to ensure proper adhesion of the new mirror or its mounting hardware.
Carefully unpack the new mirror and inspect it for any damage incurred during shipping. Review the manufacturer's instructions for specific installation guidelines related to the chosen mirror type and mounting system.
Installation Methods
Several methods are available for installing bathroom vanity mirrors. The most common methods include using clips, J-bars, and adhesive. Clips are typically used for frameless mirrors and offer a sleek, minimalist look. J-bars, also known as Z-clips, provide a secure mounting solution for both framed and frameless mirrors. Adhesive is another option, particularly for lighter mirrors, and provides a seamless installation.
When using clips or J-bars, carefully mark the locations for the mounting hardware on the wall, ensuring they are level and evenly spaced. Pre-drill pilot holes to prevent the wall from cracking, especially when working with tile or plaster walls. Use appropriate wall anchors if necessary. Securely attach the clips or J-bars to the wall and then carefully position the mirror onto the hardware. Make any necessary adjustments to ensure the mirror is level and centered.
If using adhesive, ensure the wall surface is clean and dry. Apply the adhesive as per the manufacturer's instructions, typically in vertical lines or dots on the back of the mirror. Carefully position the mirror on the wall, pressing firmly to ensure proper adhesion. Use temporary supports, such as masking tape, to hold the mirror in place while the adhesive cures.
Maintaining Your New Bathroom Vanity Mirror
Once the mirror is installed, regular cleaning is necessary to maintain its appearance and prevent buildup of water spots and grime. Use a glass cleaner and a soft, lint-free cloth to clean the mirror surface. Avoid abrasive cleaners or scrub brushes, as these can scratch the mirror. Regularly inspect the mounting hardware to ensure it remains secure and make any necessary adjustments or repairs.
By following these steps, homeowners can successfully select and install a replacement bathroom vanity mirror that enhances the functionality and aesthetic appeal of their bathroom space. Choosing the right mirror and utilizing proper installation techniques will ensure a long-lasting and visually pleasing result.

Bathroom Mirrors Vanity Wall Pottery Barn

How To Remove A Bathroom Mirror Lowe S
:strip_icc()/Design_CathieHongInteriorsPhoto_ChristyQPhotography-b2290decbe0e4d0b952f280fb7bdc896.jpg?strip=all "How To Remove A Bathroom Mirror From The Wall")
How To Remove A Bathroom Mirror From The Wall

Homlux 36 In W X H Round Frameless Led Light With 3 Color And Anti Fog Wall Mounted Bathroom Vanity Mirror 27d7004792 The Home Depot

Diy Bathroom Mirror Frame For Under 10 O Hayley Blog

Homgarden 24x36inch Rectangle Modern Wall Mirror Black Bathroom Vanity Com

Wellfor F1 Bathroom Mirror 48 In X 36 Black Rectangular Framed Vanity The Mirrors Department At Com

Mirror Doors Repairs Replacement Valiant Glass Sydney

Bathroom Medicine Cabinet Mirror Replacement Doityourself Com Community Forums

Farmhouse Style Diy Vanity Mirrors Tutorial Must Have Mom