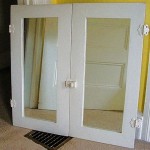
Stanley Monarch Mirror Closet Door Installation: A Comprehensive Guide
This article provides a detailed, step-by-step guide for installing Stanley Monarch mirror closet doors. The Stanley Monarch series is known for its affordability and ease of installation, making it a popular choice for homeowners. Proper installation ensures smooth operation and prolongs the life of the doors. This guide is intended for individuals with basic carpentry skills and familiarity with common household tools. Before beginning, carefully review all instructions and diagrams included with your specific Stanley Monarch door model, as minor variations may exist.
Prior to starting the installation, ensure that the rough opening for the closet is properly prepared. The opening should be square, plumb, and level. Irregularities in the opening can lead to difficulties in installation and may affect the smooth operation of the doors. Measure the width and height of the opening at multiple points to verify consistency. Any necessary adjustments to the opening should be made before proceeding with the door installation.
Gather all necessary tools and materials. Essential tools include a level, tape measure, pencil, drill with various bits, screwdriver (both Phillips and flathead), hammer, safety glasses, and shims. Required materials, beyond the Stanley Monarch mirror closet door kit itself, may include wood screws of appropriate length for securing the track and jambs to the wall, shims to level the track, and potentially paint or touch-up markers to cover any exposed screw heads or minor imperfections.
Key Point 1: Installing the Top and Bottom Tracks
The initial step involves installing the top and bottom tracks. These tracks guide the movement of the doors and are critical for smooth operation. Begin by measuring the width of the closet opening precisely. Cut the top and bottom tracks to this measurement using a hacksaw or metal cutting blade in a power saw. Ensure the cut is clean and square to prevent any binding or unevenness in the door movement.
Position the top track against the upper edge of the closet opening, ensuring it is centered. Use a level to verify that the track is perfectly horizontal. If the opening is not level, use shims between the track and the header to achieve a level surface. Once the track is level, pre-drill pilot holes through the track at intervals of approximately 12 inches. Secure the track to the header using wood screws. Ensure the screws are long enough to penetrate securely into the header framing but not so long as to protrude through the other side.
Next, install the bottom track. Use a level to ensure the floor is level. If the floor is uneven, use shims beneath the bottom track to create a level surface. Position the bottom track directly below the top track, using a plumb bob or level to ensure vertical alignment. Pre-drill pilot holes through the bottom track at intervals of approximately 12 inches. Secure the track to the floor using wood screws. Again, ensure the screws are of appropriate length. For concrete floors, use concrete screws or suitable anchors.
After securing both tracks, double-check their alignment using a long level or straight edge. Any misalignment can cause the doors to bind or rub against the tracks, leading to premature wear and tear. Make any necessary adjustments before proceeding to the next step.
Key Point 2: Installing the Door Jambs (If Applicable)
Some Stanley Monarch mirror closet door kits include side jambs. These jambs provide a finished look to the opening and can also help to improve the fit and alignment of the doors. If your kit includes jambs, install them after the tracks have been installed.
Measure the height of the closet opening from the floor to the underside of the header. Cut the jambs to this measurement, ensuring the cut is square. Position the jambs vertically along the sides of the closet opening, ensuring they are flush with the wall surface. Use a level to verify that the jambs are perfectly plumb. If the walls are not plumb, use shims behind the jambs to achieve a plumb surface.
Pre-drill pilot holes through the jambs at intervals of approximately 12 inches. Secure the jambs to the wall studs using wood screws. Ensure the screws are long enough to penetrate securely into the studs but not so long as to protrude through the wall. Use a countersink bit to create a recess for the screw heads, allowing them to sit flush with the surface of the jamb. This will provide a cleaner, more professional look.
Once the jambs are installed, check the alignment with the tracks. The jambs should be parallel to the tracks and should not interfere with the movement of the doors. Make any necessary adjustments before proceeding to the next step.
Key Point 3: Installing and Adjusting the Doors
The final step involves installing the doors into the tracks and adjusting them for smooth operation. Carefully lift each door and insert the top rollers into the top track first. Then, guide the bottom rollers into the bottom track. Refer to the manufacturer's instructions for the correct orientation of the doors; often, one door is designated as the front door and the other as the back door.
Once the doors are in place, test their movement. They should slide smoothly and easily along the tracks without binding or rubbing. If the doors are binding, check the alignment of the tracks and jambs. Minor adjustments to the track or jamb positions may be necessary to achieve smooth operation.
Most Stanley Monarch mirror closet doors have adjustable rollers. These rollers allow fine-tuning of the door height and alignment. Locate the adjustment screws on the rollers. These screws are typically accessible through small openings in the door frame. Use a screwdriver to adjust the screws, raising or lowering the doors as needed. The goal is to achieve even spacing between the top of the door and the top track, and between the bottom of the door and the bottom track. The doors should also be parallel to the jambs and should not rub against each other.
Continue to adjust the rollers until the doors slide smoothly and are properly aligned. Once you are satisfied with the alignment, tighten the adjustment screws to lock the rollers in place. Test the doors one last time to ensure they are operating correctly.
After the doors are installed and adjusted, inspect the installation for any imperfections. Touch up any exposed screw heads with paint or touch-up markers. Clean the mirror surfaces to remove any fingerprints or smudges. Ensure all packaging materials are removed from the closet area.
Regular maintenance will help to prolong the life of your Stanley Monarch mirror closet doors. Periodically clean the tracks to remove dust and debris. Lubricate the rollers with a silicone-based lubricant to ensure smooth operation. Check the alignment of the doors and adjust the rollers as needed. By following these simple maintenance tips, you can keep your closet doors operating smoothly for years to come.
If problems persist despite the preceding steps, consult the Stanley Monarch installation troubleshooting guide or contact Stanley customer support for assistance. Avoid forcing the doors, as this may cause damage to the doors, tracks, or rollers. Professional installation is recommended if you are not comfortable performing the installation yourself.

Stanley Monarch Sliding Glass Doors 50822981 64564 001 Swisco Com

Replcement Parts For Stanley Monarch Slicing Mirror Door Swisco Com

Searching For 64564 0001 Swisco Com

2 Pack Slide Co 16661 1 Steel Closet Door Roller For Monarch Mirror

Track Replacements Stanley Monarch Sliding Glass Door Swisco Com

Stanley Monarch Sliding Closet Mirror Doors Master Bedroom Swisco Com

Stanley Monarch Sliding Closet Mirror Doors Master Bedroom Swisco Com

Prime Line S N 6791 Mirror Door Top Guide Nylon Steel Pack Of 2

How To Install Bifold Mirror Closet Doors Diy Like The Pros

Lot Of 6 Stanley Monarch Mirror Decor 12 X12 Plain Edge Tiles 36 Total 110 00 Pic