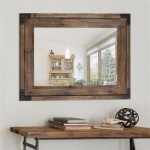
Elevate Your Bathroom with a DIY Wood Framed Mirror
Adding a touch of warmth and personalization to your bathroom can be achieved through a variety of décor elements. A statement mirror is a popular choice, and a DIY wood-framed mirror offers a unique and cost-effective way to achieve this. This project combines the rustic charm of wood with the functionality of a mirror, adding a personalized touch that reflects your style. Whether you're a seasoned DIY enthusiast or a beginner, this project offers a rewarding experience.
Key Materials and Tools
To embark on your DIY wood-framed mirror journey, gather the following essential materials and tools:
- Mirror: Choose a mirror with a size that aligns with your bathroom space and aesthetic preferences.
- Wood: Opt for a wood type that complements your bathroom's style. Popular choices include pine, oak, walnut, or reclaimed wood. Consider the thickness and width of the wood based on the desired frame thickness.
- Wood glue: Use a high-quality wood glue specifically designed for bonding wood surfaces.
- Wood screws: Select screws that are appropriate for the type of wood you are using.
- Wood stain or paint: Choose a finish that enhances the wood's natural grain or provides a desired color. Ensure it is compatible with your chosen wood type.
- Finishing sealant: Apply a sealant to protect the wood from moisture and enhance its durability.
- Measuring tape: Accurately measure the dimensions of your mirror and wood pieces.
- Saw: Cut the wood to the desired size and shape using a miter saw, circular saw, or handsaw.
- Sandpaper: Smooth the edges of the wood and prepare it for finishing.
- Clamps: Securely hold the wood pieces together while the glue dries.
- Screwdriver: Attach the mirror to the frame using screws.
- Safety goggles and gloves: Protect your eyes and hands during the cutting and sanding processes.
Step-by-Step Guide
The following steps outline the process of creating a wood-framed mirror, allowing you to transform a basic mirror into a personalized focal point in your bathroom:
- Measure and Cut: Carefully measure the dimensions of your mirror. Cut four wood pieces to the desired frame width.
- Assemble the Frame: Using wood glue, join the four wood pieces to form a square or rectangular frame. Ensure the corners are perfectly aligned and secure.
- Secure the Frame: Reinforce the frame by using wood screws to attach the pieces together.
- Sand the Frame: Smooth out any rough edges and imperfections using sandpaper. Sanding helps create a smooth surface for finishing and enhances the overall aesthetic.
- Apply Stain or Paint: Apply your chosen wood stain or paint to the frame. Follow the manufacturer's instructions for proper application and drying time.
- Apply Sealant: Once the stain or paint is dry, apply a sealant to protect the wood and enhance its durability.
- Attach the Mirror: Measure and mark the center of the frame's back side. Attach the mirror to the frame using pre-drilled holes and screws.
- Hang the Mirror: Choose a suitable hanging method, such as a picture-hanging wire or D-rings, and attach it to the back of the frame.
Design Variations
The beauty of a DIY project lies in its flexibility, allowing you to customize the design based on your personal preferences and bathroom style. Here are some design variations you can explore:
- Frame Shape: Instead of a traditional square or rectangle, consider creating a round or oval frame for a softer aesthetic.
- Wood Type and Finish: Experiment with different wood types and finishes to achieve a desired effect. For example, a distressed wood finish can add a vintage charm, while a polished wood stain creates a modern look.
- Embellishments: Add decorative elements like metal accents, rope, or patterned wood to personalize your frame.
Creating a DIY wood-framed mirror is a project that combines functionality with personalization, allowing you to elevate your bathroom's décor with a unique and custom piece. By carefully following the steps and exploring design variations, you can create a mirror that reflects your style and enhances the overall ambiance of your bathroom space.

Diy Wood Framed Bathroom Mirror Christina Maria Blog

Diy Wood Frame Mirror Farmhouse Industrial Bathroom Joyfully Treasured

Iheart Organizing Diy Wood Framed Mirror

Diy Reclaimed Wood Frames The Space Between

Mirror Frame Diy How To Update A Basic Bathroom Our Faux Farmhouse

Bathroom Renovation Diy Mirror Makeover My Happy Simple Living

Wood Mirror Diy Shanty 2 Chic

Diy Reclaimed Wood Frames The Space Between

How To Create A Diy Mirror Frame For Your Bathroom

Diy Mirror Frame Bathroom Mirrors