Decorative Trim for Bathroom Mirrors: Elevate Your Bathroom Design
Mirrors are an essential element in any bathroom, serving both functional and aesthetic purposes. Their reflective surfaces create an illusion of space, enhancing the overall brightness and openness of the room. However, beyond basic functionality, decorative trim can transform a simple bathroom mirror into a stunning focal point, adding a touch of elegance and personality. Whether you prefer a minimalist, modern aesthetic or a luxurious, traditional style, decorative trim offers a versatile way to personalize your bathroom design.
Choosing the Right Trim for Your Style
The choice of decorative trim depends largely on the desired style and existing bathroom design. For a contemporary bathroom, consider sleek, minimalist trims in polished chrome, brushed nickel, or black metal. These materials complement modern furniture and fixtures, creating a clean and sophisticated look. For a traditional bathroom, ornate moldings in wood or painted finishes provide a timeless elegance.
Consider the overall size and shape of the mirror when selecting trim. Thin, delicate trims work well with smaller mirrors, while wider, bolder trims complement larger statement pieces. For a unique touch, explore decorative elements like beadboard, wainscoting, or even decorative tile borders to frame the mirror and add visual interest.
Popular Trim Styles for Bathroom Mirrors
Different trim styles can evoke distinct moods and complement different bathroom designs. Here are a few popular choices:
1. Classic Molding:
Classic molding offers a timeless and elegant touch, ideal for traditional and farmhouse bathroom designs. These decorative frames often feature elaborate details like ogees, dentils, or fluting, adding architectural interest to the mirror and the surrounding space.
2. Modern and Minimalist:
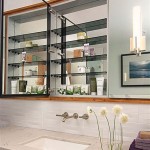
For minimalist bathrooms, a clean and simple approach is best. Modern trims often feature sleek lines and geometric patterns in metal finishes like brushed nickel, black, or polished chrome. These trims create a modern, contemporary look without overwhelming the overall design.
3. Wood Trim:
Wood trim adds warmth and natural beauty to any bathroom. Choose from various wood species and finishes to complement your existing décor. Darker wood tones create a more formal look, while lighter woods bring a sense of airiness. Consider adding decorative details like carved accents or a distressed finish to enhance the rustic charm.
4. Tile or Stone Surround:
For a luxurious look, consider surrounding your bathroom mirror with decorative tile or stone. This approach offers a unique and personalized touch, allowing you to incorporate your preferred colors, patterns, and textures.
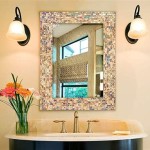
5. Accent Tiles:
For a subtle and sophisticated look, add accent tiles around the perimeter of the mirror. Consider decorative tiles with unique patterns, textures, or contrasting colors to add visual interest.
Adding a Personal Touch
Decorative trim around a bathroom mirror provides a canvas for personal expression. Incorporate elements like:
- Accent colors: Paint the trim in a complementary accent color to enhance the bathroom's color palette.
- Metallic Finishes: Add a touch of glamour with gold, silver, or copper trim.
- Glass and Mirror: Use glass or mirrored trim for a sleek and modern aesthetic.
Decorative trim for bathroom mirrors offers a simple yet effective way to upgrade your bathroom design. By carefully considering your style preferences and existing décor, you can create a truly unique and personalized space.

Easy Diy Tutorial Adding Trim Around A Giant Mirror For Ers

How To Frame A Mirror

Mirror Frame Diy How To Update A Basic Bathroom Our Faux Farmhouse

Bathroom Mirror Framed With Crown Molding Large Mirrors Frame Makeover

10 Stunning Ways To Transform Your Bathroom Mirror Without Removing It Hometalk

Mirror Molding The Easy Upgrade To Boring Bathrooms Mirrorchic

8 Budget Friendly Bathroom Decorating Ideas To Do In A Weekend Easy Updates House Interior Decor

Mirror Frame Diy How To Update A Basic Bathroom Our Faux Farmhouse

How To Frame A Bathroom Mirror

Easy Diy Tutorial Adding Trim Around A Giant Mirror For Ers