How to Mount a Frameless Mirror on Drywall
Mounting a frameless mirror on drywall requires precision and the right tools to ensure a secure and aesthetically pleasing result. This process differs slightly from mounting framed mirrors due to the lack of a supporting frame and the need for a clean, flush finish against the wall.
Plan and Measure Accurately
Precise measurements are crucial for successful installation. Begin by carefully measuring the mirror's dimensions. Transfer these measurements onto the drywall, marking the mirror's exact placement using a level and a pencil to guarantee a straight and even hang. Consider the surrounding area, including light fixtures, furniture, and other wall décor, to ensure harmonious placement.
Choose the Right Mounting Method
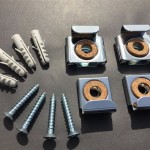
Several mounting methods are suitable for frameless mirrors on drywall. The most common and often preferred method is using specialized mirror adhesive, also known as mirror mastic. This adhesive offers strong bonding capabilities specifically designed for glass and mirror applications. Another option is using J-channels or Z-clips. These mechanical fasteners provide additional support, especially for larger or heavier mirrors.
Prepare the Drywall Surface
A clean and well-prepared drywall surface is essential for optimal adhesion. Clean the marked area thoroughly with a mild cleaner to remove dust, grease, or any other debris that may interfere with the bonding process. If necessary, lightly sand the area with fine-grit sandpaper to create a slightly roughened surface, which can improve adhesion. Ensure the surface is completely dry before proceeding with the installation.
Apply Mirror Adhesive or Install Mounting Hardware
If using mirror adhesive, apply it to the back of the mirror according to the manufacturer's instructions. Typically, the adhesive is applied in vertical beads or a grid pattern to ensure even distribution and prevent air pockets. If using J-channels or Z-clips, install them securely onto the drywall according to the manufacturer's guidelines, precisely aligning them with the marked measurements.
Carefully Mount the Mirror
Once the adhesive is applied or the mounting hardware is installed, carefully position the mirror onto the wall, aligning it with the marked placement. Apply gentle pressure across the entire mirror surface to ensure even contact and proper adhesion. If using adhesive, temporarily support the mirror with painter's tape or other non-marring supports until the adhesive fully cures, typically 24-72 hours depending on the product used.
Clean and Finish
After the adhesive has cured or the mounting hardware is secured, carefully remove any temporary supports. Clean any excess adhesive or fingerprints from the mirror surface using a glass cleaner and a soft cloth. For added security and a polished look, consider applying a thin bead of neutral-cure silicone sealant along the edges where the mirror meets the wall. This will create a watertight seal and further protect the mirror from shifting or moisture damage.
Heavy Mirrors Require Additional Support
For heavier or oversized mirrors, additional support may be necessary to ensure a safe and secure installation. This can include using multiple mounting points, reinforcing the drywall with additional backing material, or consulting a professional for specialized installation advice. Never attempt to mount a heavy mirror without taking the necessary precautions to prevent it from falling and causing damage or injury.
Dealing with Uneven Walls
Uneven walls can pose a challenge when mounting frameless mirrors. Minor imperfections can often be accommodated with a thicker application of mirror adhesive or by using shims behind the mirror to create a level surface. However, for significantly uneven walls, it may be necessary to repair the wall surface before proceeding with the mirror installation.
Consider Bathroom Installations
Bathrooms present specific considerations for mirror installation due to the presence of moisture and humidity. Ensure adequate ventilation and utilize a high-quality, mildew-resistant silicone sealant to protect the mirror and prevent the growth of mold or mildew. Always opt for mirror adhesives and mounting hardware specifically designed for bathroom environments.

How To Install A Mirror Without Frame Merrypad

How To Hang A Frameless Mirror On The Wall With Pictures
:strip_icc()/DesireeBurnsInteriors1-f76d25cad90041c88fbae4a7dc10aab4.jpg?strip=all)
2 Simple Ways To Hang A Frameless Mirror

How To Hang A Frameless Mirror June 2024 Your Guide Hanging

How To Install A Mirror Without Frame Merrypad

Oval Frameless Wall Mirror Installation Fab Glass And

How To Hang A Mirror With Clips

How To Hang A Large Wall Mirror Step By Tutorial

Mirror Installation Without Clips

How To Hang A Large Or Heavy Mirror

