DIY Big Mirror Ideas: Enhancing Your Space with Reflective Style
Mirrors serve as more than just reflective surfaces; they are powerful design elements capable of transforming the ambiance and perceived dimensions of a room. Large mirrors, in particular, can create the illusion of expanded space, amplify natural light, and add a touch of elegance to any interior. While purchasing a large, pre-made mirror can be a costly endeavor, undertaking a do-it-yourself (DIY) project offers a cost-effective and customizable alternative. This article explores various DIY big mirror ideas, providing practical guidance for crafting statement pieces that elevate your home décor.
Key Point 1: Planning and Preparation for your DIY Mirror
Prior to commencing the physical construction of a DIY mirror, meticulous planning and preparation are crucial. This stage involves selecting the appropriate materials, determining the desired size and shape of the mirror, and assessing the intended placement within the room. Consider the existing aesthetic of the space and how the mirror will complement the overall design.
The first step involves accurately measuring the available wall space where the mirror will be installed. This measurement will dictate the maximum size of the mirror frame and reflective surface. It is important to factor in any architectural details, such as moldings or baseboards, that might interfere with the mirror's placement. Additionally, consider the height at which the mirror will be hung. A full-length mirror typically requires a height that allows a person to see their entire reflection, while a decorative mirror might be positioned at eye level.
Choosing the right type of mirror glass is also a critical decision. Standard mirror glass is readily available at most hardware stores and glass suppliers. However, for a more durable and aesthetically pleasing option, consider using low-iron mirror glass, which offers superior clarity and reduces the greenish tint present in conventional mirrors. Safety is also a primary consideration. When working with glass, it's essential to wear appropriate safety glasses and gloves to prevent injury. Furthermore, consider the thickness of the mirror glass. Thicker glass is less prone to warping or distortion, especially for larger mirrors.
Selecting the appropriate framing material is another vital aspect of the planning process. Wood is a popular choice, offering versatility in design and finish. Different types of wood, such as pine, oak, or maple, can be used to create various aesthetic effects. Alternatively, metal frames, such as steel or aluminum, can provide a more contemporary and industrial look. The choice of framing material should be based on the desired style and the overall décor of the room. Ensure the framing material is strong enough to support the weight of the mirror glass, especially for larger sizes. Acquire all necessary tools, including a measuring tape, level, saw (for cutting framing material), drill, sandpaper, wood glue (if applicable), and safety equipment.
Key Point 2: Constructing the Mirror Frame
The construction of the mirror frame requires precision and attention to detail to ensure a secure and aesthetically pleasing finished product. Several framing techniques can be employed, ranging from simple butt joints to more elaborate mitered corners. The chosen technique will depend on the desired aesthetic and the level of woodworking skills possessed.
For a simple butt joint frame, the framing material is cut to the appropriate lengths and joined at right angles using wood glue and screws or nails. This method is relatively straightforward and suitable for beginners. However, it may not provide the most visually refined finish. Mitered corners, on the other hand, involve cutting the framing material at a 45-degree angle and joining the pieces to form a seamless corner. This technique requires more precise cutting and alignment but results in a more professional and elegant look.
Once the framing material has been cut, assemble the frame on a flat, stable surface. Apply wood glue to the joints and secure them with screws or nails. Ensure that the frame is square and properly aligned using a carpenter's square. Clamps can be used to hold the frame in place while the glue dries. After the glue has dried completely, sand the frame to smooth any rough edges or imperfections. Apply a primer to the frame to prepare it for painting or staining. The choice of paint or stain will depend on the desired aesthetic. Consider using a color that complements the existing décor of the room.
Once the paint or stain has dried, apply a protective sealant to the frame to protect it from moisture and scratches. Polyurethane or varnish are common choices for sealants. Allow the sealant to dry completely before proceeding to the next step. If desired, decorative elements can be added to the frame to enhance its visual appeal. This could include moldings, carvings, or other embellishments. Attach these elements using wood glue or small nails.
Key Point 3: Installing the Mirror Glass and Mounting the Mirror
The final step involves installing the mirror glass into the frame and mounting the completed mirror securely to the wall. This stage requires careful handling of the mirror glass to prevent breakage and ensure a safe and stable installation.
Before installing the mirror glass, clean it thoroughly with a glass cleaner to remove any dust or fingerprints. Apply a bead of mirror adhesive to the back of the mirror frame, ensuring that the adhesive is evenly distributed. Carefully position the mirror glass into the frame, pressing it firmly against the adhesive. Use mirror clips or retaining brackets to hold the glass securely in place while the adhesive dries. These clips or brackets can be attached to the back of the frame using screws or nails.
Allow the adhesive to dry completely according to the manufacturer's instructions. Once the adhesive has dried, remove any excess adhesive from the edges of the mirror frame using a razor blade or scraper. Inspect the mirror for any imperfections or blemishes. If necessary, clean the mirror again with a glass cleaner.
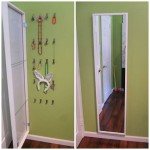
To mount the mirror to the wall, use appropriate hanging hardware. The type of hardware will depend on the weight of the mirror and the type of wall surface. For heavier mirrors, it may be necessary to use wall anchors to provide additional support. Locate the studs in the wall using a stud finder. Attach the hanging hardware to the studs using screws. Hang the mirror onto the hanging hardware, ensuring that it is level and secure. Use a level to verify that the mirror is hanging straight. Make any necessary adjustments to the hanging hardware to ensure that the mirror is properly aligned.
Consider using safety wire to further secure the mirror to the wall. Attach the safety wire to the back of the mirror frame and loop it around the hanging hardware. This will prevent the mirror from falling in the event that the hanging hardware fails. After the mirror has been mounted, clean the surrounding wall area to remove any dust or debris. Step back and admire your newly created DIY big mirror, a statement piece that reflects both your personal style and the enhanced beauty of your space.
Consider adding LED strip lights around the perimeter of the mirror for a modern and visually appealing effect. These lights can be easily attached using adhesive backing and can be controlled with a dimmer switch to adjust the brightness. Alternatively, consider incorporating mosaic tiles or other decorative elements around the edge of the mirror to create a unique and personalized design. The possibilities are limited only by your imagination and creativity. Remember to prioritize safety when working with glass and to take your time to ensure a high-quality and durable finished product.
:max_bytes(150000):strip_icc()/kaylasimonehome-905941da7dd04a08af07c415df2a1fd8.jpeg?strip=all "20 Diy Mirror Frame Ideas To Inspire Your Next Project")
20 Diy Mirror Frame Ideas To Inspire Your Next Project
:max_bytes(150000):strip_icc()/bloomingdiyer-372b1cae2a6c43af917f3bea506c11da.jpg?strip=all "20 Diy Mirror Frame Ideas To Inspire Your Next Project")
20 Diy Mirror Frame Ideas To Inspire Your Next Project

30 Diy Mirror Projects That Are Fun And Easy To Make

Diy Large Leaning Floor Mirror Hometalk

Diy Floor Mirror Liz Marie Blog

21 Creative Diy Projects To Prepare Your Guest Room Bathroom For Holiday Visitors Gold Home Decor Mirror Frame Dorm

Diy Modern Mirror Re Frame What Not To Do Kayla Simone Home

How To Build Large Floor Leaner Mirror Sawdust 2 Stitches

From Master To Mastered Home Decor Rustic Mirrors
:max_bytes(150000):strip_icc()/alahome1-a879d69e31be4a9a9ae522028c12926d.jpg?strip=all "20 Diy Mirror Frame Ideas To Inspire Your Next Project")
20 Diy Mirror Frame Ideas To Inspire Your Next Project