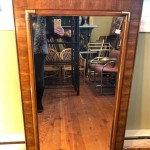
How To Add a Wooden Frame to a Mirror
Mirrors are essential elements in interior design, serving both functional and aesthetic purposes. A simple mirror can significantly enhance the ambiance of a room, making it appear larger and brighter. While frameless mirrors offer a minimalist appeal, adding a wooden frame can elevate the mirror’s visual presence, transforming it into a statement piece that complements the surrounding décor. This article provides a detailed guide on how to add a wooden frame to a mirror, covering everything from material selection to the final finishing touches.
Before embarking on the framing process, careful planning and preparation are crucial. This involves accurately measuring the mirror, selecting the appropriate wood type and frame style, and gathering the necessary tools and materials. A well-executed plan will streamline the project and ensure a professional-looking final product.
The decision to add a wooden frame to a mirror allows for a high degree of customization. The choice of wood, frame style, and finish can be tailored to match the existing interior design, adding a personal touch to the space. Whether aiming for a rustic, modern, or traditional aesthetic, a wooden frame can seamlessly integrate the mirror into the overall design scheme.
Key Point 1: Preparing the Mirror and Selecting Materials
The initial step in adding a wooden frame to a mirror involves accurately measuring the dimensions of the mirror. Use a measuring tape to determine the length and width, ensuring precise measurements for a snug and secure fit. It is advisable to measure the mirror in multiple places to account for any slight variations.
Once the measurements are obtained, it is time to choose the wood for the frame. Several factors should be considered, including the desired aesthetic, durability, and ease of workability. Popular wood choices include pine, oak, maple, and walnut. Pine is a cost-effective option that is easy to cut and shape, while oak and maple are harder woods that offer greater durability and a more refined appearance. Walnut is a premium choice with a rich, dark color that adds a touch of elegance.
In addition to the wood, other essential materials include wood glue, screws or nails, sandpaper (various grits), wood stain or paint (optional), and a clear coat sealant. The specific type of glue and fasteners will depend on the wood type and the desired strength of the frame. Sandpaper is necessary for smoothing the wood surface and preparing it for finishing. Wood stain or paint allows for customization of the frame's color and appearance, while a clear coat sealant protects the wood and enhances its durability.
The selection of the frame style is another important consideration. Common frame styles include simple rectangular frames, beveled frames, and decorative frames with molding or carvings. The choice of frame style should complement the mirror's shape and size, as well as the overall aesthetic of the room. Consider the width of the frame as well; a wider frame can create a bolder statement, while a narrower frame provides a more subtle enhancement.
Before cutting the wood, it is essential to prepare it properly. This involves inspecting the wood for any imperfections, such as knots or cracks, and selecting pieces that are free from defects. The wood should also be properly dried to prevent warping or cracking after the frame is constructed. If necessary, purchase pre-dried lumber from a reputable supplier.
Gather all the necessary tools for the project. This includes a saw (either a hand saw, miter saw, or table saw), a measuring tape, a pencil, a square, sandpaper (various grits), a drill (if using screws), clamps, and safety glasses. Ensure that all tools are in good working condition and that you are familiar with their safe operation.
Protect the mirror surface from scratches during the framing process. Cover the mirror with a protective layer, such as cardboard or painter's tape, to prevent damage. This is particularly important if you will be working on a delicate or antique mirror.
Key Point 2: Constructing the Wooden Frame
Once the materials have been selected and the mirror has been prepared, the next step is to cut the wood to the appropriate lengths for the frame. Using a miter saw or a hand saw and miter box, cut the wood at a 45-degree angle to create mitered corners. Mitered corners provide a clean, professional look and ensure that the frame fits snugly around the mirror. Alternatively, butt joints can be used, which are simpler to create but may not be as aesthetically pleasing.
After cutting the wood, dry-fit the frame pieces around the mirror to ensure a proper fit. Adjust the cuts as necessary to achieve a seamless and accurate fit. This step is crucial for identifying any potential issues before applying glue and fasteners.
Apply wood glue to the mitered corners and join the frame pieces together. Use clamps to hold the frame pieces firmly in place while the glue dries. The clamps should be positioned to apply even pressure to the corners, ensuring a strong and secure bond. Allow the glue to dry completely according to the manufacturer's instructions, typically for at least 24 hours.
For added strength, reinforce the corners with screws or nails. Drill pilot holes before inserting the screws to prevent the wood from splitting. Use countersinking drill bits to create a recess for the screw heads, ensuring a flush finish. Alternatively, use a nail gun to drive nails into the corners, providing additional support to the glued joints.
After the glue has dried and the corners have been reinforced, remove the clamps and inspect the frame for any gaps or imperfections. Fill any gaps with wood filler and allow it to dry completely. Sand the filled areas smooth to create a seamless surface.
Sand the entire frame using progressively finer grits of sandpaper. Start with a coarser grit (e.g., 80-grit) to remove any rough spots or imperfections, then move to a medium grit (e.g., 120-grit) to smooth the surface, and finally finish with a fine grit (e.g., 220-grit) to create a silky-smooth finish. Sanding is an essential step for preparing the wood for staining or painting.
Clean the frame thoroughly to remove any sanding dust. Use a tack cloth or a vacuum cleaner with a brush attachment to remove all traces of dust, ensuring a clean surface for the finishing process.
Key Point 3: Finishing and Attaching the Frame to the Mirror
Once the frame has been sanded and cleaned, it is time to apply the desired finish. This may involve staining, painting, or simply applying a clear coat sealant. If staining, select a wood stain that complements the wood type and the surrounding décor. Apply the stain evenly using a brush or cloth, following the manufacturer's instructions. Allow the stain to penetrate the wood for the recommended time, then wipe off any excess stain with a clean cloth.
If painting, apply a primer coat to the frame before painting. The primer will help the paint adhere better and provide a more uniform finish. Allow the primer to dry completely, then apply several coats of paint, allowing each coat to dry before applying the next. Use a high-quality paint that is suitable for wood and provides a durable finish.
After the stain or paint has dried completely, apply a clear coat sealant to protect the wood and enhance its durability. The sealant will also provide a glossy or matte finish, depending on the type of sealant used. Apply the sealant evenly using a brush or spray can, following the manufacturer's instructions. Allow the sealant to dry completely before handling the frame.
With the frame now finished, carefully attach it to the mirror. There are several methods for attaching the frame, including using mirror mastic adhesive, clips, or a combination of both. Mirror mastic is a specially formulated adhesive that is designed to bond mirrors to other surfaces without damaging the reflective backing. Apply the mirror mastic to the back of the frame, following the manufacturer's instructions, and carefully position the frame around the mirror.
If using clips, attach them to the back of the frame and position them so that they securely hold the mirror in place. Ensure that the clips are evenly spaced and that they do not put excessive pressure on the mirror. A combination of mirror mastic and clips can provide a more secure and durable attachment.
Allow the adhesive to dry completely according to the manufacturer's instructions before handling the framed mirror. This will typically take at least 24 hours. During this time, support the mirror and frame to prevent them from slipping or shifting.
Once the adhesive has dried, inspect the framed mirror for any imperfections. Clean the mirror surface with a glass cleaner to remove any smudges or fingerprints. The framed mirror is now ready to be hung or displayed.
Proper installation of the framed mirror is crucial for safety and stability. Use appropriate hanging hardware, such as hooks or brackets, that are rated for the weight of the mirror. Securely attach the hardware to the wall studs to ensure that the mirror is properly supported. If you are unsure about how to install the mirror safely, consult a professional installer.

Antique Diy Mirror Frame Arinsolangeathome

Diy Wood Frame Mirror Makeover With Hooks Funky Junk Interiors

How To Frame A Bathroom Mirror With Ledge Bob Vila

How To Make A Wood Mirror Frame

West Elm Inspired Wood Framed Mirror

Diy Full Length Mirror

30 Diy Mirror Frame Ideas Mint Design Blog

Diy Full Length Mirror Frame

How To Add A Wood Frame Large Wall Mirror For Under 20 Dream Design Diy

How To Frame A Mirror