How To Hang a Wall Mirror Easily: A Comprehensive Guide
Hanging a wall mirror can significantly enhance the aesthetics of a room, adding light, creating a sense of spaciousness, and serving as a focal point. While the task might seem daunting to some, with the right tools, careful planning, and a systematic approach, anyone can successfully hang a wall mirror safely and securely. This article provides a detailed guide on how to hang a wall mirror easily, covering essential preparations, step-by-step instructions, and important safety considerations.
The first step in successfully hanging a wall mirror involves careful planning and preparation. This stage is crucial for ensuring a smooth and efficient process, minimizing potential errors, and contributing to the overall safety of the installation. Neglecting this preliminary phase can lead to unnecessary complications, structural damage, or even personal injury.
Gathering Essential Tools and Materials
Before commencing the actual hanging process, it is imperative to assemble all the necessary tools and materials. Having everything readily available will streamline the task and prevent frustrating interruptions. The specific tools required may vary slightly depending on the size and weight of the mirror, as well as the type of wall and the hanging hardware employed. However, the following list encompasses the most common and essential items:
1. Measuring Tape: A reliable measuring tape is indispensable for accurately determining the desired position of the mirror on the wall, as well as for ensuring proper alignment. Accurate measurements are critical for achieving a visually balanced and aesthetically pleasing result.
2. Level: A level, preferably a spirit level or a laser level, is crucial for ensuring that the mirror hangs perfectly straight. This is especially important for larger mirrors, where even a slight tilt can be easily noticeable and detract from the overall appearance.
3. Pencil: A pencil is used for marking the wall to indicate the precise location of the hanging hardware. Use a light pencil mark to prevent leaving visible marks on the wall.
4. Drill and Drill Bits: A power drill is often required to create pilot holes for screws or anchors, particularly when hanging a mirror on drywall or plaster. Select the appropriate drill bit size based on the type of wall material and the size of the screws or anchors being used. For heavier mirrors, drilling into a wall stud is highly recommended for maximum stability.
5. Stud Finder (Optional): A stud finder is a valuable tool for locating wall studs behind drywall. Hanging a mirror directly on a stud provides significantly greater support and is crucial for heavier mirrors. There are two main types of stud finders: magnetic stud finders, which detect metal screws or nails in the stud, and electronic stud finders, which detect changes in density within the wall.
6. Screwdrivers: A set of screwdrivers, including both Phillips head and flathead screwdrivers, is necessary for securing the hanging hardware to the wall and the mirror. Ensure that the screwdrivers are the correct size for the screws being used to prevent stripping the screw heads.
7. Wall Anchors (if necessary): Wall anchors are used to provide additional support when hanging a mirror on drywall or plaster, especially if a stud cannot be located. There are various types of wall anchors available, including plastic anchors, self-drilling anchors, and toggle bolts. Select the appropriate type of anchor based on the weight of the mirror and the type of wall material.
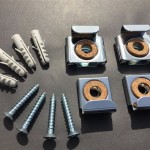
8. Hanging Hardware: The appropriate hanging hardware is crucial for securely attaching the mirror to the wall. This might include D-rings, wire, hooks, screws, or specialized mirror hanging systems. The type of hardware required will depend on the design of the mirror and the weight it needs to support.
9. Safety Glasses: Safety glasses are essential for protecting your eyes from dust and debris generated during drilling and other construction activities.
10. Gloves: Wearing gloves can provide a better grip on the mirror and protect your hands from sharp edges.
11. Painter's Tape (Optional): Painter's tape can be used to mark the desired location for the mirror on the wall and to protect the wall surface from scratches during the installation process.
Determining the Ideal Mirror Placement
Choosing the right location for the mirror is a crucial element in maximizing its aesthetic and functional benefits. Consider the following factors when deciding where to hang your mirror:
1. Purpose of the Mirror: Is the mirror intended for functional purposes, such as checking one's appearance, or for decorative purposes, such as enhancing the light and space in a room? Mirrors placed in entryways or bathrooms typically serve a functional purpose, while mirrors in living rooms or dining rooms are often used for decorative effect.
2. Room Size and Layout: In smaller rooms, a large mirror can create the illusion of more space. Conversely, in larger rooms, a smaller mirror can serve as a decorative accent. Consider the existing furniture layout and the flow of traffic within the room when determining the placement of the mirror.
3. Light Source: Placing a mirror opposite a window or other light source can amplify the natural light in the room, making it feel brighter and more inviting. Avoid placing a mirror where it will reflect direct sunlight, as this can create glare and discomfort.
4. Height: The height at which the mirror is hung should be appropriate for the intended use. For mirrors used for checking one's appearance, the center of the mirror should be at eye level. For decorative mirrors, the height can be adjusted to complement the surrounding furniture and decor.
5. Wall Conditions: Examine the wall for any existing damage, such as cracks or holes, and avoid hanging the mirror in these areas. Also, consider the location of electrical wiring and plumbing before drilling into the wall.
Once you have determined the ideal location for the mirror, use a measuring tape and pencil to mark the desired position on the wall. Use painter's tape to outline the area where the mirror will be hung. This will help you visualize the final result and make any necessary adjustments before proceeding with the installation.
Step-by-Step Hanging Instructions
With the planning and preparation completed, the next step involves the actual hanging process. It is crucial to follow these instructions carefully to ensure a safe and secure installation.
1. Prepare the Hanging Hardware: Examine the mirror's existing hanging hardware. If the mirror comes with D-rings and wire, ensure that the wire is securely attached to the D-rings. If the mirror requires the installation of hanging hardware, follow the manufacturer's instructions for attaching the hardware to the back of the mirror.
2. Mark the Hanging Points on the Wall: Using the measuring tape and level, accurately mark the location of the hanging points on the wall. If you are using D-rings and wire, measure the distance between the top of the mirror and the wire when the mirror is held taut. Use this measurement to determine the height at which the hooks or screws should be installed on the wall. Ensure that the marks are level using a spirit level or a laser level.
3. Drill Pilot Holes: If you are hanging the mirror on drywall or plaster, use a drill to create pilot holes at the marked locations on the wall. The size of the drill bit should be slightly smaller than the diameter of the screws or anchors being used. If you are hanging the mirror on a stud, you may not need to drill pilot holes.
4. Install Wall Anchors (if necessary): If you are not able to hang the mirror on a stud, install wall anchors in the pilot holes. Follow the manufacturer's instructions for installing the specific type of wall anchor being used. Ensure that the anchors are securely embedded in the wall.
5. Install Hanging Hooks or Screws: Install the hanging hooks or screws into the pilot holes or wall anchors. Ensure that the hooks or screws are securely fastened and can support the weight of the mirror. If you are using screws, leave a portion of the screw head exposed so that the D-rings or wire can be hooked onto them.
6. Hang the Mirror: Carefully lift the mirror and align the hanging hardware with the hooks or screws on the wall. Gently lower the mirror onto the hooks or screws, ensuring that the mirror is securely supported. Double-check that the mirror is level using a spirit level or a laser level. If necessary, adjust the position of the hooks or screws until the mirror is perfectly level.
7. Test the Stability: Once the mirror is hanging, gently push on the mirror to test its stability. Ensure that the mirror is securely attached to the wall and does not wobble or move excessively. If the mirror feels unstable, remove it from the wall and re-evaluate the hanging hardware and the installation process.
By carefully following these instructions, it is possible to hang a wall mirror safely and securely.
:strip_icc()/ScreenShot2022-04-28at1.12.19PM-e055476c70c6438585fa7c5cd531edcf.png?strip=all)
4 Easy Ways To Hang A Heavy Mirror

Easiest Way To Hang A Mirror

How To Hang A Wall Mirror Easy Mounting Instructions

How To Hang A Mirror On Wall With An Easy Hanging Hometalk

Homesdecornow Com Home Decor Apartment

Easy Way To Hang Up A Mirror Or Picture That Has Two Hooks Rings Painters Tap

How To Hang A Heavy Mirror In 5 Simple Steps

How To Hang A Heavy Mirror C R F T

How To Hang A Heavy Mirror The Home Depot

How To Hang A Mirror On Wall With An Easy Hanging Hometalk

