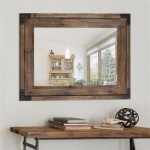
How to Make an Easy Wood Mirror Frame at Home
Creating a custom mirror frame can be a rewarding do-it-yourself (DIY) project, allowing for personalization and cost savings compared to purchasing pre-made frames. This article details the process of crafting a simple, yet elegant, wooden mirror frame at home, providing step-by-step instructions and essential considerations for a successful outcome. The project focuses on ease of execution, employing readily available materials and straightforward techniques.
Before beginning, it's imperative to gather all necessary tools and materials. This proactive approach minimizes interruptions during the construction process and ensures a smoother workflow. Essential supplies include lumber, typically pine or poplar for ease of workability and affordability, although hardwoods can be used for a more premium finish. The dimensions of the lumber will be determined by the size of the mirror and the desired width of the frame. Safety glasses are crucial to protect eyes from potential debris generated during cutting and sanding. A measuring tape is needed for accurate dimensioning of the frame components. A saw, either a hand saw, miter saw, or circular saw, is required to cut the lumber to the specified lengths and angles. Wood glue, along with clamps, will be used to join the frame pieces securely. Sandpaper in various grits (e.g., 80, 120, 220) is essential for smoothing the wood surface and preparing it for finishing. Wood filler is useful for addressing any gaps or imperfections in the joints. Finally, a finish of choice, such as paint, stain, or varnish, will protect the wood and enhance its aesthetic appeal. Safety gloves are also recommended to protect skin.
Measuring and Cutting the Wood
The first key step involves accurately measuring the mirror and determining the dimensions of the frame. The interior dimensions of the frame must precisely match the dimensions of the mirror. Add the desired width of the frame pieces (e.g., 2 inches) to each side of the mirror's dimensions to calculate the overall exterior dimensions of the frame. For example, if the mirror is 24 inches by 36 inches, and the desired frame width is 2 inches, the exterior dimensions of the frame would be 28 inches by 40 inches.
Once the dimensions are established, the lumber needs to be cut to the correct lengths. For a simple rectangular frame, four pieces of lumber will be required. Two pieces will match the length of the mirror (plus twice the frame width), and the other two pieces will match the width of the mirror (plus twice the frame width). Use the measuring tape to accurately mark the cutting lines on the lumber. A miter saw is recommended for making clean, precise cuts, especially if the frame will feature mitered corners. If using a miter saw, set the angle to 45 degrees for each cut on the frame components to create a mitered corner. If a circular saw or hand saw is used, ensure the cuts are as straight and accurate as possible. It’s advisable to make a test cut on a scrap piece of wood to verify the accuracy of the saw’s angle before cutting the actual frame pieces.
For those choosing to create butt joints (where the ends of the wood meet at a 90-degree angle), the cutting process is simpler. The length of each piece is simply the desired length of each side of the frame. It is critical to keep the cuts square and accurate for proper assembly.
After cutting, carefully inspect each piece to ensure it meets the specified dimensions. Any inaccuracies at this stage can lead to problems during assembly.
Assembling the Frame
With the wood pieces cut to size, the next stage is assembling the frame. Before applying glue, perform a dry fit of the frame pieces to ensure they align correctly and that the mirror fits snugly within the frame's inner dimensions. This allows for any necessary adjustments before committing to gluing.
Apply wood glue liberally to the joining surfaces of the frame pieces. Ensure the glue covers the entire surface area for a strong bond. For mitered corners, apply glue to both angled surfaces. Carefully align the frame pieces and press them firmly together. Use clamps to hold the frame pieces in place while the glue dries. Apply even pressure with the clamps to ensure a uniform bond. The amount of time the glue needs to dry can vary based upon the glue used and the ambient temperature. Typically, allowing the glue to dry for at least 24 hours is advisable for maximum strength.
If using butt joints, the process is similar. Apply glue to the end of one piece and the side of the adjoining piece, align them carefully, and clamp them in place. It is advisable to use corner clamps to maintain a 90-degree angle during the drying process.
Once the glue has dried completely, remove the clamps and inspect the joints. If any gaps or imperfections are present, use wood filler to fill them in. Allow the wood filler to dry completely according to the manufacturer's instructions. Sand the filled areas smooth, blending them seamlessly with the surrounding wood surface.
Reinforcing the corners is crucial for adding extra stability to the frame. Small angle brackets or metal corner plates can be attached to the inside corners of the frame using screws. This will help prevent the frame from separating over time, especially in environments with varying humidity levels.
Sanding and Finishing
After the frame is assembled and the wood filler has dried, the next step is to sand the entire surface of the frame. Start with a coarser grit sandpaper (e.g., 80 or 120 grit) to remove any imperfections, such as dried glue or rough edges. Gradually move to finer grits (e.g., 220 grit) to achieve a smooth, even surface. Pay particular attention to the joints and edges to ensure a seamless transition between the frame pieces. Sand in the direction of the wood grain to avoid creating scratches. After sanding, remove all dust with a tack cloth or a damp cloth.
With the frame sanded smooth, it's time to apply the chosen finish. Common options include paint, stain, and varnish. If using paint, apply a primer coat first to ensure proper adhesion and a uniform color. Allow the primer to dry completely before applying the paint. Apply two or more coats of paint, allowing each coat to dry according to the manufacturer's instructions. Lightly sand between coats with a fine grit sandpaper (e.g., 320 grit) to remove any imperfections and create a smooth surface.
If using stain, apply it evenly with a brush or cloth. Allow the stain to penetrate the wood for the recommended amount of time, then wipe off any excess. Apply multiple coats of stain to achieve the desired color intensity. After the stain has dried completely, apply a clear coat of varnish or lacquer to protect the wood and enhance its appearance. Varnish provides a durable, water-resistant finish, while lacquer dries quickly and provides a high-gloss sheen.
Regardless of the finish used, ensure proper ventilation during application and drying. Follow the manufacturer's instructions carefully regarding drying times and application techniques. Multiple thin coats are generally preferable to a single thick coat, as they are less likely to run or drip. Lightly sand between coats of varnish or lacquer with a fine grit sandpaper to remove any imperfections and create a smooth, professional-looking finish.
Once the finish is completely dry, carefully insert the mirror into the frame. Secure the mirror in place using mirror clips, flexible tabs, or a bead of silicone sealant. Ensure the clips or tabs are evenly spaced around the mirror to provide uniform support. If using silicone sealant, apply it sparingly to avoid squeezing out onto the frame. Allow the sealant to dry completely before handling the framed mirror.

Diy Wood Framed Mirror The Grain Cottage

How To Build A Diy Wood Mirror Frame The Holtz House

Easy Driftwood Mirror The Wood Grain Cottage

Easy Diy Wooden Mirror Frame

Diy Farmhouse Wood Frame Mirror She Gave It A Go

Diy Farmhouse Wood Frame Mirror She Gave It A Go

Diy Wood Framed Mirror The Grain Cottage

Easy Diy Wood Framed Mirror How To Build A Frame Chalking Up Success

Diy Rustic Mirror Houseful Of Handmade

Diy Reclaimed Wood Mirror Frame Montreal